> For the complete documentation index, see [llms.txt](https://docs.roboflow.com/llms.txt). Markdown versions of documentation pages are available by appending `.md` to page URLs; this page is available as [Markdown](https://docs.roboflow.com/deployment/hi/monitoring-and-analytics/model-monitoring.md).
# मॉडल मॉनिटरिंग
Roboflow के साथ Model Monitoring के लिए एक मार्गदर्शिका।
## के बारे में
Roboflow का मॉडल मॉनिटरिंग डैशबोर्ड आपको प्रोटोटाइपिंग से लेकर उत्पादन तक, अपने मॉडलों पर बेजोड़ दृश्यता देता है। मॉडल मॉनिटरिंग के साथ, आप उच्च-स्तरीय आँकड़े देख सकते हैं ताकि समय के साथ आपके मॉडल कैसे प्रदर्शन कर रहे हैं, इसकी जानकारी मिल सके, या अलग-अलग इन्फ़रेंस अनुरोध भी देख सकते हैं, ताकि आप देख सकें कि आपके मॉडल किन विशेष मामलों पर कैसा प्रदर्शन करते हैं।
{% hint style="info" %}
मॉडल मॉनिटरिंग **अप्रचलित हो जाएगा** और Vision Events से प्रतिस्थापित किया जाएगा। देखें [Vision Events का दस्तावेज़](/deployment/hi/monitoring-and-analytics/vision-events.md) अधिक जानकारी के लिए।
{% endhint %}
## वेब ऐप
### मॉडल मॉनिटरिंग तक पहुँच
मॉडल मॉनिटरिंग, Models पेज पर एक उप-टैब है। इसे एक्सेस करने के लिए, अपने वर्कस्पेस नेविगेशन बार में "Models" ड्रॉपडाउन खोलें और "Model Monitoring" चुनें, या सीधे Models पेज पर "Model Monitoring" टैब पर जाएँ।
### वर्कस्पेस डैशबोर्ड
तुरंत, आपको अपने मॉडलों से संबंधित तीन आँकड़े दिखाई देंगे:
* **कुल अनुरोध** : आपके वर्कस्पेस के सभी मॉडलों पर किए गए इन्फ़रेंस की कुल संख्या
* **औसत कॉन्फ़िडेंस:** आपके मॉडलों द्वारा की गई सभी भविष्यवाणियों में औसत कॉन्फ़िडेंस।
* **औसत इन्फ़रेंस समय** : सभी इन्फ़रेंस का औसत समय (भविष्यवाणियाँ बनाने में लगा समय, सेकंड में, जिसमें इमेज प्रीप्रोसेसिंग शामिल है)
{% hint style="info" %}
% परिवर्तन मान वर्तमान अवधि बनाम पिछली अवधि पर आधारित होते हैं। डिफ़ॉल्ट रूप से, ये आँकड़े आपको पिछले सप्ताह का डेटा दिखाएँगे। हालाँकि, आप आँकड़ों के ऊपर मौजूद बटनों का उपयोग करके समय सीमा संशोधित कर सकते हैं।
{% endhint %}
Models तालिका उन सभी मॉडलों को दिखाती है जिन पर इन्फ़रेंस हुए हैं, और उन पर क्लिक करने से आप पहुँचेंगे [मॉडल डैशबोर्ड](#model-dashboard).
आप Recent Inferences (सभी मॉडलों में) देखने के टैब और [अलर्ट सेट करने](#alerting).
### मॉडल डैशबोर्ड
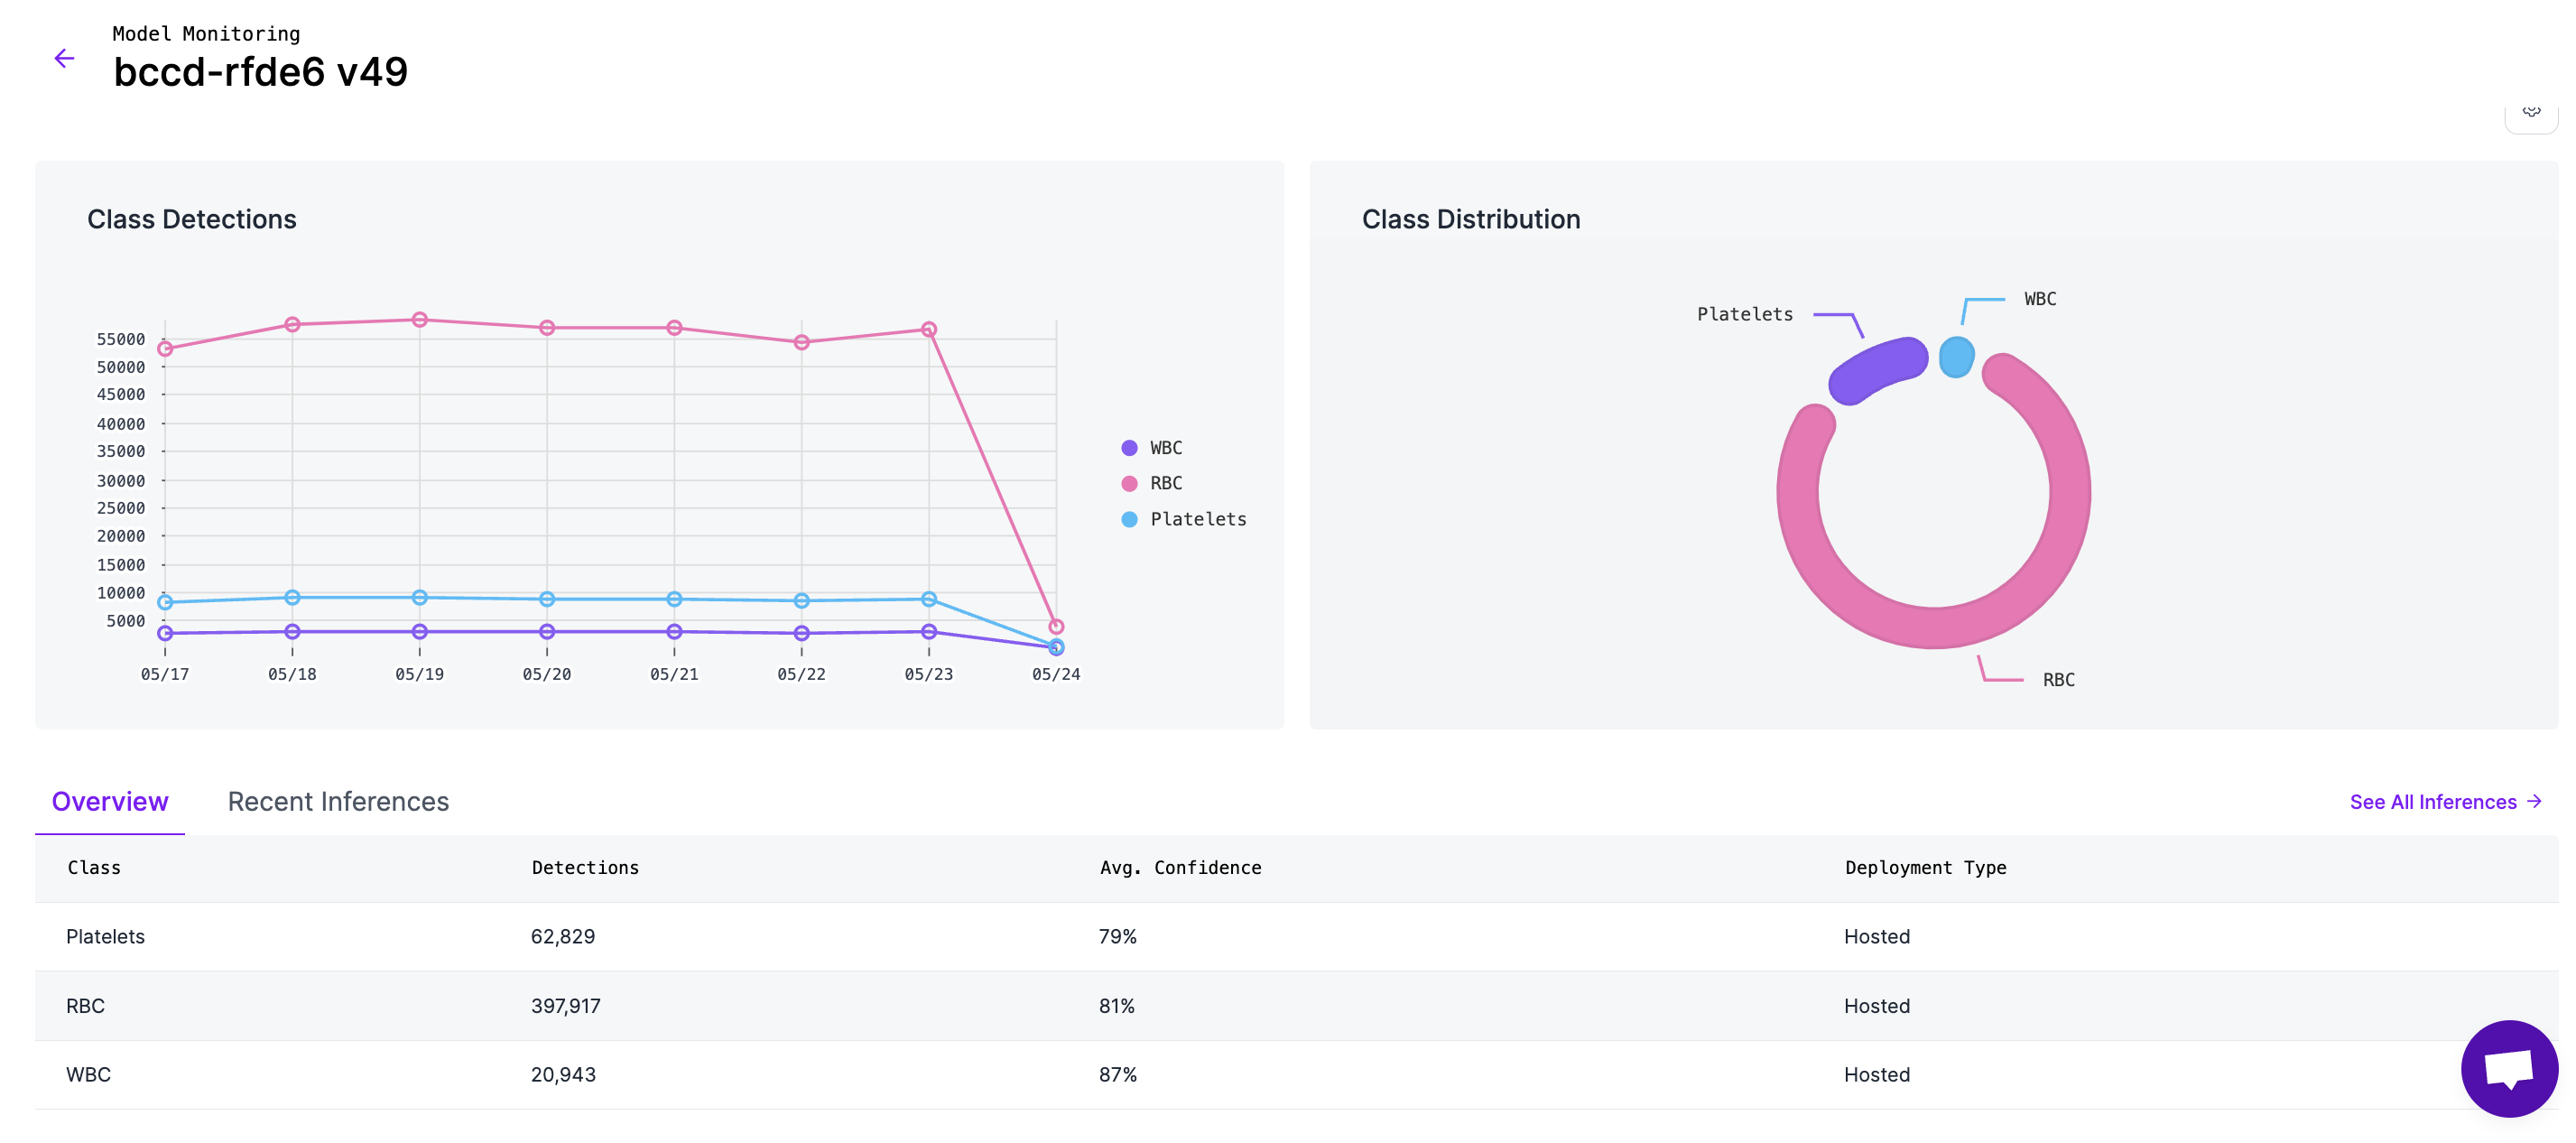
Models टैब के अंतर्गत, आप उसके डेटा को देखने के लिए कोई विशिष्ट मॉडल चुन सकते हैं। वहाँ, आपको Workspace Overview जैसे ही आँकड़े दिखेंगे, लेकिन वे एक ही मॉडल के लिए विशिष्ट होंगे।
यहाँ, आँकड़ों के अलावा, आप मॉडल में प्रत्येक क्लास के लिए डिटेक्शनों की संख्या देख सकते हैं, और अन्य क्लासों के सापेक्ष उनका वितरण देख सकते हैं।
तालिका के ऊपर दाईं ओर स्थित "See All Inferences" बटन पर क्लिक करने से आप पहुँचेंगे [इन्फ़रेंस तालिका](#inferences-table).
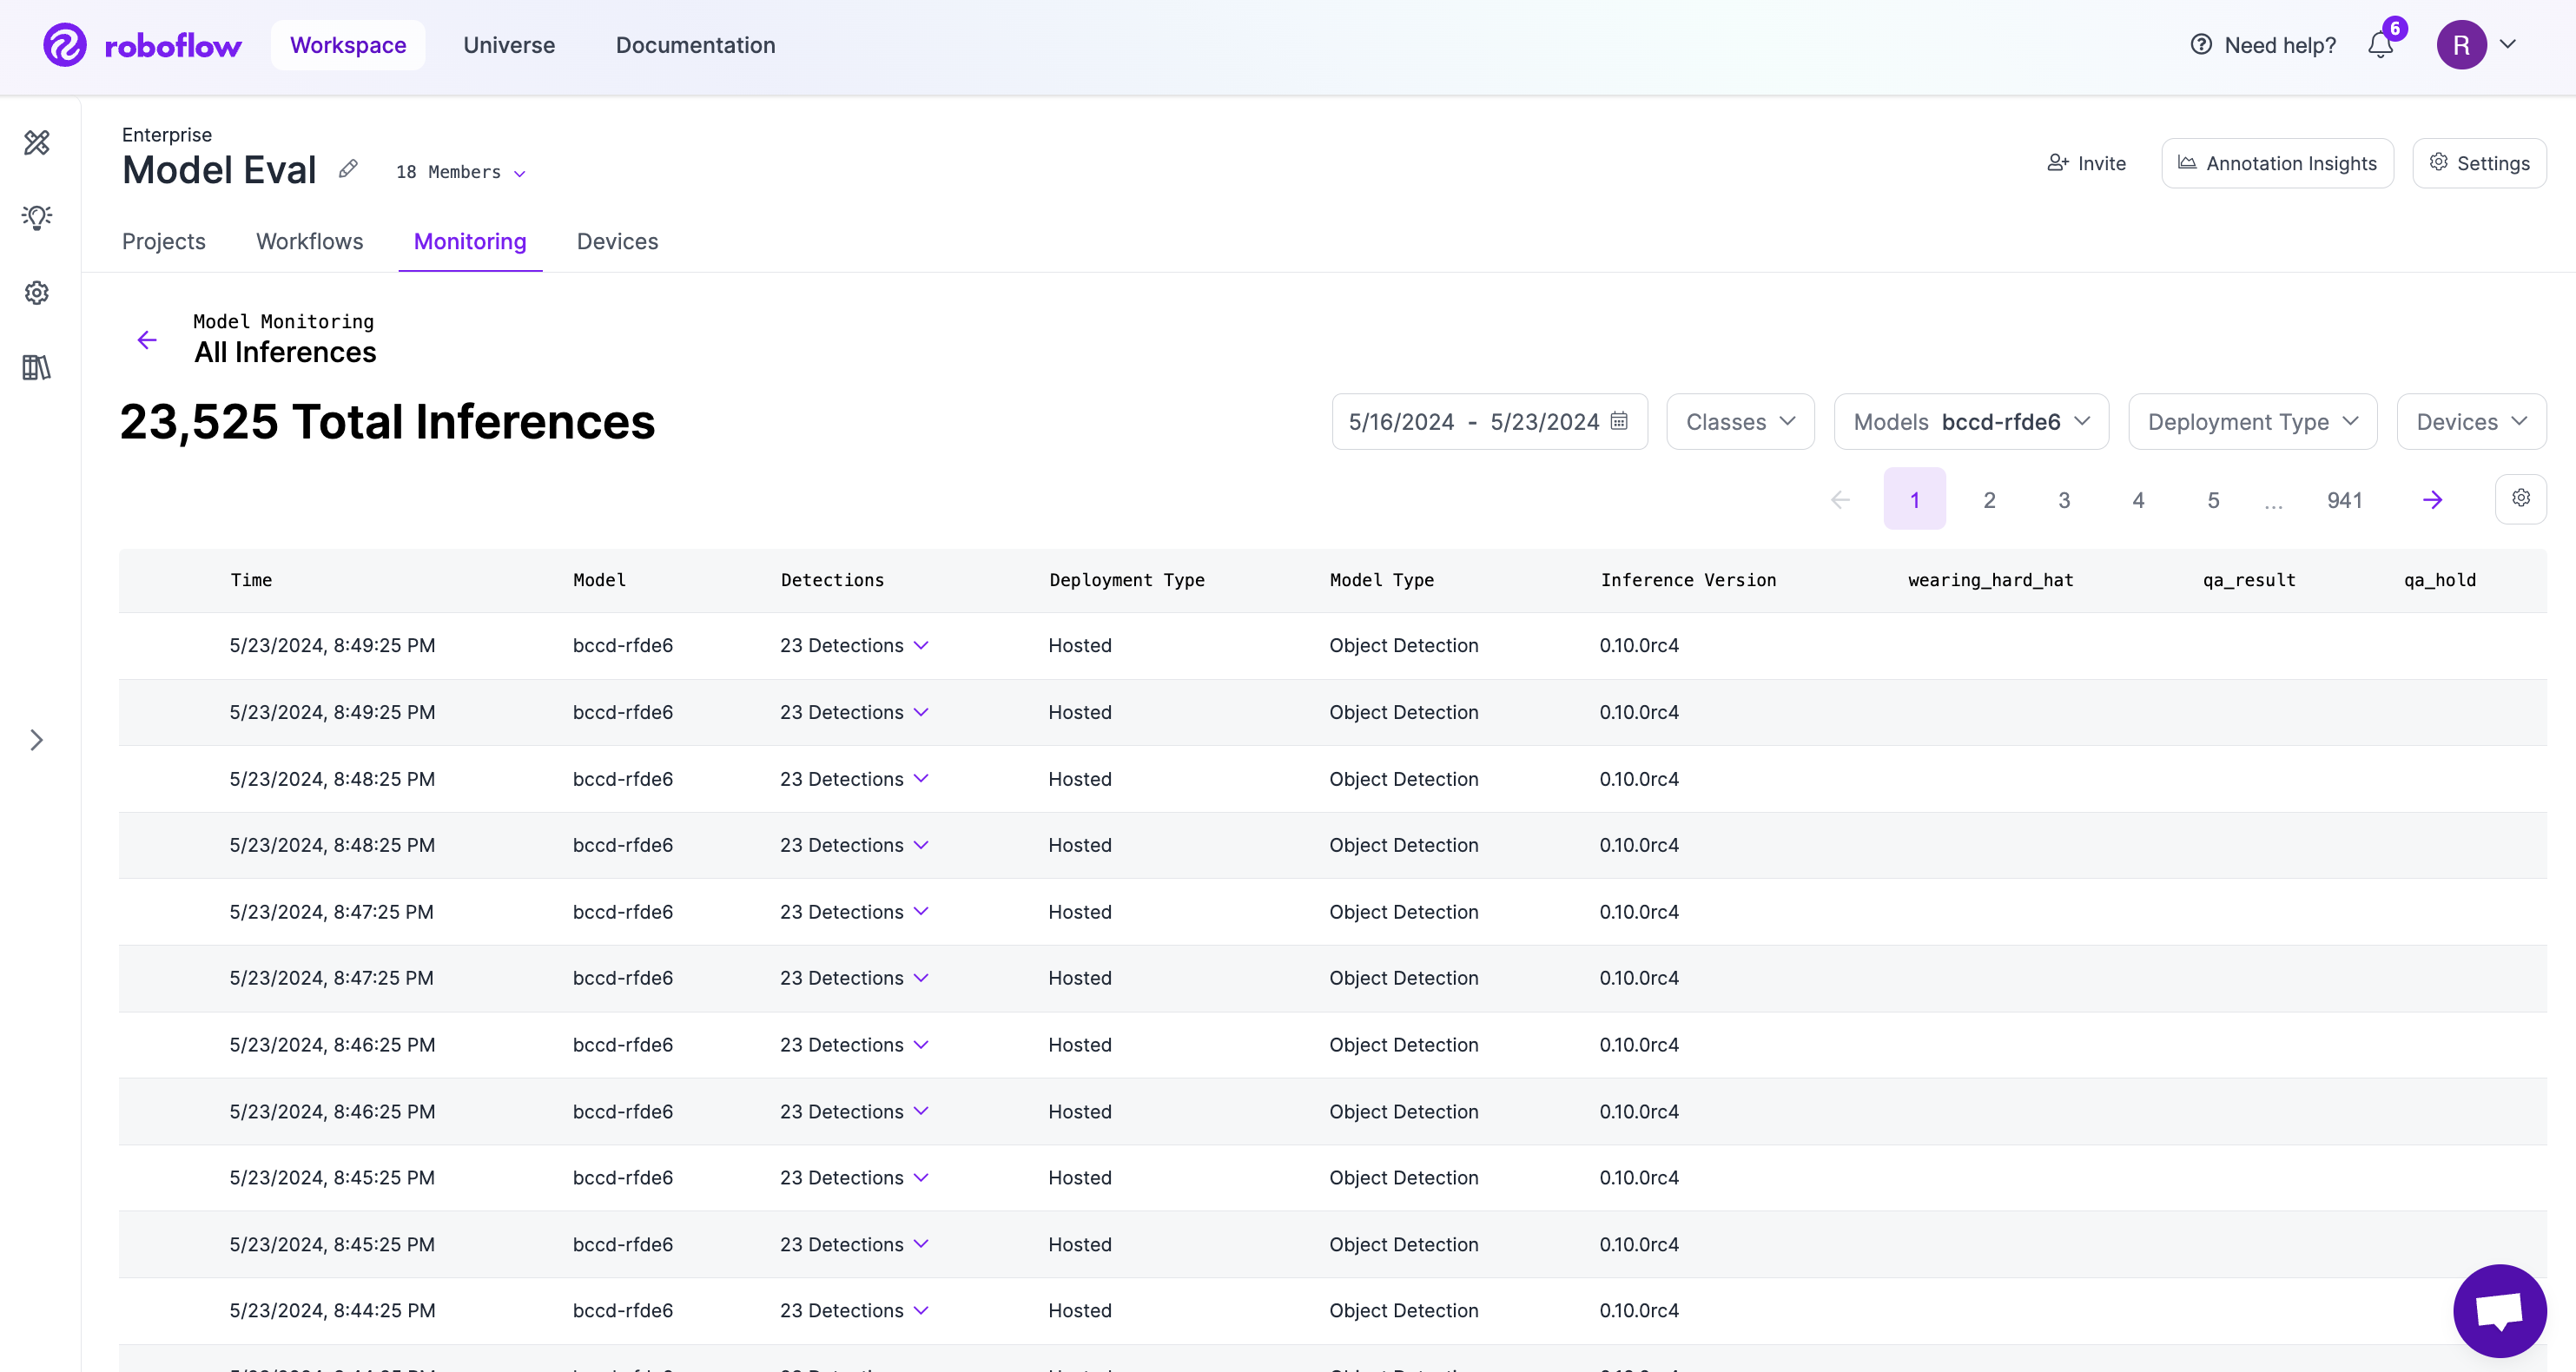
### इन्फ़रेंस तालिका
यहाँ, आप अपने मॉडल के लिए सभी भविष्यवाणी परिणाम देख सकते हैं। इसके अलावा, आप अपने इन्फ़रेंस में जोड़ा गया कोई भी कस्टम मेटाडेटा भी देखेंगे। अपने इन्फ़रेंस के किसी उपसमूह को देखने के लिए, आप तालिका के ऊपर दाईं ओर मौजूद फ़िल्टर का उपयोग कर सकते हैं।
#### इन्फ़रेंस विवरण
इन्फ़रेंस तालिका से, आप किसी विशिष्ट इन्फ़रेंस में जाकर अधिक विवरण देख सकते हैं। आइए इसे इस छवि में दिखाए गए क्रम के अनुसार समझें:
1. **छवि:** यहाँ, आप वह छवि देख सकते हैं जिस पर इन्फ़रेंस किया गया था। *नोट: यह डिफ़ॉल्ट रूप से सक्षम नहीं है। देखें* [*इन्फ़रेंस छवियाँ सक्षम करना*](#enabling-inference-images)
2. **इन्फ़रेंस विवरण:** इस पैनल में, आप अपने इन्फ़रेंस अनुरोध के बारे में सभी विवरण और गुण देख सकते हैं। सभी उपलब्ध फ़ील्ड डिफ़ॉल्ट रूप से दिखाए जाते हैं, लेकिन यदि आप कुछ छिपाना चाहते हैं, तो फ़ील्ड छिपाने के लिए ऊपर दाएँ कोने में "Cog" आइकन पर क्लिक कर सकते हैं। (यह सेटिंग आपके ब्राउज़र में बनी रहेगी)
3. कुछ फ़ील्डों में, यदि उपलब्ध हो, तो उस फ़ील्ड के आधार पर इन्फ़रेंस खोजने का विकल्प होगा। हाइलाइट किए गए उदाहरण में, यह उसी मॉडल के इन्फ़रेंस खोजेगा।
4. **डिटेक्शंस:** यह संकुचित होने वाला पेन उस इन्फ़रेंस से प्राप्त डिटेक्शनों की सूची दिखाता है। आप तालिका के क्रम को चुनने के लिए "Class" और "Confidence" तालिका हेडरों पर क्लिक कर सकते हैं।
5. **डाउनलोड और लिंक बटन:** यहाँ, आप इन्फ़रेंस से जुड़ी छवि डाउनलोड कर सकते हैं या बाद के संदर्भ के लिए इस इन्फ़रेंस विवरण का लिंक कॉपी कर सकते हैं।
#### इन्फ़रेंस छवियाँ सक्षम करना
{% hint style="info" %}
Active Learning या Dataset Upload द्वारा सहेजी गई छवियाँ आपके प्रोजेक्ट में छवि अपलोड करने के समान ही गिनी जाएँगी। आपके प्लान प्रकार के अनुसार क्रेडिट, सीमा या कोटा उपयोग लागू हो सकता है।
{% endhint %}
Model Monitoring में इन्फ़रेंस छवियाँ दिखाने के लिए दो तरीके हैं:
* **Roboflow Dataset Upload ब्लॉक:** वर्कफ़्लोज़ में, आप एक "Roboflow Dataset Upload" ब्लॉक जोड़ सकते हैं। एक बार जब आप भविष्यवाणियों और भविष्यवाणी छवि को जोड़ देते हैं, तो यह Model Monitoring में दिखाई देगा।
* **Active Learning:** आप कॉन्फ़िगर कर सकते हैं [Active Learning](/deployment/hi/monitoring-and-analytics/active-learning.md) अपने प्रोजेक्ट से नियम, ताकि उत्पादन इन्फ़रेंस छवियाँ स्वतः एकत्र की जा सकें।
### अलर्टिंग
आप और आपकी टीम के अन्य सदस्य वास्तविक-समय अलर्ट की सदस्यता ले सकते हैं जब आपके मॉडल में समस्याएँ या असामान्यताएँ होती हैं। उदाहरण के लिए, यदि आपके मॉडल का कॉन्फ़िडेंस अचानक कम हो जाए, या आपका इन्फ़रेंस सर्वर बंद हो जाए, और आपका मॉडल चलना बंद कर दे, तो आपकी टीम को ईमेल सूचना प्राप्त होगी।
अलर्टिंग पेज पर अधिक जानकारी देखें:
{% content-ref url="/pages/6afb282d58833df4e700416778ad8991287a22f5" %}
[अलर्टिंग](/deployment/hi/monitoring-and-analytics/model-monitoring/alerting.md)
{% endcontent-ref %}
### कस्टम मेटाडेटा
किसी इन्फ़रेंस में अतिरिक्त मेटाडेटा जोड़ने के लिए, आप Model Monitoring की कस्टम मेटाडेटा सुविधा का उपयोग कर सकते हैं। कस्टम मेटाडेटा का उपयोग करके, आप इन्फ़रेंस में ऐसी जानकारी जोड़ सकते हैं जैसे कि छवि कहाँ ली गई थी, भविष्यवाणी का अपेक्षित मान, आदि। आपका कस्टम मेटाडेटा "Recent Inferences" और "All Inferences" दृश्यों में दिखाई देगा।
किसी इन्फ़रेंस परिणाम में कस्टम मेटाडेटा जोड़ने के लिए, कृपया देखें [कस्टम मेटाडेटा API](#http-api) दस्तावेज़।
### मॉडल मॉनिटरिंग API
स्वचालन और बाहरी प्रणालियों के साथ एकीकरण के लिए, आप [मॉडल मॉनिटरिंग के लिए हमारा API](#http-api).
### समर्थित तैनातियाँ
Model Monitoring, Roboflow की Cloud API या Roboflow Inference Server का उपयोग करके किए गए इन्फ़रेंस अनुरोधों का समर्थन करता है, बशर्ते Inference Server के पास इंटरनेट पहुँच हो। इसमें edge deployments शामिल हैं जो Roboflow के [लाइसेंस सर्वर](https://blog.roboflow.com/roboflow-license-server/).
## HTTP API
### किसी वर्कस्पेस में तैनात मॉडलों के बारे में आँकड़े प्राप्त करें
आप Model Monitoring API का उपयोग करके Model Monitoring आँकड़े प्राप्त कर सकते हैं। यह endpoint वर्तमान में 3 query params स्वीकार करता है (api\_key के अतिरिक्त):
* **startTime** : DateTime स्ट्रिंग, स्वरूप "YYYY-MM-DD HH:flag\_mm:ss"। यदि खाली हो, तो अनुरोध के समय से 24 घंटे पहले का डिफ़ॉल्ट होगा
* **endTime** : DateTime स्ट्रिंग, स्वरूप "YYYY-MM-DD HH:flag\_mm:ss"। यदि खाली हो, तो अनुरोध के वर्तमान समय का डिफ़ॉल्ट होगा
* **modelNames** : अल्पविराम से अलग किए गए मॉडल नामों की स्ट्रिंग, जैसे "?modelNames=license-plate-detector,truck-detector"
#### आँकड़े
`GET /:workspace/inference-stats`
#### **उदाहरण अनुरोध:**
```
curl --location --request GET 'https://api.roboflow.com/${WORKSPACE}/inference-stats?api_key=$ROBOFLOW_API_KEY&startTime=&endTime=' \\
```
**उदाहरण प्रतिक्रिया:**
{% tabs %}
{% tab title="200" %}
```json
{
"num_inferences": 120,
"prev_num_inferences": 290,
"num_errors": 0,
"prev_num_errors": 0,
"avg_confidence": 0.92541713388321,
"prev_avg_confidence": 0.8610920182589827,
"avg_response_time": 0.16464362986438943,
"prev_avg_response_time": 0.043521592255159045,
"inference_stats": [
{
"model_name": "cards-3z9gn",
"predicted_class": "Playingcards",
"num_inferences": 106,
"prev_num_inferences": 190,
"num_errors": null,
"prev_num_errors": null,
"avg_confidence": 0.931105958703923,
"prev_avg_confidence": 0.935741652940449,
"avg_response_time": 0.176652773857811,
"prev_avg_response_time": 0.05487422056841488,
"median_confidence": 0.9268901944160461,
"class_count": 211,
"deployment_types": "hosted",
"inference_server_versions": "0.15.3,0.16.0",
"model_num_inferences": 107,
"prev_model_num_inferences": 190
},
{
"model_name": "cards-3z9gn",
"predicted_class": "",
"num_inferences": 1,
"prev_num_inferences": null,
"num_errors": null,
"prev_num_errors": null,
"avg_confidence": 0,
"prev_avg_confidence": null,
"avg_response_time": 0,
"prev_avg_response_time": null,
"median_confidence": 0,
"class_count": 1,
"deployment_types": "hosted",
"inference_server_versions": "0.16.0",
"model_num_inferences": 107,
"prev_model_num_inferences": null
},
{
"model_name": "hard-hat-sample-8j2w3",
"predicted_class": "head",
"num_inferences": null,
"prev_num_inferences": 100,
"num_errors": null,
"prev_num_errors": null,
"avg_confidence": null,
"prev_avg_confidence": 0.6933842897415161,
"avg_response_time": null,
"prev_avg_response_time": 0.021951598459972955,
"median_confidence": null,
"class_count": null,
"deployment_types": "hosted",
"inference_server_versions": "0.15.1",
"model_num_inferences": null,
"prev_model_num_inferences": 100
},
{
"model_name": "hard-hat-sample-8j2w3",
"predicted_class": "helmet",
"num_inferences": null,
"prev_num_inferences": 100,
"num_errors": null,
"prev_num_errors": null,
"avg_confidence": null,
"prev_avg_confidence": 0.7451311349868774,
"avg_response_time": null,
"prev_avg_response_time": 0.021951598459972955,
"median_confidence": null,
"class_count": null,
"deployment_types": "hosted",
"inference_server_versions": "0.15.1",
"model_num_inferences": null,
"prev_model_num_inferences": 100
},
{
"model_name": "coco",
"predicted_class": "car",
"num_inferences": 11,
"prev_num_inferences": null,
"num_errors": null,
"prev_num_errors": null,
"avg_confidence": 0.91790372133255,
"prev_avg_confidence": null,
"avg_response_time": 0.0647244118180817,
"prev_avg_response_time": null,
"median_confidence": 0.91790372133255,
"class_count": 22,
"deployment_types": "hosted",
"inference_server_versions": "0.15.3",
"model_num_inferences": 11,
"prev_model_num_inferences": null
},
{
"model_name": "license-plate-recognition-rxg4e",
"predicted_class": "License_Plate",
"num_inferences": 2,
"prev_num_inferences": null,
"num_errors": null,
"prev_num_errors": null,
"avg_confidence": 0.8706022202968597,
"prev_avg_confidence": null,
"avg_response_time": 0.07911215199999333,
"prev_avg_response_time": null,
"median_confidence": 0.8706022202968597,
"class_count": 2,
"deployment_types": "hosted",
"inference_server_versions": "0.15.3",
"model_num_inferences": 2,
"prev_model_num_inferences": null
}
]
}
```
{% endtab %}
{% endtabs %}
### किसी इन्फ़रेंस में मेटाडेटा संलग्न करें
आप प्रत्येक इन्फ़रेंस परिणाम में एक कस्टम मेटाडेटा मान जोड़ सकते हैं और उसे Model Monitoring डैशबोर्ड में देख सकते हैं।
**अनुप्रयोग**
कस्टम मेटाडेटा के कई अनुप्रयोग हैं, डेटा को टैग करके उसे ढूँढना और व्यवस्थित करना आसान बनाने से लेकर, इन्फ़रेंस परिणाम में अतिरिक्त संदर्भ जोड़ने तक। उदाहरण के लिए, मान लीजिए आप एक ऑटोमोटिव निर्माता हैं जिसके संयुक्त राज्य अमेरिका में तीन कारखाने हैं। आप अपने इन्फ़रेंस परिणामों में जो कुछ जोड़ने पर विचार कर सकते हैं उनमें स्थान, किस उत्पादन-लाइन पर छवि ली गई थी, क्या कोई निश्चित ऑपरेशन पास हुआ या असफल रहा, और इन्फ़रेंस का अपेक्षित परिणाम (जैसे `color=blue`).
**कस्टम मेटाडेटा बनाएँ**
`POST` `/:workspace/inference-stats/metadata`
इन्फ़रेंस परिणाम में अतिरिक्त डेटा संलग्न करता है, जो Model Monitoring डैशबोर्ड में प्रदर्शित होगा।
जब आप Roboflow के Inference Container या Serverless Cloud API के साथ इन्फ़रेंस अनुरोध करते हैं, तो आपको प्रतिक्रिया में एक `inference_id` प्राप्त होगा। इस ID का उपयोग करके, आप इसे `inference_ids` ऐरे में नीचे दिखाए अनुसार जोड़ सकते हैं ताकि अपना मेटाडेटा उससे संलग्न कर सकें। `field_name` गुण का नाम है, और `value` मान है।
उदाहरण के लिए, यदि मैं अपने इन्फ़रेंस परिणामों में भौगोलिक स्थान जोड़ना चाहता हूँ, तो मैं `field_name` को "location" पर सेट करूँगा और `value` "united\_states" जैसे स्थान का मान होगा।
**नोट:** के लिए मान `field_name` और `field_value` पूरी तरह से उपयोगकर्ता-परिभाषित हैं। फ़ॉर्मैटिंग को सुसंगत रखना सुनिश्चित करें, जिसमें अक्षर केस भी शामिल है। उदाहरण के लिए `field_name: "my_location"` और `field_name: "My_location"` को दो अलग-अलग मेटाडेटा मानों के रूप में माना जाएगा।
**उदाहरण अनुरोध:**
```
curl --location --request POST 'https://api.roboflow.com/${WORKSPACE}/inference-stats/metadata' \\
--header 'Content-Type: application/json' \
--data-raw '{
"api_key": "YOUR_API_KEY",
"data": [
{
"inference_ids": ["a12a19a9-a933-44c9-970c-a55ea03bb453"],
"field_name": "camera_location",
"field_value": "canada"
},
{
"inference_ids": ["accf0af9-bdf0-4b22-8106-6988d4cada5a"],
"field_name": "camera_location",
"field_value": "emea"
}
]
}'
```
**हेडर्स:**
| नाम | मान |
| ------------ | ------------------ |
| Content-Type | `application/json` |
**बॉडी:**
| नाम | प्रकार | विवरण |
| ------ | ---------------- | ------------------------------------------------------------------------------------------------------------------- |
| `डेटा` | Array\ |
{
"inference\_ids": Array\;
"field\_name": string;
"field\_value": string;
}
|
**प्रतिक्रिया:**
{% tabs %}
{% tab title="200" %}
```json
{
"status": "ok"
}
```
{% endtab %}
{% tab title="400" %}
```json
{
"error": "Invalid request"
}
```
{% endtab %}
{% endtabs %}
**Python का उदाहरण:**
```python
import requests
from inference_sdk import InferenceHTTPClient, InferenceConfiguration
#### इन्हें बदलें
api_key = "YOUR_API_KEY"
workspace = "YOUR_WORKSPACE_ID"
#### डिफ़ॉल्ट मान
field_name = "test_field"
field_value = "test_value"
model_id = "coco/24"
image_path = "https://cdn.britannica.com/79/232779-050-6B0411D7/German-Shepherd-dog-Alsatian.jpg"
api_url = "https://serverless.roboflow.com"
#### क्लाइंट प्रारंभ करें
print("InferenceHTTPClient प्रारंभ किया जा रहा है...")
client = InferenceHTTPClient(
api_url=api_url, api_key=api_key
).configure(InferenceConfiguration(api_key_transport="header"))
#### इन्फ़रेंस चलाएँ
result = client.infer(image_path, model_id=model_id)
print("परिणाम:", result)
#### परिणाम से इन्फ़रेंस ID निकालें
inference_id = result.get('inference_id')
if inference_id:
print("इन्फ़रेंस ID:", inference_id)
else:
raise ValueError("प्रतिक्रिया में इन्फ़रेंस ID नहीं मिला.")
url = f"https://api.roboflow.com/{workspace}/inference-stats/metadata"
#### POST अनुरोध के लिए हेडर्स और डेटा सेट करें
headers = {
"Content-Type": "application/json"
}
data = {
"api_key": api_key,
"data": [
{
"inference_ids": [inference_id],
"field_name": field_name,
"field_value": field_value
}
]
}
#### कस्टम मेटाडेटा संलग्न करने के लिए POST अनुरोध करें
response = requests.post(url, headers=headers, json=data)
#### प्रतिक्रिया की स्थिति जाँचें
if response.status_code == 200:
print("कस्टम मेटाडेटा सफलतापूर्वक संलग्न किया गया:", response.json())
else:
print("कस्टम मेटाडेटा संलग्न करने में विफल:", response.text)
```
.png?alt=media)
 {% endhint %}
Models तालिका उन सभी मॉडलों को दिखाती है जिन पर इन्फ़रेंस हुए हैं, और उन पर क्लिक करने से आप पहुँचेंगे [मॉडल डैशबोर्ड](#model-dashboard).
{% endhint %}
Models तालिका उन सभी मॉडलों को दिखाती है जिन पर इन्फ़रेंस हुए हैं, और उन पर क्लिक करने से आप पहुँचेंगे [मॉडल डैशबोर्ड](#model-dashboard).
.png?alt=media)
.png?alt=media)
.png?alt=media)
.png?alt=media)
.png?alt=media)