> For the complete documentation index, see [llms.txt](https://docs.roboflow.com/llms.txt). Markdown versions of documentation pages are available by appending `.md` to page URLs; this page is available as [Markdown](https://docs.roboflow.com/deployment/ko/monitoring-and-analytics/model-monitoring.md).
# 모델 모니터링
Roboflow를 사용한 Model Monitoring 가이드입니다.
## 정보
Roboflow의 Model Monitoring 대시보드는 프로토타이핑부터 프로덕션까지 모델을 전례 없이 자세히 볼 수 있게 해줍니다. Model Monitoring을 사용하면 상위 수준의 통계를 확인하여 시간이 지남에 따라 모델이 어떻게 성능을 내는지 파악할 수 있고, 개별 추론 요청까지 살펴보며 엣지 케이스에서 모델이 어떻게 동작하는지도 확인할 수 있습니다.
{% hint style="info" %}
모델 모니터링 **더 이상 사용되지 않게 됩니다** 그리고 Vision Events로 대체됩니다. 자세한 내용은 [Vision Events 문서](/deployment/ko/monitoring-and-analytics/vision-events.md) 에서 확인하세요.
{% endhint %}
## 웹 앱
### 모델 모니터링에 접근하기
Model Monitoring은 Models 페이지의 하위 탭입니다. 접근하려면 워크스페이스 탐색 바에서 "Models" 드롭다운을 열고 "Model Monitoring"을 선택하거나, Models 페이지의 "Model Monitoring" 탭으로 직접 이동하세요.
### 워크스페이스 대시보드
즉시, 모델과 관련된 세 가지 통계를 볼 수 있습니다:
* **총 요청 수**: 워크스페이스의 모든 모델에 대해 수행된 추론의 총 수
* **평균 신뢰도:** 모델이 만든 모든 예측의 평균 신뢰도입니다.
* **평균 추론 시간**: 모든 추론의 평균 추론 시간(이미지 전처리를 포함해 예측을 생성하는 데 걸린 시간(초))
{% hint style="info" %}
% 변화 값은 현재 기간과 이전 기간을 기준으로 합니다. 기본적으로 이 통계는 지난 1주일의 데이터를 표시합니다. 그러나 통계 상단의 버튼을 사용하여 시간 범위를 수정할 수 있습니다.
{% endhint %}
Models 표에는 추론이 생성된 모든 모델이 표시되며, 해당 모델을 클릭하면 [모델 대시보드](#model-dashboard).
모든 모델의 Recent Inferences를 보는 탭과 [알림 설정](#alerting).
### 모델 대시보드
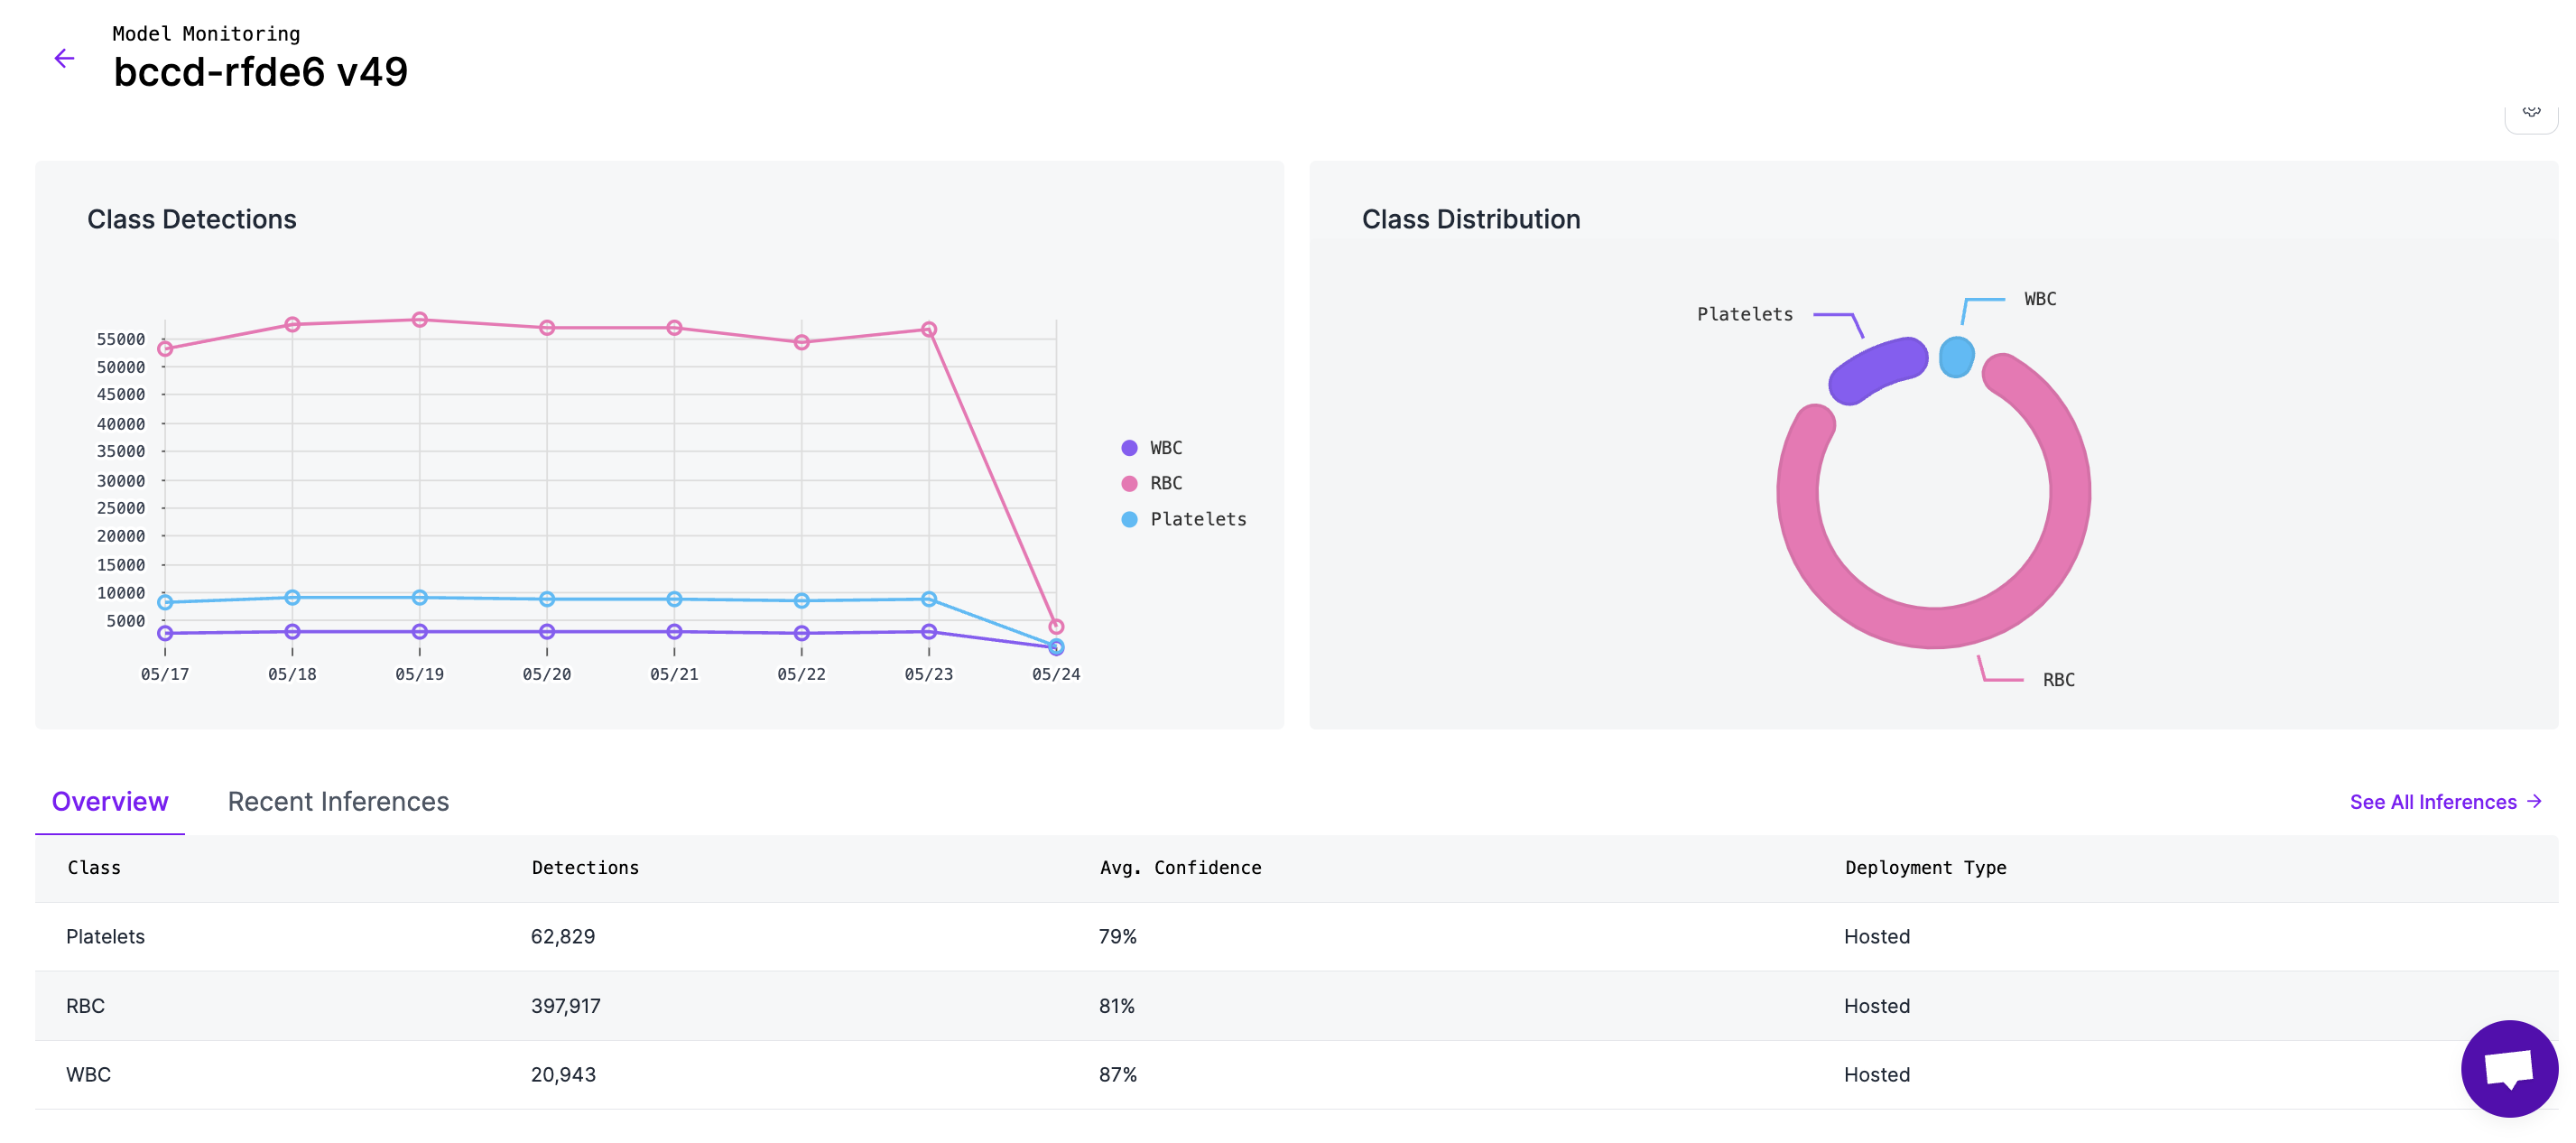
Models 탭에서 특정 모델을 선택해 해당 데이터를 볼 수 있습니다. 거기에서는 Workspace Overview와 같은 통계를 볼 수 있지만, 하나의 모델에 한정됩니다.
여기서는 통계 외에도 모델의 각 클래스별 검출 수를 확인하고, 다른 클래스에 대한 분포도 볼 수 있습니다.
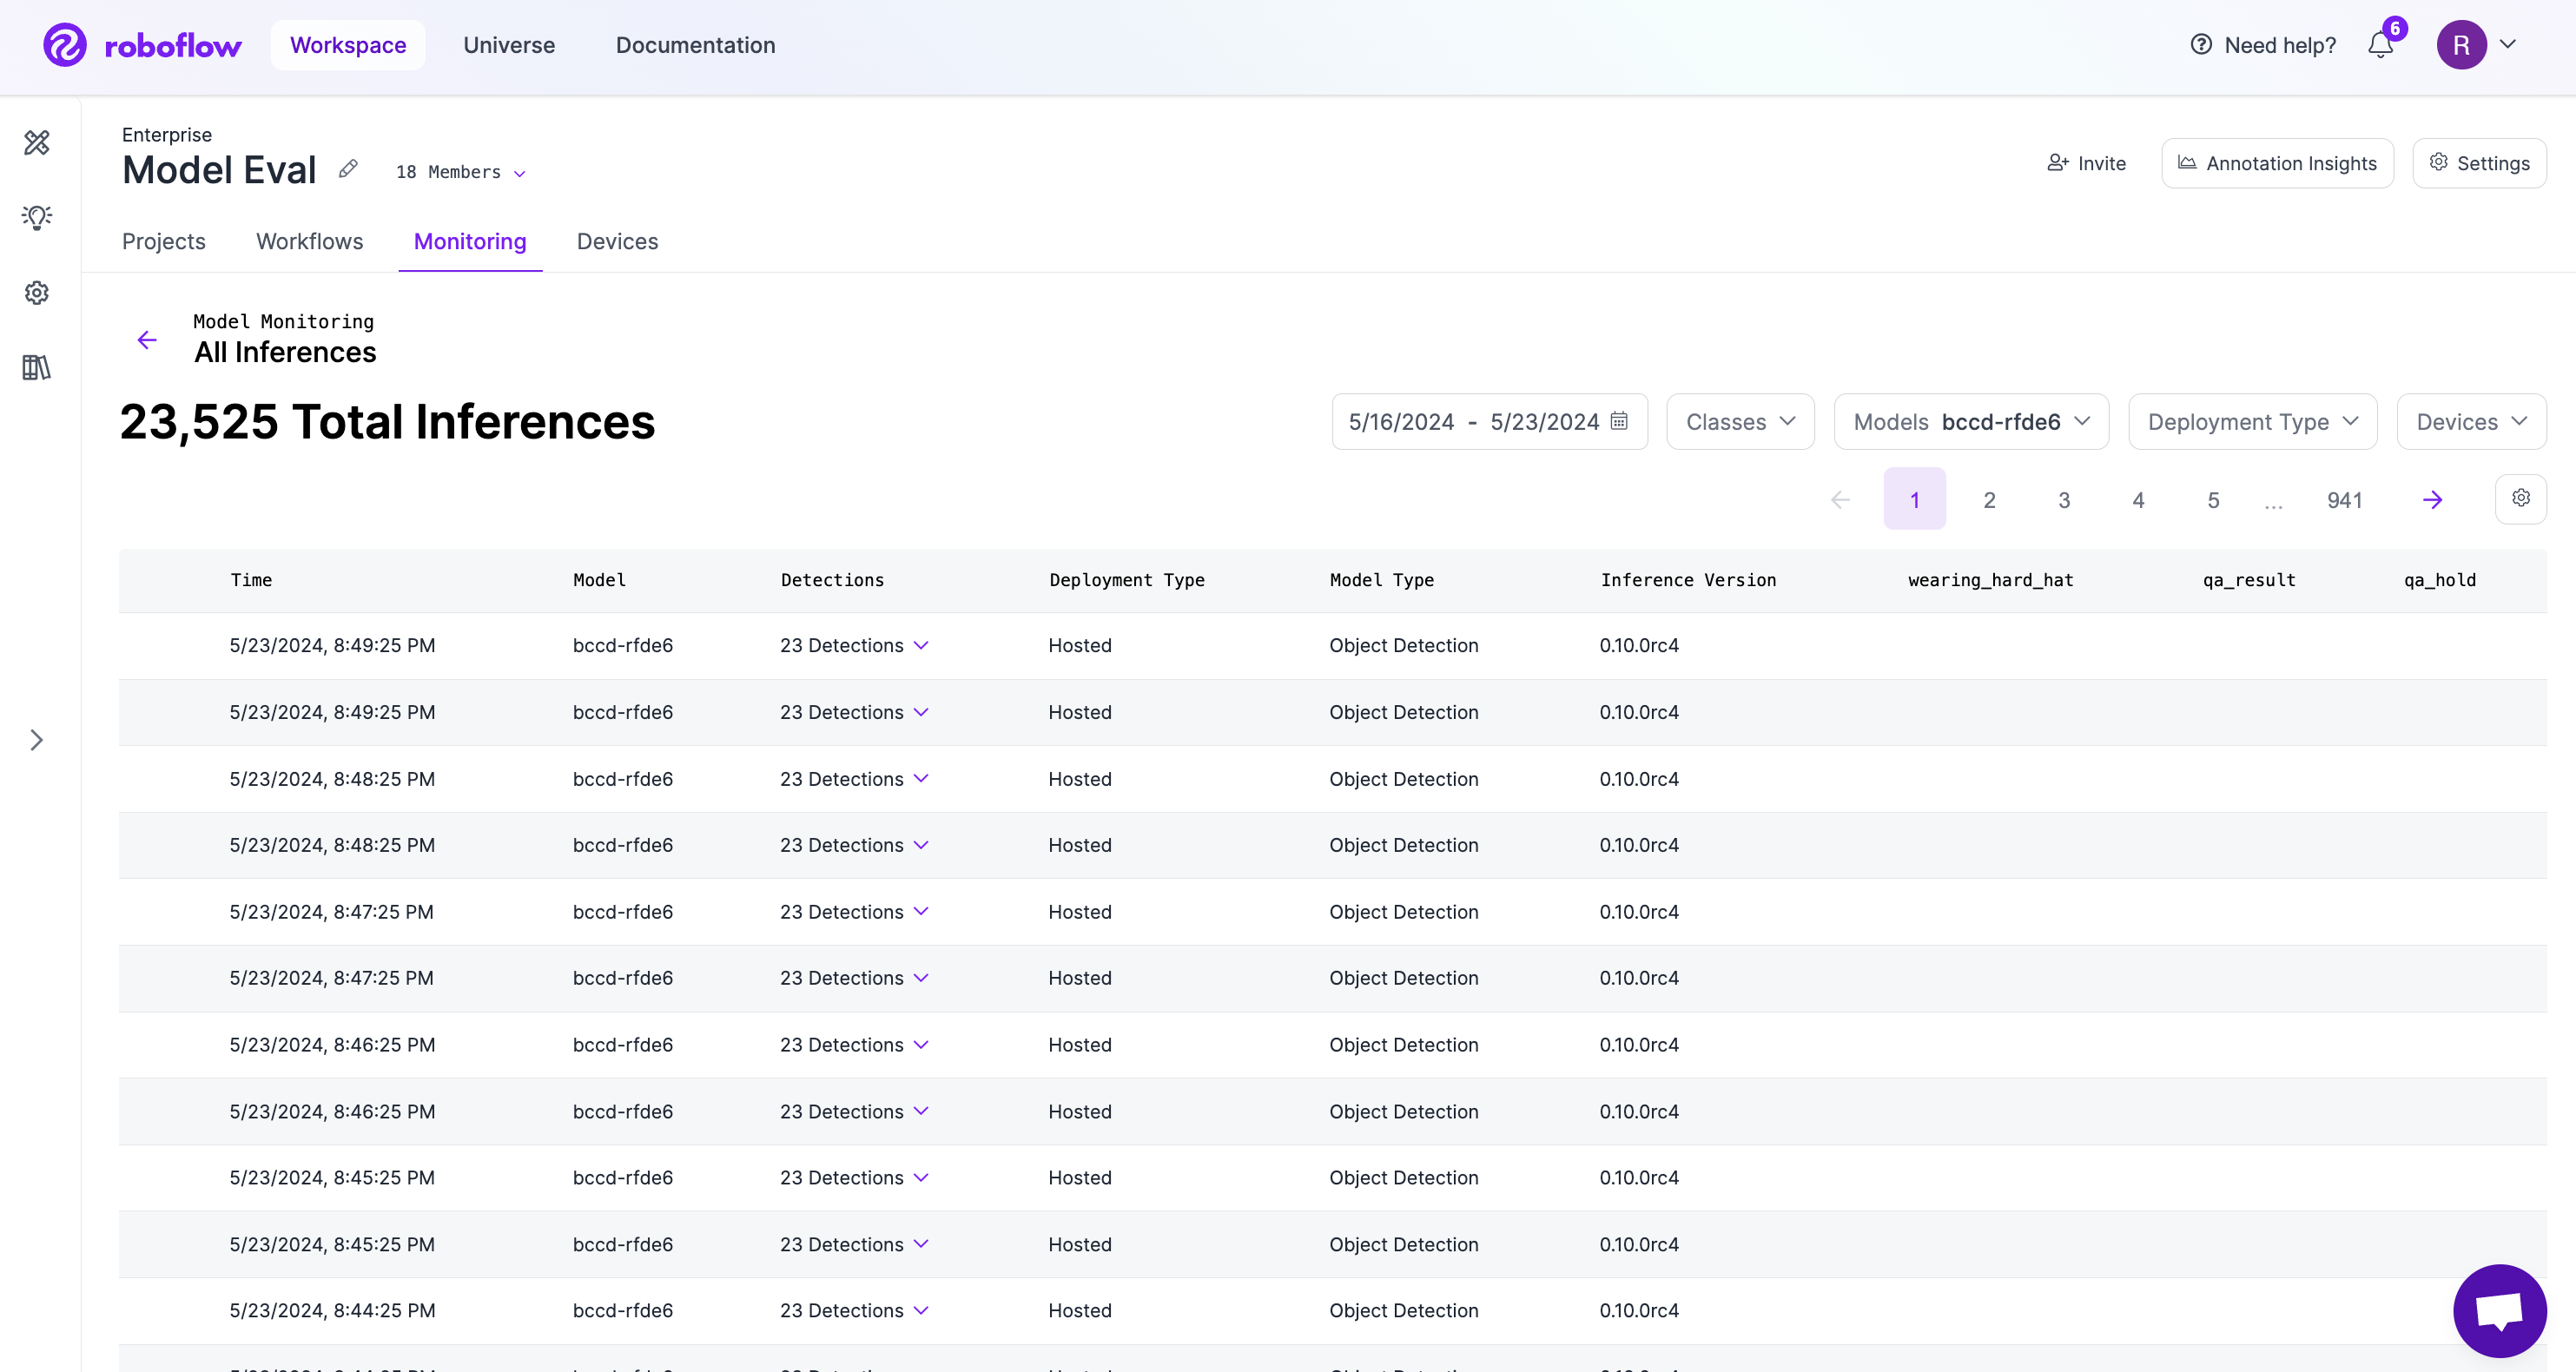
표 오른쪽 상단의 "See All Inferences" 버튼을 클릭하면 [추론 표](#inferences-table).
### 추론 표
여기에서 모델의 모든 예측 결과를 볼 수 있습니다. 또한 추론에 추가된 모든 사용자 지정 메타데이터도 볼 수 있습니다. 추론의 일부만 보려면 표 오른쪽 상단의 필터를 사용할 수 있습니다.
#### 추론 세부 정보
Inferences Table에서 특정 추론을 자세히 살펴보고 더 많은 세부 정보를 볼 수 있습니다. 아래 이미지에 표시된 순서대로 살펴보겠습니다:
1. **이미지:** 여기에서 추론된 이미지를 볼 수 있습니다. *참고: 이 기능은 기본적으로 활성화되어 있지 않습니다. 을 참고하세요* [*추론 이미지 활성화*](#enabling-inference-images)
2. **추론 세부 정보:** 이 패널에서는 추론 요청에 대한 모든 세부 정보와 속성을 볼 수 있습니다. 사용 가능한 모든 필드는 기본적으로 표시되지만, 일부를 숨기고 싶다면 오른쪽 상단 모서리의 "Cog" 아이콘을 클릭하여 필드를 숨길 수 있습니다. (이 설정은 브라우저에 유지됩니다)
3. 일부 필드의 경우, 사용 가능하다면 해당 필드를 기준으로 추론을 검색할 수 있는 옵션이 있습니다. 강조 표시된 예시에서는 동일한 모델의 추론을 검색합니다.
4. **검출:** 이 접을 수 있는 패널은 해당 추론에서 받은 검출 목록을 보여줍니다. "Class" 및 "Confidence" 표 헤더를 클릭하여 표의 정렬 순서를 선택할 수 있습니다.
5. **다운로드 및 링크 버튼:** 여기에서 추론과 연결된 이미지를 다운로드하거나, 나중에 참고할 수 있도록 이 추론 세부 정보의 링크를 복사할 수 있습니다.
#### 추론 이미지 활성화
{% hint style="info" %}
Active Learning 또는 Dataset Upload로 저장된 이미지는 프로젝트에 이미지를 업로드한 것과 동일하게 계산됩니다. 플랜 유형에 따라 크레딧, 한도 또는 할당량 사용이 적용될 수 있습니다.
{% endhint %}
Model Monitoring에 추론 이미지를 표시하도록 활성화하는 방법은 두 가지입니다:
* **Roboflow Dataset Upload 블록:** Workflows에서 "Roboflow Dataset Upload" 블록을 추가할 수 있습니다. 예측과 예측 이미지를 연결하면 Model Monitoring에 표시됩니다.
* **능동 학습:** 설정할 수 있습니다 [능동 학습](/deployment/ko/monitoring-and-analytics/active-learning.md) 규칙을 프로젝트에서 구성하여 프로덕션 추론 이미지를 자동으로 수집할 수 있습니다.
### 알림
문제나 이상이 모델에 발생하면 귀하와 팀의 다른 구성원들이 실시간 알림을 구독할 수 있습니다. 예를 들어 모델의 신뢰도가 갑자기 떨어지거나 추론 서버가 다운되어 모델이 중지되면 팀은 이메일 알림을 받게 됩니다.
알림 페이지에서 더 많은 정보를 확인하세요:
{% content-ref url="/pages/9111ed2787b16024df5f1056fba9426e6b3d0d0d" %}
[알림](/deployment/ko/monitoring-and-analytics/model-monitoring/alerting.md)
{% endcontent-ref %}
### 사용자 지정 메타데이터
추론에 추가 메타데이터를 첨부하려면 Model Monitoring의 사용자 지정 메타데이터 기능을 사용할 수 있습니다. 사용자 지정 메타데이터를 사용하면 이미지가 촬영된 위치, 예측의 예상 값 등의 정보를 추론에 추가할 수 있습니다. 사용자 지정 메타데이터는 "Recent Inferences" 및 "All Inferences" 보기에서 표시됩니다.
추론 결과에 사용자 지정 메타데이터를 첨부하려면 다음 [사용자 지정 메타데이터 API](#http-api) 문서를 참조하세요.
### Model Monitoring API
자동화 및 외부 시스템 통합을 위해, 다음을 사용하여 Model Monitoring 통계를 가져올 수 있습니다 [모델 모니터링용 API](#http-api).
### 지원되는 배포
Model Monitoring은 Inference Server가 인터넷에 연결되어 있는 경우 Roboflow의 Cloud API 또는 Roboflow Inference Server를 사용해 만든 추론 요청을 지원합니다. 여기에는 Roboflow의 [License Server](https://blog.roboflow.com/roboflow-license-server/).
## HTTP API
### 워크스페이스에서 배포된 모델의 통계 가져오기
Model Monitoring API를 사용하여 Model Monitoring 통계를 가져올 수 있습니다. 이 엔드포인트는 현재 api\_key 외에 3개의 쿼리 매개변수를 받습니다:
* **startTime**: "YYYY-MM-DD HH:flag\_mm:ss" 형식의 DateTime 문자열입니다. 비어 있으면 요청 시점으로부터 24시간 전으로 기본 설정됩니다
* **endTime**: "YYYY-MM-DD HH:flag\_mm:ss" 형식입니다. 비어 있으면 요청 시점의 현재 시간으로 기본 설정됩니다
* **modelNames**: 쉼표로 구분된 모델 이름 문자열입니다. 예: "?modelNames=license-plate-detector,truck-detector"
#### 통계
`GET /:workspace/inference-stats`
#### **예시 요청:**
```
curl --location --request GET 'https://api.roboflow.com/${WORKSPACE}/inference-stats?api_key=$ROBOFLOW_API_KEY&startTime=&endTime=' \\
```
**예시 응답:**
{% tabs %}
{% tab title="200" %}
```json
{
"num_inferences": 120,
"prev_num_inferences": 290,
"num_errors": 0,
"prev_num_errors": 0,
"avg_confidence": 0.92541713388321,
"prev_avg_confidence": 0.8610920182589827,
"avg_response_time": 0.16464362986438943,
"prev_avg_response_time": 0.043521592255159045,
"inference_stats": [
{
"model_name": "cards-3z9gn",
"predicted_class": "Playingcards",
"num_inferences": 106,
"prev_num_inferences": 190,
"num_errors": null,
"prev_num_errors": null,
"avg_confidence": 0.931105958703923,
"prev_avg_confidence": 0.935741652940449,
"avg_response_time": 0.176652773857811,
"prev_avg_response_time": 0.05487422056841488,
"median_confidence": 0.9268901944160461,
"class_count": 211,
"deployment_types": "hosted",
"inference_server_versions": "0.15.3,0.16.0",
"model_num_inferences": 107,
"prev_model_num_inferences": 190
},
{
"model_name": "cards-3z9gn",
"predicted_class": "",
"num_inferences": 1,
"prev_num_inferences": null,
"num_errors": null,
"prev_num_errors": null,
"avg_confidence": 0,
"prev_avg_confidence": null,
"avg_response_time": 0,
"prev_avg_response_time": null,
"median_confidence": 0,
"class_count": 1,
"deployment_types": "hosted",
"inference_server_versions": "0.16.0",
"model_num_inferences": 107,
"prev_model_num_inferences": null
},
{
"model_name": "hard-hat-sample-8j2w3",
"predicted_class": "head",
"num_inferences": null,
"prev_num_inferences": 100,
"num_errors": null,
"prev_num_errors": null,
"avg_confidence": null,
"prev_avg_confidence": 0.6933842897415161,
"avg_response_time": null,
"prev_avg_response_time": 0.021951598459972955,
"median_confidence": null,
"class_count": null,
"deployment_types": "hosted",
"inference_server_versions": "0.15.1",
"model_num_inferences": null,
"prev_model_num_inferences": 100
},
{
"model_name": "hard-hat-sample-8j2w3",
"predicted_class": "helmet",
"num_inferences": null,
"prev_num_inferences": 100,
"num_errors": null,
"prev_num_errors": null,
"avg_confidence": null,
"prev_avg_confidence": 0.7451311349868774,
"avg_response_time": null,
"prev_avg_response_time": 0.021951598459972955,
"median_confidence": null,
"class_count": null,
"deployment_types": "hosted",
"inference_server_versions": "0.15.1",
"model_num_inferences": null,
"prev_model_num_inferences": 100
},
{
"model_name": "coco",
"predicted_class": "car",
"num_inferences": 11,
"prev_num_inferences": null,
"num_errors": null,
"prev_num_errors": null,
"avg_confidence": 0.91790372133255,
"prev_avg_confidence": null,
"avg_response_time": 0.0647244118180817,
"prev_avg_response_time": null,
"median_confidence": 0.91790372133255,
"class_count": 22,
"deployment_types": "hosted",
"inference_server_versions": "0.15.3",
"model_num_inferences": 11,
"prev_model_num_inferences": null
},
{
"model_name": "license-plate-recognition-rxg4e",
"predicted_class": "License_Plate",
"num_inferences": 2,
"prev_num_inferences": null,
"num_errors": null,
"prev_num_errors": null,
"avg_confidence": 0.8706022202968597,
"prev_avg_confidence": null,
"avg_response_time": 0.07911215199999333,
"prev_avg_response_time": null,
"median_confidence": 0.8706022202968597,
"class_count": 2,
"deployment_types": "hosted",
"inference_server_versions": "0.15.3",
"model_num_inferences": 2,
"prev_model_num_inferences": null
}
]
}
```
{% endtab %}
{% endtabs %}
### 추론에 메타데이터 첨부하기
각 추론 결과에 사용자 지정 메타데이터 값을 첨부하고 Model Monitoring 대시보드에서 확인할 수 있습니다.
**활용 사례**
사용자 지정 메타데이터는 데이터를 태그하여 더 쉽게 찾고 정리하는 것부터, 추론 결과에 추가 맥락을 제공하는 것까지 다양한 용도로 사용할 수 있습니다. 예를 들어 미국 전역에 세 개의 공장을 둔 자동차 제조업체라고 가정해 봅시다. 추론 결과에 추가할 수 있는 항목으로는 위치, 이미지가 어떤 생산 라인에서 촬영되었는지, 특정 작업이 통과했는지 실패했는지, 그리고 추론의 예상 결과(예: `color=blue`).
**사용자 지정 메타데이터 생성**
`POST` `/:workspace/inference-stats/metadata`
Model Monitoring 대시보드에 표시될 추론 결과에 추가 데이터를 첨부합니다.
Roboflow의 Inference Container 또는 Serverless Cloud API로 추론 요청을 보내면, 응답에서 `inference_id` 를 받게 됩니다. 이 ID를 사용하여 이를 `inference_ids` 배열에 아래와 같이 추가해 메타데이터를 첨부할 수 있습니다. The `field_name` 은 속성의 이름이며, `value` 는 값입니다.
예를 들어, 추론 결과에 지리적 위치를 첨부하고 싶다면 다음과 같이 설정합니다: `field_name` "location"으로 설정하고, `value` 는 "united\_states"와 같은 위치가 됩니다.
**참고:** 의 값은 `field_name` 및 `field_value` 는 완전히 사용자 정의입니다. 대소문자를 포함하여 형식을 일관되게 유지하세요. 예를 들어 `field_name: "my_location"` 및 `field_name: "My_location"` 는 두 개의 별도 메타데이터 값으로 처리됩니다.
**예시 요청:**
```
curl --location --request POST 'https://api.roboflow.com/${WORKSPACE}/inference-stats/metadata' \\
--header 'Content-Type: application/json' \\
--data-raw '{
"api_key": "YOUR_API_KEY",
"data": [
{
"inference_ids": ["a12a19a9-a933-44c9-970c-a55ea03bb453"],
"field_name": "camera_location",
"field_value": "canada"
},
{
"inference_ids": ["accf0af9-bdf0-4b22-8106-6988d4cada5a"],
"field_name": "camera_location",
"field_value": "emea"
}
]
}'
```
**헤더:**
| 이름 | 값 |
| -- | ------------------ |
| 의 | `application/json` |
**본문:**
| 이름 | 유형 | 설명 |
| ------ | ---------------- | ------------------------------------------------------------------------------------------------------------------- |
| `data` | Array\ |
{
"inference\_ids": Array\;
"field\_name": string;
"field\_value": string;
}
|
**응답:**
{% tabs %}
{% tab title="200" %}
```json
{
"status": "ok"
}
```
{% endtab %}
{% tab title="400" %}
```json
{
"error": "잘못된 요청"
}
```
{% endtab %}
{% endtabs %}
**Python 사용 예시:**
```python
import requests
from inference_sdk import InferenceHTTPClient, InferenceConfiguration
#### 변경할 부분
api_key = "YOUR_API_KEY"
workspace = "YOUR_WORKSPACE_ID"
#### 기본값
field_name = "test_field"
field_value = "test_value"
model_id = "coco/24"
image_path = "https://cdn.britannica.com/79/232779-050-6B0411D7/German-Shepherd-dog-Alsatian.jpg"
api_url = "https://serverless.roboflow.com"
#### 클라이언트 초기화
print("InferenceHTTPClient를 초기화하는 중...")
client = InferenceHTTPClient(
api_url=api_url, api_key=api_key
).configure(InferenceConfiguration(api_key_transport="header"))
#### 추론 실행
result = client.infer(image_path, model_id=model_id)
print("결과:", result)
#### 결과에서 추론 ID 추출
inference_id = result.get('inference_id')
if inference_id:
print("추론 ID:", inference_id)
else:
raise ValueError("응답에서 추론 ID를 찾을 수 없습니다.")
url = f"https://api.roboflow.com/{workspace}/inference-stats/metadata"
#### POST 요청을 위한 헤더와 데이터 설정
headers = {
"Content-Type": "application/json"
}
data = {
"api_key": api_key,
"data": [
{
"inference_ids": [inference_id],
"field_name": field_name,
"field_value": field_value
}
]
}
#### 사용자 지정 메타데이터를 첨부하기 위해 POST 요청 보내기
response = requests.post(url, headers=headers, json=data)
#### 응답 상태 확인
if response.status_code == 200:
print("사용자 지정 메타데이터가 성공적으로 첨부되었습니다:", response.json())
else:
print("사용자 지정 메타데이터 첨부에 실패했습니다:", response.text)
```
.png?alt=media)
 {% endhint %}
Models 표에는 추론이 생성된 모든 모델이 표시되며, 해당 모델을 클릭하면 [모델 대시보드](#model-dashboard).
{% endhint %}
Models 표에는 추론이 생성된 모든 모델이 표시되며, 해당 모델을 클릭하면 [모델 대시보드](#model-dashboard).
.png?alt=media)
.png?alt=media)
.png?alt=media)
.png?alt=media)
.png?alt=media)