> For the complete documentation index, see [llms.txt](https://docs.roboflow.com/llms.txt). Markdown versions of documentation pages are available by appending `.md` to page URLs; this page is available as [Markdown](https://docs.roboflow.com/get-started/hi/guides/run-model-serverless-api.md).
# मॉडल API एंडपॉइंट का उपयोग करें
Roboflow के क्लाउड GPU पर पाँच मिनट में एक मॉडल चलाएँ, बिना किसी हार्डवेयर सेटअप के।
द [Serverless Cloud API](https://docs.roboflow.com/deployment/roboflow-cloud/serverless-api) Roboflow के क्लाउड में GPUs पर मॉडल और वर्कफ़्लोज़ चलाता है। आप एक इमेज भेजते हैं और परिणाम वापस पाते हैं। सेटअप करने के लिए कोई हार्डवेयर नहीं है और चालू रखने के लिए कोई सर्वर नहीं है।
यह गाइड आपको शून्य से लेकर पाँच मिनट में मॉडल चलाने तक ले जाती है। आप सिर्फ़ उनका नाम देकर इमेज में ऑब्जेक्ट्स ढूँढेंगे, तैयार मॉडल से रोज़मर्रा के ऑब्जेक्ट्स का पता लगाएंगे, और अपने स्वयं के मॉडल चलाएंगे—सब कुछ उसी Serverless Cloud API endpoint के विरुद्ध।
## नाम देकर ऑब्जेक्ट्स खोजें
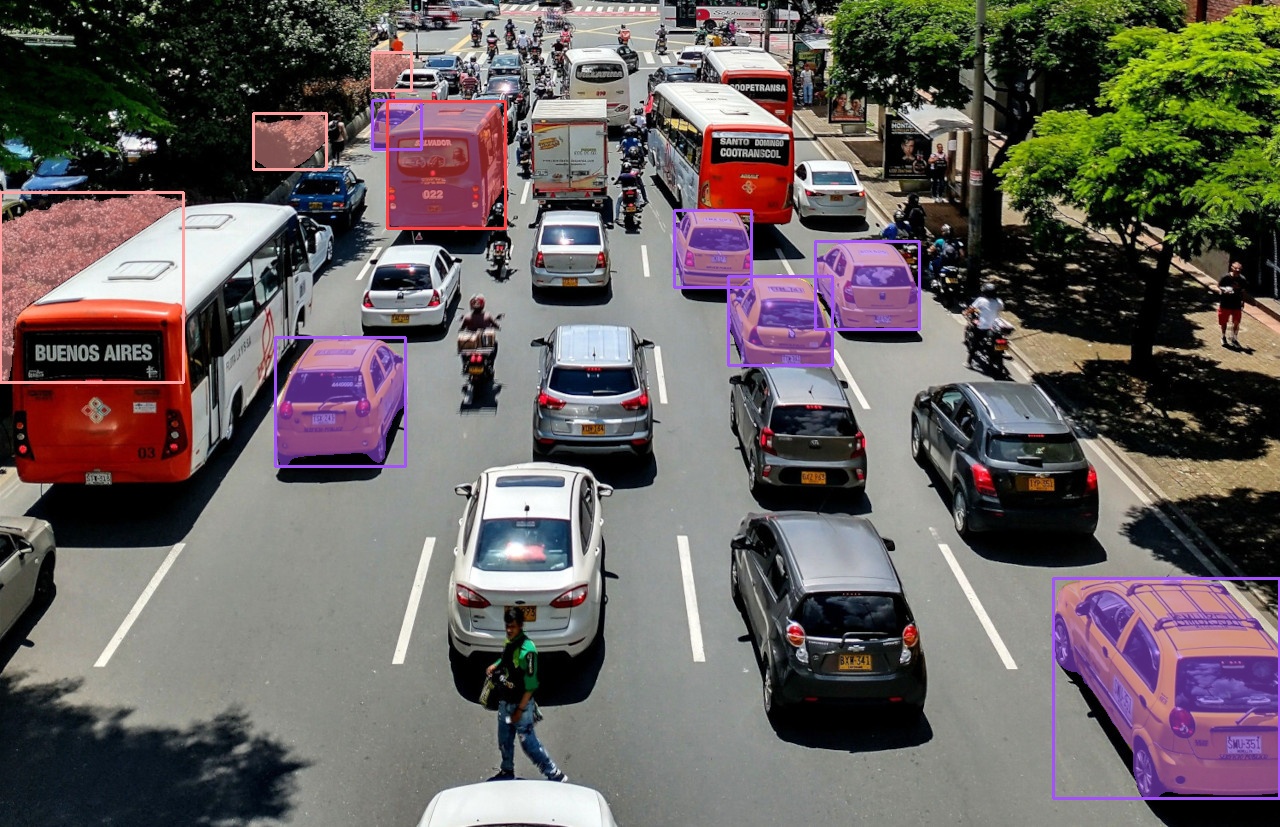
मॉडल को कुछ शब्द दें जैसे `"टैक्सी"`, `"नीली बस"`, या `"झाड़ी"` और यह इमेज में हर मिलते-जुलते ऑब्जेक्ट की रूपरेखा बनाता है। पहले सेट अप या ट्रेन करने के लिए कुछ नहीं है। यह चलाता है [SAM3](https://docs.roboflow.com/models/supported-models/sam3).
{% tabs %}
{% tab title="HTTP (Python)" icon="webhook" %}
{% stepper %}
{% step %}
### अपनी API कुंजी प्राप्त करें
Roboflow खाता बनाएँ, अपनी कुंजी यहाँ खोजें [Roboflow API settings page](https://app.roboflow.com/settings/api) और इसे अपने shell में उपलब्ध कराएँ:
```bash
export ROBOFLOW_API_KEY="your-key-here"
```
{% endstep %}
{% step %}
### डिपेंडेंसियाँ इंस्टॉल करें
`supervision` लाता है `cv2` और `numpy`:
```bash
pip install -U supervision
```
{% endstep %}
{% step %}
### मॉडल चलाएँ
को POST अनुरोध भेजें `/sam3/concept_segment` मॉडल चलाने के लिए। `sv.Detections.from_sam3` उन परिणामों को एक ऐसे रूप में बदलता है [`supervision`](https://supervision.roboflow.com) जिसे ड्रॉ किया जा सकता है:
```python
import os
import base64
import cv2
import requests
import supervision as sv
image = sv.load_image_from_url("https://media.roboflow.com/quickstart/traffic.jpg")
image_b64 = base64.b64encode(content).decode("utf-8")
h, w = image.shape[:2]
response = requests.post(
"https://serverless.roboflow.com/sam3/concept_segment",
headers={"Authorization": f"Bearer {os.environ['ROBOFLOW_API_KEY']}"},
json={
"image": {"type": "base64", "value": image_b64},
"prompts": [
{"type": "text", "text": "टैक्सी"},
{"type": "text", "text": "नीली बस"},
{"type": "text", "text": "झाड़ी"},
],
},
)
detections = sv.Detections.from_sam3(response.json(), (w, h))
annotated = sv.MaskAnnotator().annotate(image.copy(), detections)
cv2.imwrite("sam3.jpg", annotated)
```
{% endstep %}
{% endstepper %}
{% endtab %}
{% tab title="SDK (Python)" icon="python" %}
{% stepper %}
{% step %}
### अपनी API कुंजी प्राप्त करें
Roboflow खाता बनाएँ, अपनी कुंजी यहाँ खोजें [Roboflow API settings page](https://app.roboflow.com/settings/api) और इसे अपने shell में उपलब्ध कराएँ:
```bash
export ROBOFLOW_API_KEY="your-key-here"
```
{% endstep %}
{% step %}
### डिपेंडेंसियाँ इंस्टॉल करें
ये दो पैकेज मॉडल को कॉल करते हैं और उसके परिणामों को ड्रॉ करते हैं:
```bash
pip install -U inference-sdk supervision
```
{% endstep %}
{% step %}
### मॉडल चलाएँ
द [Inference SDK](https://docs.roboflow.com/reference/inference/inference-sdk) आपकी इमेज को क्लाउड में भेजता है और परिणाम लौटाता है। `sv.Detections.from_sam3` उन परिणामों को एक ऐसे रूप में बदलता है [`supervision`](https://supervision.roboflow.com) जिसे ड्रॉ किया जा सकता है:
```python
import os
import cv2
import supervision as sv
from inference_sdk import InferenceHTTPClient, InferenceConfiguration
image = sv.load_image_from_url("https://media.roboflow.com/quickstart/traffic.jpg")
h, w = image.shape[:2]
client = InferenceHTTPClient(
api_url="https://serverless.roboflow.com",
api_key=os.environ["ROBOFLOW_API_KEY"],
).configure(InferenceConfiguration(api_key_transport="header"))
data = client.sam3_concept_segment(
image,
prompts=[
{"type": "text", "text": "टैक्सी"},
{"type": "text", "text": "नीली बस"},
{"type": "text", "text": "झाड़ी"},
],
)
detections = sv.Detections.from_sam3(data, (w, h))
annotated = sv.MaskAnnotator().annotate(image.copy(), detections)
annotated = sv.BoxAnnotator().annotate(annotated, detections)
cv2.imwrite("sam3.jpg", annotated)
```
{% endstep %}
{% endstepper %}
{% endtab %}
{% endtabs %}
प्रतिक्रिया में प्रत्येक prompt के लिए मिली रूपरेखाएँ सूचीबद्ध होती हैं, और हर एक के लिए एक confidence score होता है। `sv.Detections.from_sam3` यह सब आपके लिए पढ़ता है।
टेक्स्ट prompts से रूपरेखित ऑब्जेक्ट्स
visual prompts, exemplar boxes, और RLE output सहित पूरे SAM3 API के लिए, देखें [SAM3 दस्तावेज़](https://docs.roboflow.com/models/supported-models/sam3).
## तैयार मॉडल से रोज़मर्रा के ऑब्जेक्ट्स का पता लगाएँ
{% tabs %}
{% tab title="HTTP (Python)" icon="webhook" %}
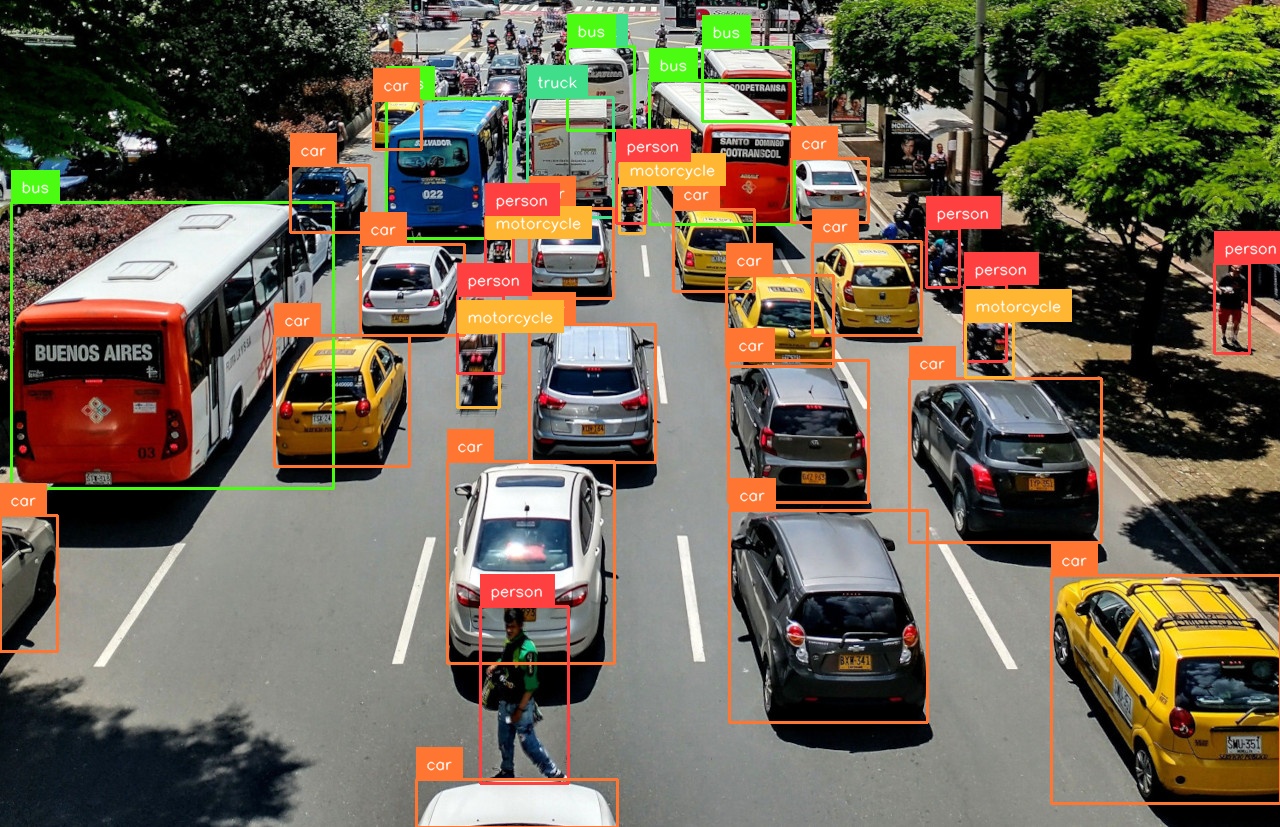
नामित ऑब्जेक्ट्स की रूपरेखा बनाने के बजाय सामान्य ऑब्जेक्ट्स के चारों ओर बॉक्स खींचने के लिए, कॉल करें `POST /{project}/{version}` एक model ID के बजाय `POST /sam3/concept_segment`। यह उदाहरण एक तैयार-प्रयोग [RF-DETR](https://docs.roboflow.com/models/supported-models/rf-detr) मॉडल का उपयोग करता है, जो वाहनों, लोगों और पालतू जानवरों जैसे सामान्य ऑब्जेक्ट्स का पता लगा सकता है। RF-DETR Apache 2.0 है, इसलिए यह व्यावसायिक उपयोग के लिए मुफ़्त है:
```python
result = requests.post(
"https://serverless.roboflow.com/coco/40", # coco/40 rfdetr-medium का उपनाम है
data=image_b64, # बॉडी में raw base64, JSON नहीं
headers={
"Authorization": f"Bearer {os.environ['ROBOFLOW_API_KEY']}",
"Content-Type": "application/x-www-form-urlencoded",
},
).json()
detections = sv.Detections.from_inference(result)
print(f"Found {len(detections)} objects")
annotated = sv.BoxAnnotator().annotate(image.copy(), detections)
annotated = sv.LabelAnnotator().annotate(annotated, detections)
cv2.imwrite("rf-detr.jpg", annotated)
```
{% endtab %}
{% tab title="SDK (Python)" icon="python" %}
नामित ऑब्जेक्ट्स की रूपरेखा बनाने के बजाय सामान्य ऑब्जेक्ट्स के चारों ओर बॉक्स खींचने के लिए, कॉल करें `client.infer()` एक model ID के बजाय `client.sam3_concept_segment()`। यह उदाहरण एक तैयार-प्रयोग [RF-DETR](https://docs.roboflow.com/models/supported-models/rf-detr) मॉडल का उपयोग करता है, जो वाहनों, लोगों और पालतू जानवरों जैसे सामान्य ऑब्जेक्ट्स का पता लगा सकता है। RF-DETR Apache 2.0 है, इसलिए यह व्यावसायिक उपयोग के लिए मुफ़्त है:
```python
result = client.infer(image, model_id="rfdetr-medium")
detections = sv.Detections.from_inference(result)
print(f"Found {len(detections)} objects")
annotated = sv.BoxAnnotator().annotate(image.copy(), detections)
annotated = sv.LabelAnnotator().annotate(annotated, detections)
cv2.imwrite("rf-detr.jpg", annotated)
```
{% endtab %}
{% endtabs %}
RF-DETR कारों, बसों, लोगों और मोटरसाइकिलों का पता लगाता है
## अपना या कोई और मॉडल चलाएँ
वही `client.infer()` या `POST /{project}/{version}` कॉल उसके `model_id`:
* Roboflow में आपके द्वारा प्रशिक्षित मॉडल। इसका model ID कॉपी करें (इस प्रारूप में `{project}/{version}`) अपने प्रोजेक्ट से [Roboflow ऐप में](https://app.roboflow.com)
* से एक सार्वजनिक मॉडल [Roboflow Universe](https://docs.roboflow.com/datasets/universe/universe/what-is-roboflow-universe)
* एक तैयार-प्रयोग [पूर्व-प्रशिक्षित मॉडल](https://docs.roboflow.com/models/pretrained-aliases) को उपनाम से, जैसे `rfdetr-nano`, `rfdetr-seg-medium`, या `yolo26l-640` (सिर्फ़ inference SDK के लिए)। RF-DETR Apache 2.0 है; YOLO26 AGPL-3.0 है, और जब आप इसे Roboflow पर deploy करते हैं तो इसमें commercial license शामिल होता है। देखें [मॉडल लाइसेंस](https://docs.roboflow.com/models/model-licenses)
## आगे कहाँ जाएँ
आप क्लाउड में एक मॉडल चला रहे हैं। यहाँ से आप यह कर सकते हैं:
* उन्हीं मॉडलों को अपने हार्डवेयर पर चलाएँ। देखें [मॉडल को स्थानीय रूप से चलाएँ](/get-started/hi/guides/run-a-model-locally.md)
* बड़े मॉडलों और स्थिर ट्रैफ़िक के लिए एक निजी, single-tenant endpoint प्राप्त करें [Dedicated Deployments](https://docs.roboflow.com/deployment/roboflow-cloud/dedicated-deployments)
* मॉडलों और लॉजिक को एक एप्लिकेशन में जोड़ें [वर्कफ़्लोज़](https://docs.roboflow.com/workflows)
* समझें कि प्रत्येक अनुरोध की लागत कितनी है [Serverless pricing page](https://docs.roboflow.com/deployment/roboflow-cloud/serverless-api/pricing)