> For the complete documentation index, see [llms.txt](https://docs.roboflow.com/llms.txt). Markdown versions of documentation pages are available by appending `.md` to page URLs; this page is available as [Markdown](https://docs.roboflow.com/guides/run-a-model-on-a-video.md).
# Run a Model on a Video
Build a Workflow that detects, tracks, and counts objects, then run it on a video in your browser.
A [Workflow](https://docs.roboflow.com/workflows) is a multi-step computer vision application you build in your browser by connecting blocks: a model, a tracker, visualizations, and logic. You build it once and run it on images, video files, or live RTSP streams.
On video, a Workflow runs as a pipeline built for real-time speed. [Roboflow Inference](https://docs.roboflow.com/deployment/self-hosted/self-hosted) decodes frames, runs the model, and draws the results in parallel so the GPU stays busy. On a live stream, it skips frames it cannot keep up with so it stays on the latest frame instead of falling behind.
This guide builds a Workflow that detects vehicles, tracks each one across frames, and counts them as they cross a line, then runs it on a sample video.
## Build and run the Workflow
{% stepper %}
{% step %}
### Open the Workflow editor
Create a [Roboflow account](https://app.roboflow.com) if you don't have one, then open [app.roboflow.com/workflows](https://app.roboflow.com/workflows) and click "Create Workflow" to open a blank Workflow in the editor.
{% endstep %}
{% step %}
### Add and connect the blocks
Add these blocks and connect them top to bottom, so each block's output feeds the next:
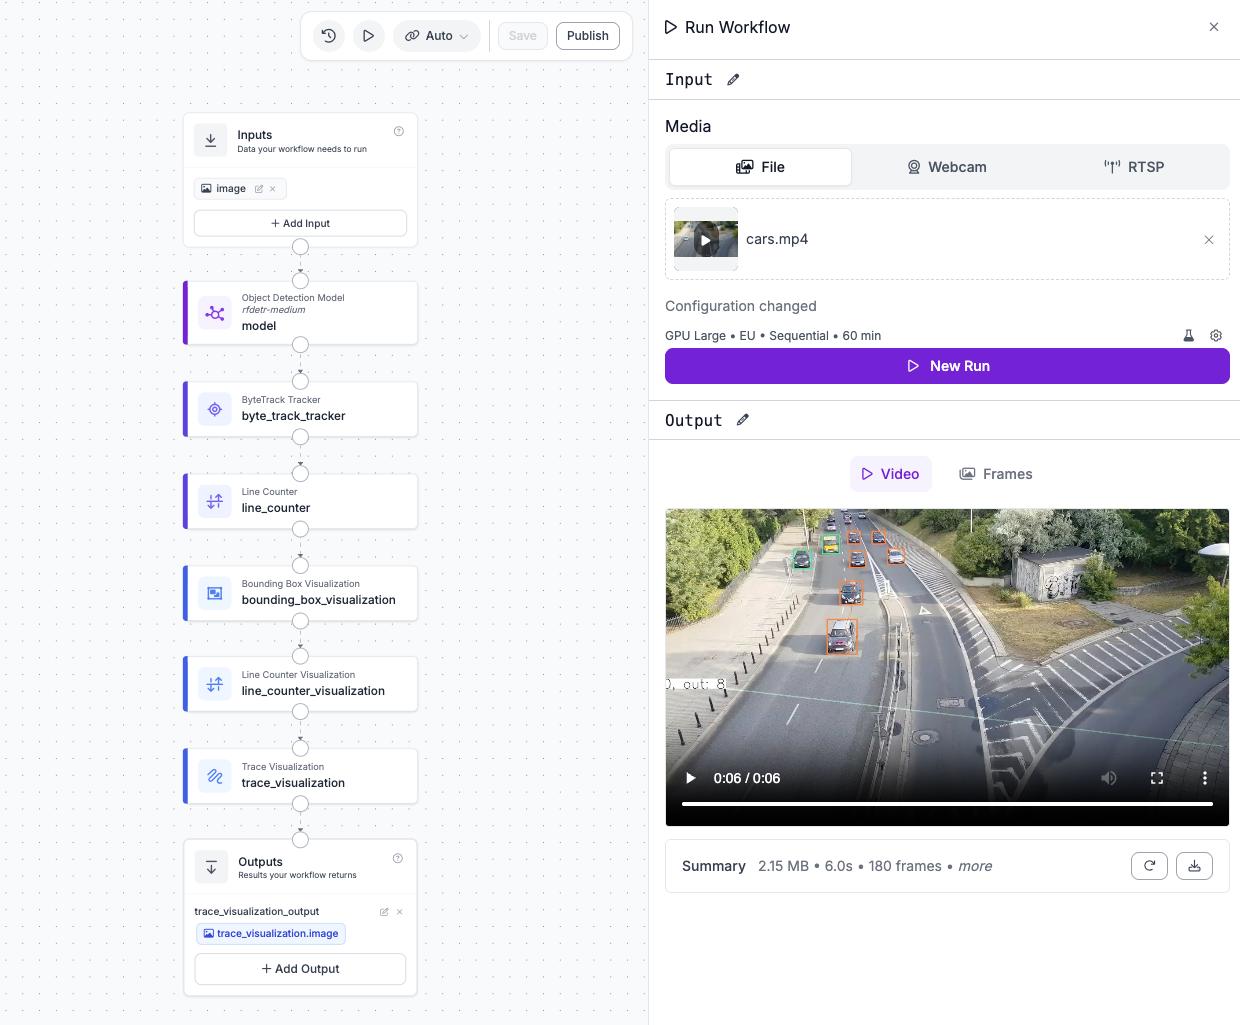
The detect, track, and count Workflow
* Object Detection Model: runs an [RF-DETR](https://docs.roboflow.com/models/supported-models/rf-detr) model on each frame and returns bounding boxes.
* ByteTrack Tracker: assigns a persistent ID to each detection so the same object is followed across frames.
* Line Counter: counts tracked objects as they cross a line you position on the frame.
* Bounding Box Visualization: draws the detection boxes.
* Line Counter Visualization: draws the counting line and the running tally.
* Trace Visualization: draws the path each tracked object has traveled.
To skip building it by hand, open the JSON editor with the `` icon at the top left of the editor and paste in [this Workflow definition](https://media.roboflow.com/quickstart/workflow.json).
For a deeper walkthrough of adding and configuring blocks, see [Build a Workflow](https://docs.roboflow.com/workflows/build/build-a-workflow).
{% endstep %}
{% step %}
### Upload a video and run
Click "Run" (`▶` icon) to open the run panel. Under "Media", select the "File" tab and upload [this sample video](https://media.roboflow.com/quickstart/cars.mp4), then click "Run".
The Workflow processes the video and returns the annotated video with boxes, traces, and a live count.
{% endstep %}
{% endstepper %}
{% embed url="" %}
## Run part of a video
A long video takes longer to run and uses more credits. To run only a section of an uploaded file, click the gear icon in the run panel and set "Start (ms)" and "End (ms)". Leave both empty to run the whole video, or leave "End (ms)" empty to run to the end of it. The window resets when you select another video, and a run that uses one skips the [block cache](https://docs.roboflow.com/workflows/build/test-a-workflow#reuse-block-results).
## Where the Workflow runs
By default, "Run" executes the Workflow on the [Serverless Cloud API](https://docs.roboflow.com/deployment/roboflow-cloud/serverless-api): auto-scaling GPUs in Roboflow's cloud, with no hardware to provision. You can also run the same Workflow on [your own hardware](/guides/run-a-model-locally.md), from a laptop to an NVIDIA Jetson.
* **Serverless**: No hardware to manage and it scales automatically. Each frame makes a network round trip to the cloud, which adds latency, so it suits getting started, images, and batch jobs more than low-latency live video.
* **Local**: Frames never leave the machine, so there is no network hop and per-frame latency is lower, which matters for live streams. In exchange you provision and maintain the hardware yourself.
To lower latency either way, run on a GPU, choose a smaller model (ex: `rfdetr-nano` or `rfdetr-small`), or reduce the input resolution. For a private, single-tenant cloud endpoint, see [Dedicated Deployments](https://docs.roboflow.com/deployment/roboflow-cloud/dedicated-deployments).
## Use a different model
The Object Detection Model block runs a ready-made RF-DETR by default, but you can change it. Click the block and set its model to:
* A model you trained in Roboflow. Copy its model ID (formatted as `{project}/{version}`) from your project in the [Roboflow app](https://app.roboflow.com).
* A public model from [Roboflow Universe](https://docs.roboflow.com/datasets/universe/universe/what-is-roboflow-universe).
* A different ready-made [pretrained model](https://docs.roboflow.com/models/pretrained-aliases) by alias, such as `rfdetr-nano`, `rfdetr-seg-medium`, or `yolo26l-640`. RF-DETR is Apache 2.0; YOLO26 is AGPL-3.0, with a commercial license included when you deploy on Roboflow. See [Model Licenses](https://docs.roboflow.com/models/model-licenses).
## Process many videos at once
To run a Workflow across a large set of videos or images offline, use [Batch Processing](https://docs.roboflow.com/deployment/roboflow-cloud/batch-processing). It is a managed service: select your data and your Workflow, and Roboflow processes the batch in the cloud with no code and no local compute.
## Where to go next
* Run the Workflow on your own hardware, including live webcam and RTSP streams. See [Run a Model Locally](/guides/run-a-model-locally.md).
* Add logic, filtering, zones, and notifications. See [Build a Workflow](https://docs.roboflow.com/workflows/build/build-a-workflow).
* Understand what each Workflow run costs on the [Serverless pricing page](https://docs.roboflow.com/deployment/roboflow-cloud/serverless-api/pricing#workflow-run).