# Roboflow Documentation
Find the resources you need to build and deploy your computer vision application.
Go from idea to deployed application with Roboflow's end-to-end platform. Get the right model and deploy it immediately in scalable cloud infrastructure or across a fleet of edge devices.
{% hint style="warning" icon="key" %}
Find your [API Key here](https://app.roboflow.com/settings/api).
{% endhint %}
# Model Training
Turn a short video into a custom-trained object detection model you can call from an API.
This guide takes you from a 30 second video to a trained object detection model you can call from an API. Roboflow pulls frames from the video, Auto Label draws the boxes, and trains the model on the dataset. In this example we'll create potato detection model, but you can swap in your own object.
{% stepper %}
{% step %}
### Create a project
Sign in at [app.roboflow.com](https://app.roboflow.com), or create an account if you do not have one. Open the "Projects" tab and create a [Project](https://docs.roboflow.com/datasets/create-and-upload/create-a-project). This guide uses the Object Detection project type and the Traditional annotation tool.
{% embed url="" %}
{% endstep %}
{% step %}
### Upload your data
[Upload your data](https://docs.roboflow.com/datasets/create-and-upload/adding-data) to the project. Roboflow takes images, videos, annotation files, and PDFs. This guide uploads a 30 second video and pulls 1.4 frames per second from it, which gives 42 images. If you have no data yet, you can [import a dataset from Roboflow Universe](https://docs.roboflow.com/datasets/create-and-upload/adding-data/roboflow-universe) instead.
{% embed url="" %}
{% endstep %}
{% step %}
### Label with Auto Label
Select [Auto Label](https://docs.roboflow.com/datasets/annotate/annotate/ai-labeling/auto-label) and type a class name or a short description of your object (here: `potato`). We'll set the confidence threshold a bit higher than the default. A high threshold means Auto Label only keeps boxes it is sure about. It may miss a few potatoes, but adding a missing box during review is quicker than fixing a wrong box.
{% embed url="" %}
{% endstep %}
{% step %}
### Review the annotations
Check Auto Label's work on each image. If the boxes look right, approve the image (`A`). If not, you can remove, fix, or add boxes manually or with [Smart Select](https://docs.roboflow.com/datasets/annotate/annotate/ai-labeling/smart-select), which draws a box for you when you click an object. We'll go through all 42 images so all are approved.
{% embed url="" %}
{% endstep %}
{% step %}
### Create a version and train
We add the approved images to your dataset and [split them into train, validation, and test sets](https://docs.roboflow.com/datasets/versions/dataset-versions/create-a-dataset-version). We'll use [RF-DETR](https://docs.roboflow.com/models/supported-models/rf-detr) (Medium), as it's fast and accurate detection model built by Roboflow. Then create a dataset version and start training.
While the model trains, you can watch [live training graphs](https://docs.roboflow.com/models/evaluate/training-results). This model finishes in about 45 minutes, and you get an email when it is done. Open the model to see its [evaluation metrics](https://docs.roboflow.com/models/evaluate/evaluate-trained-models) (mAP, precision, recall, and F1).
{% embed url="" %}
{% endstep %}
{% step %}
### Deploy the model
Now you can run the model. Use it in a [Workflow](https://docs.roboflow.com/workflows), or deploy it on its own. This guide uses the cloud-hosted [Serverless Cloud API](https://docs.roboflow.com/deployment/roboflow-cloud/serverless-api). On your model's deploy page, copy the Python script, install dependencies, point it at one of your own images, and run it. The script prints the model's predictions as JSON.
{% embed url="" %}
{% endstep %}
{% step %}
### Visualize the results
To see the bounding boxes, draw them on the image with [supervision](https://supervision.roboflow.com), Roboflow's open-source annotation library. Install it with `pip install supervision`, then load the JSON predictions and draw a box around each potato. Add these lines to the original Python script:
```python
detections = sv.Detections.from_inference(result)
image = cv2.imread(image_path)
image = sv.BoxAnnotator().annotate(image, detections)
cv2.imwrite("annotated.jpg", image)
```
Each box marks a potato the model found:
The trained model's predictions drawn on a frame with supervision.
{% endstep %}
{% endstepper %}
## Where to go next
* Build a [Workflow](https://docs.roboflow.com/workflows/build/create-a-workflow) around your model to chain it with logic, visualizations, and other steps.
* Run the model on your own hardware. See [Run a Model Locally](/guides/run-a-model-locally); you need the model\_id from your version page (in our case that's `erikrf/potatoes-daysm-1-rfdetr-medium-t1`).
* Run the model on video streams. See [Run a Model on a Video](/guides/run-a-model-on-a-video).
* Improve accuracy by labeling more images and retraining. See [Evaluate Trained Models](https://docs.roboflow.com/models/evaluate/evaluate-trained-models).
# Run a Model Locally
Run Roboflow models on your own hardware with a Docker inference server, in five minutes.
[Roboflow Inference](https://docs.roboflow.com/deployment/self-hosted/self-hosted) is the free, open-source engine behind Roboflow's hosted models. You can run the same models on your own computer: start the inference server in a Docker container, then send it images over HTTP or with the Python [Inference SDK](https://docs.roboflow.com/reference/inference/inference-sdk). Running it yourself keeps your images on your own machine and gives you full control over your setup.
## Run a model on your machine
{% tabs %}
{% tab title="HTTP (Python)" icon="webhook" %}
{% stepper %}
{% step %}
### Start the inference server
`inference server start` launches the [Inference Server](https://docs.roboflow.com/deployment/self-hosted/inference-server) in a Docker container and picks the right version for your hardware: CPU, NVIDIA GPU, or Jetson. [Docker](https://docs.docker.com/get-docker/) must be installed and running.
```bash
pip install inference-cli && inference server start
```
The server listens on `http://localhost:9001`. For device-specific setup and troubleshooting, see the [Inference install guide](https://docs.roboflow.com/deployment/self-hosted/inference-server/install).
{% endstep %}
{% step %}
### Install the dependencies
`supervision` draws the results and brings in `cv2` and `numpy`:
```bash
pip install -U supervision
```
{% endstep %}
{% step %}
### Run the model
Send the image to your local server and run a ready-made [RF-DETR](https://docs.roboflow.com/models/supported-models/rf-detr) model. Ready-made models like this one don't need an API key:
```python
import base64
import cv2
import requests
import supervision as sv
image = sv.load_image_from_url("https://media.roboflow.com/quickstart/cars.jpg")
image_b64 = base64.b64encode(content).decode("utf-8")
result = requests.post(
"http://localhost:9001/coco/38", # coco/38 == rfdetr-nano
data=image_b64, # raw base64 in the body
headers={"Content-Type": "application/x-www-form-urlencoded"},
).json()
detections = sv.Detections.from_inference(result)
print(f"Found {len(detections)} objects")
annotated = sv.BoxAnnotator().annotate(image.copy(), detections)
annotated = sv.LabelAnnotator().annotate(annotated, detections)
cv2.imwrite("output.jpg", annotated)
```
{% endstep %}
{% endstepper %}
{% endtab %}
{% tab title="SDK (Python)" icon="python" %}
{% stepper %}
{% step %}
### Start the inference server
`inference server start` launches the [Inference Server](https://docs.roboflow.com/deployment/self-hosted/inference-server) in a Docker container and picks the right version for your hardware: CPU, NVIDIA GPU, or Jetson. [Docker](https://docs.docker.com/get-docker/) must be installed and running.
```bash
pip install inference-cli && inference server start
```
The server listens on `http://localhost:9001`. For device-specific setup and troubleshooting, see the [Inference install guide](https://docs.roboflow.com/deployment/self-hosted/inference-server/install).
{% endstep %}
{% step %}
### Install the SDK
`supervision` draws the results and brings in `cv2` and `numpy`:
```bash
pip install -U inference-sdk supervision
```
{% endstep %}
{% step %}
### Run the model
Point the client at your local server and run a ready-made [RF-DETR](https://docs.roboflow.com/models/supported-models/rf-detr) model. Ready-made models like this one don't need an API key:
```python
import cv2
import supervision as sv
from inference_sdk import InferenceHTTPClient
image = sv.load_image_from_url("https://media.roboflow.com/quickstart/cars.jpg")
client = InferenceHTTPClient(api_url="http://localhost:9001")
result = client.infer(image, model_id="rfdetr-nano")
detections = sv.Detections.from_inference(result)
print(f"Found {len(detections)} objects")
annotated = sv.BoxAnnotator().annotate(image.copy(), detections)
annotated = sv.LabelAnnotator().annotate(annotated, detections)
cv2.imwrite("output.jpg", annotated)
```
{% endstep %}
{% endstepper %}
{% endtab %}
{% endtabs %}
The first request downloads the model, so it can take a few seconds. Later requests are fast.
RF-DETR detections from the local inference server
## Process a video
To run a model on a video, open a WebRTC session with the server and receive processed frames plus predictions as the video plays. If your computer cannot keep up, the server skips frames to stay in real time. The same SDK can stream one model or a [Workflow](https://docs.roboflow.com/workflows).
{% hint style="info" %}
You can also run a model on a video over HTTP by sending one frame at a time, the same way as the image example above (no streaming add-on needed). This is slower: each frame has to be sent, processed, and drawn before the next one starts, so there's a lot of waiting in between. The SDK streams the whole video and works on several frames at once, so it keeps up much better.
{% endhint %}
{% stepper %}
{% step %}
### Install the SDK
Streaming video needs the `webrtc` add-on:
```bash
pip install "inference-sdk[webrtc]"
```
{% endstep %}
{% step %}
### Run the model on a video
```python
import cv2
from inference_sdk import InferenceHTTPClient
from inference_sdk.webrtc import VideoFileSource
import supervision as sv
client = InferenceHTTPClient.init(api_url="http://localhost:9001")
# Download+cache video
source = VideoFileSource("https://media.roboflow.com/quickstart/cars.mp4")
# Uses webrtc for optimized video streaming
session = client.webrtc.stream(
source=source,
model_id="rfdetr-nano"
)
# on_frame runs on the main thread, so cv2.imshow is safe
@session.on_frame
def show(frame, data):
det = sv.Detections.from_inference(data)
img = sv.BoxAnnotator().annotate(frame, det)
img = sv.LabelAnnotator().annotate(img, det)
cv2.imshow("RF-DETR", img)
if cv2.waitKey(1) == ord("q"):
session.close()
session.run()
cv2.destroyAllWindows()
```
{% endstep %}
{% endstepper %}
{% embed url="" %}
Build richer pipelines (tracking, filtering, zones, notifications) visually in the [Workflows editor](https://docs.roboflow.com/workflows/build/create-a-workflow), then run them through the same WebRTC client. See [Video processing with Workflows](https://docs.roboflow.com/workflows/deploy/video-processing).
## Other options
* Prefer a managed endpoint without running hardware? Use a [Dedicated Deployment](https://docs.roboflow.com/deployment/roboflow-cloud/dedicated-deployments) or the [Serverless Cloud API](https://docs.roboflow.com/deployment/roboflow-cloud/serverless-api).
* Need on-premises, air-gapped, or Kubernetes deployment? See [Enterprise Deployment](https://docs.roboflow.com/deployment/self-hosted/enterprise).
* Compare every option in [Deploy a Model or Workflow](https://docs.roboflow.com/deployment).
# Run a Model on a Video
Build a Workflow that detects, tracks, and counts objects, then run it on a video in your browser.
A [Workflow](https://docs.roboflow.com/workflows) is a multi-step computer vision application you build in your browser by connecting blocks: a model, a tracker, visualizations, and logic. You build it once and run it on images, video files, or live RTSP streams.
On video, a Workflow runs as a pipeline built for real-time speed. [Roboflow Inference](https://docs.roboflow.com/deployment/self-hosted/self-hosted) decodes frames, runs the model, and draws the results in parallel so the GPU stays busy. On a live stream, it skips frames it cannot keep up with so it stays on the latest frame instead of falling behind.
This guide builds a Workflow that detects vehicles, tracks each one across frames, and counts them as they cross a line, then runs it on a sample video.
## Build and run the Workflow
{% stepper %}
{% step %}
### Open the Workflow editor
Create a [Roboflow account](https://app.roboflow.com) if you don't have one, then open [app.roboflow.com/workflows](https://app.roboflow.com/workflows) and click "Create Workflow" to open a blank Workflow in the editor.
{% endstep %}
{% step %}
### Add and connect the blocks
Add these blocks and connect them top to bottom, so each block's output feeds the next:
The detect, track, and count Workflow
* Object Detection Model: runs an [RF-DETR](https://docs.roboflow.com/models/supported-models/rf-detr) model on each frame and returns bounding boxes.
* ByteTrack Tracker: assigns a persistent ID to each detection so the same object is followed across frames.
* Line Counter: counts tracked objects as they cross a line you position on the frame.
* Bounding Box Visualization: draws the detection boxes.
* Line Counter Visualization: draws the counting line and the running tally.
* Trace Visualization: draws the path each tracked object has traveled.
To skip building it by hand, open the JSON editor with the `` icon at the top left of the editor and paste in [this Workflow definition](https://media.roboflow.com/quickstart/workflow.json).
For a deeper walkthrough of adding and configuring blocks, see [Build a Workflow](https://docs.roboflow.com/workflows/build/build-a-workflow).
{% endstep %}
{% step %}
### Upload a video and run
Click "Run" (`▶` icon) to open the run panel. Under "Media", select the "File" tab and upload [this sample video](https://media.roboflow.com/quickstart/cars.mp4), then click "Run".
The Workflow processes the video and returns the annotated video with boxes, traces, and a live count.
{% endstep %}
{% endstepper %}
{% embed url="" %}
## Where the Workflow runs
By default, "Run" executes the Workflow on the [Serverless Cloud API](https://docs.roboflow.com/deployment/roboflow-cloud/serverless-api): auto-scaling GPUs in Roboflow's cloud, with no hardware to provision. You can also run the same Workflow on [your own hardware](/guides/run-a-model-locally), from a laptop to an NVIDIA Jetson.
* **Serverless**: No hardware to manage and it scales automatically. Each frame makes a network round trip to the cloud, which adds latency, so it suits getting started, images, and batch jobs more than low-latency live video.
* **Local**: Frames never leave the machine, so there is no network hop and per-frame latency is lower, which matters for live streams. In exchange you provision and maintain the hardware yourself.
To lower latency either way, run on a GPU, choose a smaller model (ex: `rfdetr-nano` or `rfdetr-small`), or reduce the input resolution. For a private, single-tenant cloud endpoint, see [Dedicated Deployments](https://docs.roboflow.com/deployment/roboflow-cloud/dedicated-deployments).
## Use a different model
The Object Detection Model block runs a ready-made RF-DETR by default, but you can change it. Click the block and set its model to:
* A model you trained in Roboflow. Copy its model ID (formatted as `{project}/{version}`) from your project in the [Roboflow app](https://app.roboflow.com).
* A public model from [Roboflow Universe](https://docs.roboflow.com/datasets/universe/universe/what-is-roboflow-universe).
* A different ready-made [pretrained model](https://docs.roboflow.com/models/pretrained-aliases) by alias, such as `rfdetr-nano`, `rfdetr-seg-medium`, or `yolo26l-640`.
## Process many videos at once
To run a Workflow across a large set of videos or images offline, use [Batch Processing](https://docs.roboflow.com/deployment/roboflow-cloud/batch-processing). It is a managed service: select your data and your Workflow, and Roboflow processes the batch in the cloud with no code and no local compute.
## Where to go next
* Run the Workflow on your own hardware, including live webcam and RTSP streams. See [Run a Model Locally](/guides/run-a-model-locally).
* Add logic, filtering, zones, and notifications. See [Build a Workflow](https://docs.roboflow.com/workflows/build/build-a-workflow).
* Understand what each Workflow run costs on the [Serverless pricing page](https://docs.roboflow.com/deployment/roboflow-cloud/serverless-api/pricing#workflow-run).
# Use a Model API Endpoint
Run a model on Roboflow's cloud GPUs in five minutes, with no hardware to set up.
The [Serverless Cloud API](https://docs.roboflow.com/deployment/roboflow-cloud/serverless-api) runs models and Workflows on GPUs in Roboflow's cloud. You send an image and get results back. There is no hardware to set up and no server to keep running.
This guide takes you from zero to running a model in five minutes. You will find objects in an image just by naming them, detect everyday objects with a ready-made model, and run your own models, all against the same Serverless Cloud API endpoint.
## Find objects by naming them
Give the model a few words like `"taxi"`, `"blue bus"`, or `"bush"` and it outlines every matching object in the image. There is nothing to set up or train first. This runs [SAM3](https://docs.roboflow.com/models/supported-models/sam3).
{% tabs %}
{% tab title="HTTP (Python)" icon="webhook" %}
{% stepper %}
{% step %}
### Get your API Key
Create a Roboflow account, find your key on the [Roboflow API settings page](https://app.roboflow.com/settings/api) and make it available to your shell:
```bash
export ROBOFLOW_API_KEY="your-key-here"
```
{% endstep %}
{% step %}
### Install the dependencies
`supervision` brings in `cv2` and `numpy`:
```bash
pip install -U supervision
```
{% endstep %}
{% step %}
### Run the model
Send a POST request to `/sam3/concept_segment` to run the model. `sv.Detections.from_sam3` turns those results into a form [`supervision`](https://supervision.roboflow.com) can draw:
```python
import os
import base64
import cv2
import requests
import supervision as sv
image = sv.load_image_from_url("https://media.roboflow.com/quickstart/traffic.jpg")
image_b64 = base64.b64encode(content).decode("utf-8")
h, w = image.shape[:2]
response = requests.post(
"https://serverless.roboflow.com/sam3/concept_segment",
headers={"Authorization": f"Bearer {os.environ['ROBOFLOW_API_KEY']}"},
json={
"image": {"type": "base64", "value": image_b64},
"prompts": [
{"type": "text", "text": "taxi"},
{"type": "text", "text": "blue bus"},
{"type": "text", "text": "bush"},
],
},
)
detections = sv.Detections.from_sam3(response.json(), (w, h))
annotated = sv.MaskAnnotator().annotate(image.copy(), detections)
cv2.imwrite("sam3.jpg", annotated)
```
{% endstep %}
{% endstepper %}
{% endtab %}
{% tab title="SDK (Python)" icon="python" %}
{% stepper %}
{% step %}
### Get your API Key
Create a Roboflow account, find your key on the [Roboflow API settings page](https://app.roboflow.com/settings/api) and make it available to your shell:
```bash
export ROBOFLOW_API_KEY="your-key-here"
```
{% endstep %}
{% step %}
### Install the dependencies
These two packages call the model and draw its results:
```bash
pip install -U inference-sdk supervision
```
{% endstep %}
{% step %}
### Run the model
The [Inference SDK](https://docs.roboflow.com/reference/inference/inference-sdk) sends your image to the cloud and returns the results. `sv.Detections.from_sam3` turns those results into a form [`supervision`](https://supervision.roboflow.com) can draw:
```python
import os
import cv2
import supervision as sv
from inference_sdk import InferenceHTTPClient, InferenceConfiguration
image = sv.load_image_from_url("https://media.roboflow.com/quickstart/traffic.jpg")
h, w = image.shape[:2]
client = InferenceHTTPClient(
api_url="https://serverless.roboflow.com",
api_key=os.environ["ROBOFLOW_API_KEY"],
).configure(InferenceConfiguration(api_key_transport="header"))
data = client.sam3_concept_segment(
image,
prompts=[
{"type": "text", "text": "taxi"},
{"type": "text", "text": "blue bus"},
{"type": "text", "text": "bush"},
],
)
detections = sv.Detections.from_sam3(data, (w, h))
annotated = sv.MaskAnnotator().annotate(image.copy(), detections)
annotated = sv.BoxAnnotator().annotate(annotated, detections)
cv2.imwrite("sam3.jpg", annotated)
```
{% endstep %}
{% endstepper %}
{% endtab %}
{% endtabs %}
The response lists the outlines found for each prompt, with a confidence score for each one. `sv.Detections.from_sam3` reads all of that for you.
Objects outlined from the text prompts
For the full SAM3 API, including visual prompts, exemplar boxes, and RLE output, see the [SAM3 documentation](https://docs.roboflow.com/models/supported-models/sam3).
## Detect everyday objects with a ready-made model
{% tabs %}
{% tab title="HTTP (Python)" icon="webhook" %}
To draw boxes around common objects instead of outlining named ones, call `POST /{project}/{version}` with a model ID instead of `POST /sam3/concept_segment`. This example uses a ready-made [RF-DETR](https://docs.roboflow.com/models/supported-models/rf-detr) model, which can detect common objects like vehicles, people, and pets:
```python
result = requests.post(
"https://serverless.roboflow.com/coco/40", # coco/40 is the rfdetr-medium alias
data=image_b64, # raw base64 in the body, not JSON
headers={
"Authorization": f"Bearer {os.environ['ROBOFLOW_API_KEY']}",
"Content-Type": "application/x-www-form-urlencoded",
},
).json()
detections = sv.Detections.from_inference(result)
print(f"Found {len(detections)} objects")
annotated = sv.BoxAnnotator().annotate(image.copy(), detections)
annotated = sv.LabelAnnotator().annotate(annotated, detections)
cv2.imwrite("rf-detr.jpg", annotated)
```
{% endtab %}
{% tab title="SDK (Python)" icon="python" %}
To draw boxes around common objects instead of outlining named ones, call `client.infer()` with a model ID instead of `client.sam3_concept_segment()`. This example uses a ready-made [RF-DETR](https://docs.roboflow.com/models/supported-models/rf-detr) model, which can detect common objects like vehicles, people, and pets:
```python
result = client.infer(image, model_id="rfdetr-medium")
detections = sv.Detections.from_inference(result)
print(f"Found {len(detections)} objects")
annotated = sv.BoxAnnotator().annotate(image.copy(), detections)
annotated = sv.LabelAnnotator().annotate(annotated, detections)
cv2.imwrite("rf-detr.jpg", annotated)
```
{% endtab %}
{% endtabs %}
RF-DETR detects the cars, buses, people, and motorcycles
## Run your own or another model
The same `client.infer()` or `POST /{project}/{version}` call runs any model by its `model_id`:
* A model you trained in Roboflow. Copy its model ID (formatted as `{project}/{version}`) from your project in the [Roboflow app](https://app.roboflow.com)
* A public model from [Roboflow Universe](https://docs.roboflow.com/datasets/universe/universe/what-is-roboflow-universe)
* A ready-made [pretrained model](https://docs.roboflow.com/models/pretrained-aliases) by alias, such as `rfdetr-nano`, `rfdetr-seg-medium`, or `yolo26l-640` (only for inference SDK)
## Where to go next
You are running a model in the cloud. From here you can:
* Run the same models on your own hardware. See [Run a Model Locally](/guides/run-a-model-locally)
* Get a private, single-tenant endpoint for large models and steady traffic with [Dedicated Deployments](https://docs.roboflow.com/deployment/roboflow-cloud/dedicated-deployments)
* Chain models and logic into an application with [Workflows](https://docs.roboflow.com/workflows)
* Understand what each request costs on the [Serverless pricing page](https://docs.roboflow.com/deployment/roboflow-cloud/serverless-api/pricing)
# Agents
Overview of Roboflow's AI agent options: the MCP Server, Agent Skills, and the in-app Roboflow Agent.
Roboflow supports AI Agents with:
* [MCP Server](/agents/mcp-server) for connecting your agents to Roboflow,
* [Agent Skills](https://github.com/roboflow/computer-vision-skills) for giving skills (knowledge) to your agents,
* [Roboflow Agent](/agents/roboflow-agent), an in-app agent that connects to your [Workspace](/platform/workspaces/key-concepts) and can build, run, and debug [Workflows](https://docs.roboflow.com/workflows) and [Rapid](https://docs.roboflow.com/models/rapid/rapid) models.
## Claude
Add the [Roboflow connector](https://claude.ai/directory/connectors/dbbc26cf-80b0-4a85-9877-f85874282794) to connect Claude to the [MCP Server](/agents/mcp-server), giving it tools to manage datasets, train models, run inference, and build Workflows. Install [Agent Skills](https://github.com/roboflow/computer-vision-skills) separately with `npx @roboflow/skills install`.
## Cursor
Add [Roboflow from the Cursor marketplace](https://cursor.com/marketplace/roboflow) to install the [MCP Server](/agents/mcp-server) and all seven [Agent Skills](https://github.com/roboflow/computer-vision-skills) in one step.
# MCP Server
Connect Claude, Cursor, Codex, or any MCP client to the Roboflow MCP server, and the tools it exposes.
Work on your Roboflow projects together with AI. Connect Claude Code (or any MCP-compatible agent) to your workspace. It can create projects, upload data, train models, build Workflows, and guide you through the visual steps in the Roboflow UI. You handle what you're best at (seeing, labeling, judging results), your agent handles the rest.
## Demo
{% embed url="" %}
## Adding MCP
The Roboflow MCP server uses OAuth for authentication - no API key needed. You'll be prompted to sign in to Roboflow on first use.
### Claude Connector (Recommended)
Add Roboflow as a connector in your Claude account. Once connected, it works everywhere - Claude.ai, Claude Desktop, and Claude Code.
[**Add Roboflow to Claude**](https://claude.ai/directory/connectors/dbbc26cf-80b0-4a85-9877-f85874282794) - click the link, confirm, and you're done. You'll be prompted to sign in to Roboflow with OAuth on first use.
### Claude Code CLI
```bash
claude mcp add -s user roboflow \
--transport http https://mcp.roboflow.com/mcp
```
### Cursor
Install the Roboflow plugin from the [Cursor marketplace](https://cursor.com/marketplace/roboflow), or run `/add-plugin roboflow` in Cursor. Either installs the MCP server along with Roboflow's skills. Sign in to Roboflow with OAuth on first use.
To configure the server manually instead, add this to Cursor's MCP config (`~/.cursor/mcp.json`):
```json
{
"mcpServers": {
"roboflow": {
"type": "http",
"url": "https://mcp.roboflow.com/mcp"
}
}
}
```
### Codex
Add this to `~/.codex/config.toml`:
```toml
[mcp_servers.roboflow]
url = "https://mcp.roboflow.com/mcp"
```
### Connecting MCP Gateways (Pre-Registered Credentials)
Most MCP clients (Cursor, Claude Desktop, VS Code, Claude Code) register automatically using Dynamic Client Registration. Some platforms require a pre-registered `client_id` and `client_secret` instead - for example, Azure AI Foundry agents, Microsoft Copilot Studio, and TrueFoundry AI Gateway.
To connect one of these platforms:
1. Go to **Workspace Settings > Developer** in the Roboflow dashboard
2. Click "Create OAuth App" and fill in a name, redirect URI (matching your gateway's callback URL), and allowed scopes
3. Set "Token endpoint authentication" to match your gateway: `client_secret_basic` (HTTP Basic header, used by Azure and TrueFoundry) or `client_secret_post` (secret in the form body)
4. Copy the Client ID and Client Secret (shown once)
5. In your gateway's connector form, enter:
| Field | Value |
| ----------------------------- | ----------------------------------------------------------------------------------- |
| MCP Server URL | `https://mcp.roboflow.com/mcp` |
| Authorization URL | `https://app.roboflow.com/oauth/authorize` |
| Token URL | `https://app.roboflow.com/oauth/token` |
| Discovery (OAuth AS metadata) | `https://app.roboflow.com/.well-known/oauth-authorization-server` |
| Scopes | Space-separated list (ex: `workspace:read project:read model:infer offline_access`) |
Include `offline_access` in your scope list if the gateway supports refresh tokens.
For the full scope catalog, see [Available Scopes](https://docs.roboflow.com/reference/authentication/authentication/sign-in-with-roboflow-getting-started#available-scopes).
## Tools
The server exposes 141 tools. Most MCP clients namespace them, so `projects_list` appears as `mcp__roboflow__projects_list`. Each tool declares the OAuth scopes it needs, and your client only gets the scopes you approve at sign-in.
### Agent
Hand a task to the Roboflow agent and collect what it produced.
Tool
Description
agent_chat
Chat with the Roboflow AI agent for Q&A, Workflow building, and solution planning.
agent_chat_result
Collect the result of an agent_chat run that was still working.
agent_conversations_list
List agent conversations in the workspace.
agent_conversation_get
Get one conversation with its message history.
agent_workflow_publish
Publish the latest agent-edited draft of a Workflow.
### Projects
Create and inspect projects in your workspace.
Tool
Description
projects_list
List projects in the workspace.
projects_get
Get project detail including versions, classes, splits, and trained models.
projects_create
Create a new computer vision project.
projects_delete
Delete a project, moving it to the workspace Trash.
projects_fork
Enqueue an async fork of a public Universe project into your workspace.
projects_health
Get the dataset health check for a project.
datasets_rebalance_splits
Enqueue an async rebalance of a project's train, valid, and test splits.
### Images
Upload images and find them again later.
Tool
Description
image_upload
Upload local image files to a project via a zip.
image_upload_status
Check the status of an image zip upload task.
images_search
Search for images inside a project.
images_workspace_search
Search images across the entire workspace using RoboQL.
images_update_metadata
Update metadata and tags on a single image.
images_batch_update_metadata
Batch-update metadata and tags on multiple images.
### Annotation
Save labels and run automatic labeling.
Tool
Description
annotations_save
Save an annotation for an existing image.
autolabel_start
Start a hosted auto label job over a batch of images.
autolabel_job_get
Get per-subjob status and progress for an auto label job.
### Batches
Group uploaded images before they enter labeling.
Tool
Description
annotation_batches_list
List upload batches in a project.
annotation_batches_get
Get details about one upload batch.
annotation_batches_create
Move selected images from one batch into a new batch.
annotation_batches_merge
Move all images from source batches into a target batch.
annotation_batches_delete
Delete a batch and move its images to unassigned.
annotation_batches_admin_list
List annotation board batches with cursor pagination.
annotation_batches_admin_get
Get details about one annotation board batch.
annotation_batches_admin_images_list
List image IDs in a batch with cursor pagination.
### Annotation Jobs
Assign labeling work, run review, and accept results into the Dataset.
Tool
Description
annotation_jobs_list
List annotation jobs in a project.
annotation_jobs_get
Get details about one annotation job.
annotation_jobs_create
Create a job and move images from a batch into it.
annotation_jobs_update
Update a job's labeler, reviewer, or instructions.
annotation_jobs_images_list
List image IDs assigned to a job.
annotation_jobs_images_add
Move images into an existing job.
annotation_jobs_images_reassign
Create a job from selected images and clear their prior assignment.
annotation_jobs_submit_for_review
Advance a labeling job into review.
annotation_jobs_return_for_edits
Move a review job back to labeling, optionally with a new labeler.
annotation_jobs_review_image
Set the review status for one image in a job.
annotation_jobs_review_images
Set a status for every job image matching a current status.
annotation_jobs_accept_into_dataset
Finalize job images into the Dataset and assign splits.
annotation_jobs_move_to_unassigned
Remove a job and move its images to an unassigned batch.
annotation_jobs_delete_annotations
Delete the annotation data for every image assigned to a job.
### Versions
Freeze a dataset version and export it.
Tool
Description
versions_generate
Create a version with optional preprocessing and augmentation.
versions_get
Get version info including splits and its trainings.
versions_export
Check or trigger a dataset export for a version.
versions_delete
Delete a version, moving it to the workspace Trash.
### Models and Training
Train models, watch progress, and run inference.
Tool
Description
trainings_describe_recipe
Describe the tuning options for a model type and return a ready-to-submit recipe.
trainings_create
Start a training run on a dataset version.
trainings_list
List the training runs on a dataset version.
trainings_get
Get a training's status, produced models, and metrics.
trainings_stop
Request an early stop on an in-flight training run.
trainings_cancel
Cancel an in-flight training run.
trainings_delete
Delete a training run, moving it to the workspace Trash.
models_list
List trained models in a project.
models_get
Get details for a trained model.
models_infer
Run hosted inference on an image using a trained model.
models_upload_custom_weights
Get the recipe for uploading locally trained weights to Roboflow.
models_star_nas
Star or unstar a model found by neural architecture search.
### Model Evaluations
Read mAP, confusion matrices, and per-class results.
Tool
Description
model_evals_list
List model evaluations in the workspace.
model_evals_get
Get the top-level summary for one evaluation.
model_evals_get_map_results
Get per-split mAP results.
model_evals_get_confidence_sweep
Get the precision, recall, and F1 confidence sweep.
model_evals_get_performance_by_class
Get per-class performance metrics for one split.
model_evals_get_confusion_matrix
Get the confusion matrix.
model_evals_get_image_predictions
Get per-image prediction stats, paginated.
model_evals_get_vector_analysis
Get clustering of image embeddings for the evaluation.
model_evals_get_recommendations
Get generated recommendations for the evaluation, if available.
### Workflows
Build, validate, and run inference pipelines.
Tool
Description
workflows_list
List saved Workflows in the workspace.
workflows_get
Get details for a saved Workflow.
workflows_create
Create and save a new Workflow.
workflows_update
Update a saved Workflow's name and definition.
workflows_delete
Delete a saved Workflow, moving it to the workspace Trash.
workflows_run
Execute a saved Workflow on one or more images.
workflow_specs_validate
Validate a Workflow JSON definition without running it.
workflow_specs_run
Execute a Workflow from an inline JSON definition.
workflow_blocks_list
List all available Workflow blocks with a short summary of each.
workflow_blocks_get_schema
Get the full schema of one Workflow block.
### Project Deployment
Manage a project's stable live endpoint and Active Learning.
Tool
Description
project_deployment_get
Get the live endpoint state for a project.
project_deployment_launch
Create or prepare a Project Deployment.
project_deployment_set_model
Change the default model behind a deployment without changing its endpoint.
project_deployment_run
Run inference through the project's live endpoint.
project_deployment_enable_active_learning
Enable Active Learning for a deployment.
project_deployment_disable_active_learning
Pause Active Learning collection.
project_deployment_configure_active_learning
Configure how a deployment collects Active Learning data.
project_deployment_list_review_queues
List review queues fed by production inference.
### Vision Events
Query production events and manage use cases.
Tool
Description
vision_events_query
Query production vision events with filters and pagination.
vision_events_use_cases_list
List the vision event use cases in the workspace.
vision_events_custom_metadata_schema_get
Get the custom metadata schema discovered for a use case.
vision_events_use_case_create
Create a new use case.
vision_events_use_case_rename
Rename an existing use case.
vision_events_use_case_archive
Archive a use case.
vision_events_use_case_unarchive
Restore a previously archived use case.
### Devices and Streams
Monitor and configure edge devices managed by Deployment Manager.
Tool
Description
devices_list
List devices registered in the workspace.
devices_get
Get a single device by id.
devices_create
Provision a new device.
devices_get_snapshot
Get the full current state of a device in one call.
devices_get_config
Get the device's current runtime configuration.
devices_update_config
Update the device's runtime configuration.
devices_get_default_config
Get the workspace's default device configuration.
devices_get_config_history
List prior configuration revisions, newest first.
devices_streams_list
List streams configured on the device.
devices_streams_get
Get a single stream by id.
devices_get_logs
Fetch device logs.
devices_get_telemetry
Get aggregated hardware metrics and device health.
devices_get_deployments
Get the device's deployment history with per-deployment activity.
devices_get_events
List device and stream lifecycle events.
devices_get_exception_occurrences
List raw occurrences of one exception fingerprint, newest first.
### Cloud Storage
Mirror an S3 or GCS bucket into a project.
Tool
Description
connect_cloud_storage
Set up a bucket mirror end to end, from credential to first run.
credentials_list
List cloud storage credentials in the workspace.
credentials_create
Create a cloud storage credential.
credentials_delete
Delete a credential.
datasources_list
List bucket mirror configurations in the workspace.
datasource_get
Get full detail for a single datasource.
datasource_create
Create a datasource that mirrors a bucket path into a project.
datasource_update
Update a datasource. Only the fields you pass change.
datasource_delete
Delete a datasource. Already mirrored images stay in the project.
datasource_validate
Check that Roboflow can reach the datasource's bucket.
datasource_trigger
Start a mirror run.
datasource_job_get
Get the status and statistics of one mirror run.
### Universe
Search public datasets and models on Roboflow Universe.
Tool
Description
universe_search
Search Roboflow Universe for datasets or models.
universe_dataset_images_search
Search images inside a public Universe dataset given its URL.
### Media
Look at an image or video before deciding what to build.
Tool
Description
media_upload
Prepare a local image or video for analysis.
media_upload_finalize
Validate a staged upload and publish it.
media_analyze
Analyze an image or short video with a vision model to understand its contents.
media_trim
Cut a clip from an Asset Library video and get an analyzable public URL.
### API Keys
Create and retire keys for your workspace.
Tool
Description
api_keys_list
List all API keys for the workspace.
api_keys_get
Get metadata for a single key.
api_keys_get_publishable
Get the workspace's publishable key.
api_keys_create
Create a new API key.
api_keys_update
Update a key's name, scopes, or metadata.
api_keys_protect
Mark a key as protected so it cannot be revoked or disabled.
api_keys_disable
Disable or re-enable a key without revoking it.
api_keys_revoke
Permanently revoke a key.
### Trash
Restore something that was deleted.
Tool
Description
trash_list
List soft-deleted items currently in the workspace Trash.
trash_restore_project
Restore a deleted project.
trash_restore_version
Restore a deleted dataset version.
trash_restore_workflow
Restore a deleted Workflow.
trash_restore_training
Restore a deleted training run.
### Other
Poll long-running work and send feedback.
Tool
Description
async_tasks_get
Poll an async task by id, such as a project fork or a split rebalance.
meta_feedback_send
Report a bug, missing feature, or documentation issue to the Roboflow team.
# Roboflow Agent
The in-app Roboflow Agent that builds, runs, and debugs Workflows and Rapid models, plus its HTTP chat API.
## About
Roboflow Agent has access to your [Workspace](/platform/workspaces/key-concepts) and can create, edit, run, and debug [Workflows](https://docs.roboflow.com/workflows). You can also use it to set up [Rapid](https://docs.roboflow.com/models/rapid/rapid) models. Access the Agent by clicking "Agent" in the left sidebar of your workspace.
### Capabilities
The Agent can work with:
* [Workflows](https://docs.roboflow.com/workflows): build from a plain description, run on images, RTSP streams, video, or webcam, watch live previews, auto-fix failures, investigate run errors, and draw detection zones.
* Attached media: analyze images and MP4 or MOV videos you drop into the chat, and build and verify Workflows with them.
* [Rapid](https://docs.roboflow.com/models/rapid/rapid) models: set up, manage, and diagnose training failures.
* Projects: [create projects](https://docs.roboflow.com/datasets/create-and-upload/create-a-project#create-a-project-from-the-agent), start [model training](https://docs.roboflow.com/models/train/train-a-model#train-from-the-agent), [rebalance splits](https://docs.roboflow.com/datasets/versions/dataset-versions/create-a-dataset-version#readjusting-train-validation-test-splits), and [merge projects](https://docs.roboflow.com/datasets/manage/merge-datasets).
* Datasets: [browse images by labeling stage](https://docs.roboflow.com/datasets/annotate/annotate/team-collaboration#browse-labeling-work-from-the-agent), annotate, move jobs to their next stage, and approve or reject reviews.
* [Active Learning](https://docs.roboflow.com/deployment/monitoring-and-analytics/active-learning): turn collection on or off per project and edit its limits and conditions.
* [Vision Events](https://docs.roboflow.com/deployment/monitoring-and-analytics/vision-events): add blocks to Workflows, [answer questions about your event data](https://docs.roboflow.com/deployment/monitoring-and-analytics/vision-events/query-events), and schedule [Summary Reports](https://docs.roboflow.com/deployment/monitoring-and-analytics/vision-events/summary-reports).
* Usage: show your [Credit Usage Dashboard](/platform/billing-and-plans/credits/view-credit-usage) with filters matching your question.
* Edge devices: answer questions with read-only access to your [Deployment Manager](https://docs.roboflow.com/deployment/self-hosted/enterprise/deployment-manager) fleet, telemetry, logs, and streams.
* Tabs: organize open Workflows, models, projects, and usage views; drag to reorder; reopen closed items or create new ones from the "+" tab.
### Background Tasks
Long jobs the Agent starts keep running while you chat: model training, auto-labeling, dataset version generation, project merges, class remaps, and split rebalances. A pill above the chat box counts the running ones. Click it, or click "Background Tasks" in the left menu, to open a panel that lists them under "Running" and "Finished". Click a task to open the page it created.
The Agent tells you in the chat when a task finishes, even if you closed the tab and came back later. Only jobs started from inside a conversation appear here. A training you start elsewhere in the app or through the API does not, and you track it in the Activity Center instead.
## HTTP API
The Agent API lets you interact with the Roboflow AI agent through `api.roboflow.com`. You can send natural-language instructions to create or edit [Workflows](https://docs.roboflow.com/workflows/build/create-a-workflow), then publish them when ready. All edits are saved as drafts until you explicitly publish.
Authentication is via [API key](https://docs.roboflow.com/reference/platform/rest-api/authenticate-with-the-rest-api). If you use a [Scoped API Key](https://docs.roboflow.com/reference/authentication/authentication/scoped-api-keys) with folder restrictions, the agent will only be able to access Workflows within that folder scope.
### Chat
Send a message to the agent. Start a new conversation, or continue one by passing `conversation_id`.
{% openapi src="/files/AJ4ZFCHIBc3AWX3yfVQ3" path="/{workspace}/agent/chat" method="post" %}
[agent-api.yaml](https://4160767428-files.gitbook.io/~/files/v0/b/gitbook-x-prod.appspot.com/o/spaces%2F1YMZNIiZMBdlCHUDeZMP%2Fuploads%2Fgit-blob-fe7368626d50bfa1cbdc6309c07567b2b9391c85%2Fagent-api.yaml?alt=media)
{% endopenapi %}
### Publish a Workflow
Deploy the latest draft of a Workflow the agent created or edited.
{% openapi src="/files/AJ4ZFCHIBc3AWX3yfVQ3" path="/{workspace}/agent/workflows/{workflowUrl}/publish" method="post" %}
[agent-api.yaml](https://4160767428-files.gitbook.io/~/files/v0/b/gitbook-x-prod.appspot.com/o/spaces%2F1YMZNIiZMBdlCHUDeZMP%2Fuploads%2Fgit-blob-fe7368626d50bfa1cbdc6309c07567b2b9391c85%2Fagent-api.yaml?alt=media)
{% endopenapi %}
### List Conversations
{% openapi src="/files/AJ4ZFCHIBc3AWX3yfVQ3" path="/{workspace}/agent/conversations" method="get" %}
[agent-api.yaml](https://4160767428-files.gitbook.io/~/files/v0/b/gitbook-x-prod.appspot.com/o/spaces%2F1YMZNIiZMBdlCHUDeZMP%2Fuploads%2Fgit-blob-fe7368626d50bfa1cbdc6309c07567b2b9391c85%2Fagent-api.yaml?alt=media)
{% endopenapi %}
### Get a Conversation
{% openapi src="/files/AJ4ZFCHIBc3AWX3yfVQ3" path="/{workspace}/agent/conversations/{id}" method="get" %}
[agent-api.yaml](https://4160767428-files.gitbook.io/~/files/v0/b/gitbook-x-prod.appspot.com/o/spaces%2F1YMZNIiZMBdlCHUDeZMP%2Fuploads%2Fgit-blob-fe7368626d50bfa1cbdc6309c07567b2b9391c85%2Fagent-api.yaml?alt=media)
{% endopenapi %}
## MCP Server
Connect your AI agent to the [MCP Server](/agents/mcp-server) and it can hand work to Roboflow Agent with these tools:
Tool
Description
agent_chat
Chat with the Roboflow AI agent.
agent_chat_result
Collect the result of a run that was still working.
agent_conversations_list
List agent conversations in the workspace.
agent_conversation_get
Get one conversation with its message history.
agent_workflow_publish
Publish the latest agent-edited draft of a Workflow.
# Workspaces
Create and manage Roboflow Workspaces, control who has access, and restore deleted work.
A Workspace holds your projects, datasets, models, and team. These pages cover how to create a Workspace, manage the people in it, and restore work you deleted.
# Asset Library
Find, filter, and manage images and videos across an entire workspace, and run Workflows on them as batch jobs.
Asset Library allows you to find and manage images and videos across an entire Workspace in one place. Open it from "Asset Library" in the Workspace sidebar.
Using semantic search ("boxes") to find images across all projects in a Workspace
### Finding Images and Videos
Asset Library search combines:
* Semantic search: describe what you are looking for (ex: `boxes`) and it returns matching images and videos
* [Similarity search](https://docs.roboflow.com/datasets/annotate/annotate/use-roboflow-annotate/similarity-search-and-settings): find visually similar images (ex: `like-image:61JNhXnwbNqNxux5Acnk`)
* [Dataset filtering](https://docs.roboflow.com/datasets/manage/manage-datasets/dataset-search): filter by class, tag, or other fields (ex: `class:helmet AND NOT (tag:v1 OR tag:v2)`)
* [Metadata search](https://docs.roboflow.com/datasets/create-and-upload/adding-data/image-metadata#searching-by-metadata): filter by custom metadata (ex: `metadata:author=John`)
Uploaded videos are automatically indexed for semantic search. A thumbnail is generated from the first frame of each video so you can identify results at a glance.
### Filtering by Project Type
Use the "Type" dropdown to show only images and videos from projects of a chosen type (ex: Object Detection, Classification, Instance Segmentation, Keypoint Detection, Multimodal). The "Type" dropdown appears when your Workspace has projects of more than one type.
### Managing Images
Select images individually, or use "Select All" to select every image matching your current search query. This reveals a sticky action bar at the bottom of the page. From the action bar, you can:
* Add [tags](https://docs.roboflow.com/datasets/manage/manage-datasets/add-tags-to-images) and [metadata](https://docs.roboflow.com/datasets/create-and-upload/adding-data/image-metadata) to selected images
* Create a new Project with selected images
* Add selected images to an existing Project
* [Run a Workflow](#running-a-workflow) on selected images as a background Batch Processing job
* Export/download search results
* Delete images from the Workspace
When you use "Select All" with an active search, these actions apply to all matching results across the Workspace, not just the images visible on the current page.
Export always covers your whole search query, so it stays disabled until you use "Select All". That way what you download matches what you selected.
{% hint style="info" %}
Exporting and downloading Asset Library search results requires the "Export Workspace Images" permission, granted to workspace owners by default. On workspaces with [Custom Roles](/platform/enterprise-features/role-based-access-control#custom-roles), you can grant it to other roles. Members without it do not see the export action.
{% endhint %}
### Running a Workflow
You can run a [Workflow](https://docs.roboflow.com/workflows) on the images you select as a [Batch Processing](https://docs.roboflow.com/deployment/roboflow-cloud/batch-processing) job. This is useful for enriching large sets of images with model outputs (ex: classifications, detections, quality scores) in one step.
Select the images you want, then click "Run Workflow" in the action bar. In the modal:
* Select the Workflow to run. It must have exactly one `image` input.
* Choose a Machine type. CPU is best for smaller detection, classification, and segmentation models. GPU is faster and required for some models such as SAM3, large VLMs, and larger RF-DETR or YOLO models. When a Workflow requires a GPU, it is selected for you.
* Click "Start".
The job runs in the background as a Batch Processing job. You can track its progress in the Activity Center and on the "Batch Processing" tab under Deployments.
#### Writing Results Back to the Asset Library
To make a Workflow's results searchable in the Asset Library, have the Workflow write attributes and tags back onto each source image:
1. Add a `source_id` input under your Workflow's Inputs block. Batch Processing fills it automatically, one value per image.
2. Add a [Roboflow Asset Library Attributes](https://docs.roboflow.com/workflows/blocks/blocks/data-storage/roboflow-asset-library-attributes) block, wire the `source_id` into it, and choose the tags and attributes it writes.
After the job completes, you can find those images using [metadata and tag search](https://docs.roboflow.com/datasets/create-and-upload/adding-data/image-metadata#searching-by-metadata) (ex: `metadata:blur_score>0.7`, `tag:auto-labeled`).
# Delete a Workspace
How to delete a non-default Roboflow workspace from Settings.
To delete your Workspace, click on "Settings" button on the left sidebar and then on the "Delete Workspace".
{% hint style="warning" %}
You can only delete non-default Workspaces.
{% endhint %}
{% hint style="info" %}
Workspaces on an Enterprise plan cannot be deleted from Settings. The "Delete Workspace" button is hidden, and the API returns a 403 error. Contact to delete an Enterprise Workspace.
{% endhint %}
Each user gets the default Workspace which can't be manually deleted. You can also delete your account in [app.roboflow.com/settings/account](https://app.roboflow.com/settings/account), which will delete both your account and the default Workspace that's linked to your account.
# Workspaces, Projects, and Models
Learn how Workspaces, Projects, Versions, and Models structure your computer vision work in Roboflow
Everything in Roboflow follows this structure:
Workspace → Projects → Dataset Versions → Models → Workflows → Deployments
### **Workspaces**
A [Workspace](/platform/workspaces/roboflow-workspaces) is the top-level container.
* It's where you and your team collaborate.
* All Projects and Workflows live inside a Workspace
* Billing and [subscription plans](https://roboflow.com/pricing) are managed at the Workspace level
Think of it like a company folder that holds all your computer vision work.
### Projects
A [Project](https://docs.roboflow.com/datasets/create-and-upload/create-a-project) lives inside a Workspace. Each Project is built around a computer vision dataset. This is where you manage:
* Images
* Annotations
* Dataset updates over time
When you create a Project, you have to choose the Project type - one of the computer vision task type:
* Object detection
* Classification
* Instance segmentation
* Keypoint detection
* Semantic segmentation
* Multimodal
This determines how your data is structured and which model architectures you can train.
### **Dataset Versions**
A [Dataset Version](https://docs.roboflow.com/datasets/versions/dataset-versions) is a snapshot of your dataset at a specific moment in time.
* You create a Version from the current state of your Project
* Once created, it does not change
* Any future edits to images or annotations will not affect existing Versions
Which ensures reproducibility, clear tracking, and helps with model comparison.
### Models
[Models](https://docs.roboflow.com/models) are trained using Dataset Versions.
* You select a specific Dataset Version which will be used to train a model
* That model is permanently linked to that version
* Available model architectures for training will depend on your Project type
You can also [upload trained models to Roboflow](https://docs.roboflow.com/models/model-weights/upload-custom-weights).
After you have a model, [create a workflow](https://docs.roboflow.com/workflows/build/create-a-workflow), or go [right to deploy](https://docs.roboflow.com/deployment)!
# List Workspaces and Projects
List workspaces, projects, versions, and trained models using the REST API, Python SDK, and CLI.
## About
The workspace endpoint returns metadata about a workspace and every project it contains - including each project's type, image and annotation counts, versions, and dataset splits. Use it to enumerate the projects your API key can access (for example, to discover project IDs before uploading data or exporting a version) and to drill into a project's generated versions, trained models, and dataset exports. The same data is available through the REST API, the Python SDK, and the CLI.
## HTTP API
The `/:workspace` endpoint gives you information about your workspace and its Projects. This endpoint lists all Projects in the Workspace your API key authenticates against, and you can dive deeper into any project to find information about its generated versions, models, and dataset exports.
The endpoint URL is:
```url
curl "https://api.roboflow.com/roboflow?api_key=$ROBOFLOW_API_KEY"
```
Here is an example of a response from the endpoint:
### Get a Project and List Versions
You can retrieve information about a project using the following REST endpoint:
```bash
curl "https://api.roboflow.com/roboflow/chess-sample-4ckfl?api_key=$ROBOFLOW_API_KEY"
```
This endpoint returns a JSON response with the following structure:
```bash
{
"workspace": {
"name": "Roboflow",
"url": "roboflow",
"members": 7
},
"project": {
"id": "roboflow/chess-sample-4ckfl",
"type": "object-detection",
"name": "Chess Sample",
"created": 1630335544.592,
"updated": 1630335741.988,
"images": 12,
"unannotated": 3,
"annotation": "pieces",
"public": false,
"splits": {
"valid": 2,
"train": 9,
"test": 1
},
"classes": {
"white-queen": 7,
"white-king": 8,
"black-knight": 11,
"black-pawn": 37,
"black-rook": 10,
"white-pawn": 34,
"black-bishop": 8,
"white-knight": 10,
"black-queen": 4,
"white-bishop": 11,
"black-king": 8,
"white-rook": 10
},
"versions": [
{
"id": "roboflow/chess-sample-4ckfl/3",
"name": "raw",
"created": 1630335741.989,
"images": 12,
"splits": {
"train": 9,
"test": 1,
"valid": 2
},
"preprocessing": {
"auto-orient": {
"enabled": true
}
},
"augmentation": {},
"exports": [
"coco",
"voc"
]
},
{
"id": "roboflow/chess-sample-4ckfl/2",
"name": "416x416",
"created": 1630335730.142,
"images": 12,
"splits": {
"train": 9,
"test": 1,
"valid": 2
},
"preprocessing": {
"resize": {
"enabled": true,
"format": "Stretch to",
"width": 416,
"height": 416
},
"auto-orient": {
"enabled": true
}
},
"augmentation": {},
"exports": []
},
{
"id": "roboflow/chess-sample-4ckfl/1",
"name": "augmented",
"created": 1630335698.746,
"images": 30,
"splits": {
"valid": 2,
"train": 27,
"test": 1
},
"model": {
"id": "chess-sample-4ckfl/1",
"endpoint": "https://serverless.roboflow.com/infer/chess-sample-4ckfl/1",
"start": 1630335799.682,
"end": 1630337523.889,
"fromScratch": false,
"tfjs": true,
"oak": true,
"map": "62.87",
"recall": "85.29",
"precision": "23.44"
},
"preprocessing": {
"resize": {
"enabled": true,
"width": 416,
"format": "Stretch to",
"height": 416
},
"auto-orient": {
"enabled": true
},
"grayscale": {
"enabled": true
}
},
"augmentation": {
"exposure": {
"percent": "25",
"enabled": true
},
"brightness": {
"percent": "25",
"enabled": true,
"darken": true,
"brighten": true
},
"rotate": {
"degrees": "5",
"enabled": true
},
"image": {
"enabled": true,
"versions": "3"
},
"flip": {
"enabled": true,
"horizontal": true,
"vertical": false
},
"crop": {
"min": 0,
"percent": 30,
"enabled": true
},
"noise": {
"percent": "2",
"enabled": true
}
},
"exports": [
"yolov5pytorch"
],
"versionNotes": "Fix: rotated box misalignment"
}
]
}
}
```
### List Project Models
You can retrieve all trained models in a project using the `/:workspace/:project/models` endpoint. This returns both version-trained models and standalone models (such as NAS children).
With [Sign In With Roboflow (Getting Started)](https://docs.roboflow.com/reference/authentication/authentication/sign-in-with-roboflow-getting-started), use `Authorization: Bearer` and scope `model:infer` instead of `api_key`:
```bash
curl -H "Authorization: Bearer $ACCESS_TOKEN" \
"https://api.roboflow.com/:workspace/:project/models"
```
#### List All Models
```bash
curl "https://api.roboflow.com/:workspace/:project/models?api_key=$ROBOFLOW_API_KEY"
```
**Filter by NAS Group**
To list only the models from a specific NAS run, pass the `group` query parameter:
```bash
curl "https://api.roboflow.com/:workspace/:project/models?group=GROUP_ID&api_key=$ROBOFLOW_API_KEY"
```
The `group` value is the NAS run identifier returned on each model object. If the group doesn't match any models, the endpoint returns an empty array.
#### Response
The endpoint returns a JSON array of model objects:
```json
[
{
"url": "my-workspace/my-project/3",
"version": "3",
"train": { "status": "finished" },
"modelType": "rfdetr-base",
"name": "My Model",
"created": "2026-04-01T00:00:00.000Z",
"metrics": {
"map50": 91.0,
"precision": 88.0,
"recall": 85.0
}
}
]
```
**NAS Model Fields**
Models produced by [Neural Architecture Search](https://docs.roboflow.com/models/train/neural-architecture-search) include additional fields:
```json
{
"url": "my-workspace/my-project-410-nas-gpu-066866",
"train": { "status": "finished" },
"modelType": "rfdetr-nas-S",
"name": "NAS Child 1",
"created": "2026-04-01T00:00:00.000Z",
"nasFamily": "child",
"group": "pVYKOWUB6AUIVJMgPc7u-410-rfdetrNasGroup",
"favorites": {},
"recommended": true,
"metrics": {
"map50": 81.2,
"map5095": 64.3,
"f1": 78.0,
"hardware": "gpu",
"latency": 1.157,
"paretoOptimalFor": ["gpu"]
}
}
```
| Field | Type | Description |
| -------------------------- | --------- | ------------------------------------------------------------------------------------------------------- |
| `nasFamily` | string | `"child"` for NAS-discovered models, `null` for the baseline |
| `group` | string | NAS run identifier, shared by all models in the same run |
| `favorites` | object | Map of user IDs to favorite status |
| `recommended` | boolean | Present and `true` when this model is the recommended pick for at least one metric/hardware combination |
| `metrics.map5095` | number | mAP\@50-95 score (percentage) |
| `metrics.f1` | number | F1 score (percentage) |
| `metrics.hardware` | string | Hardware target the model was benchmarked on (e.g. `"gpu"`, `"jetson-orin-nano"`) |
| `metrics.latency` | number | Inference latency in milliseconds on the target hardware |
| `metrics.paretoOptimalFor` | string\[] | Hardware targets for which this model sits on the Pareto frontier |
These fields are only present on NAS models. Standard trained models are not affected.
## Python SDK
Get a `Workspace` handle for the workspace your API key authenticates against:
```python
import roboflow
rf = roboflow.Roboflow(api_key="YOUR_API_KEY")
workspace = rf.workspace()
```
Each Roboflow API key is scoped to a single workspace. To work against a different workspace, use a different API key (or, for public Universe workspaces, pass the workspace slug):
```python
# Public Universe workspace - only your API key is needed.
public_ws = rf.workspace("roboflow-100")
```
### Workspace properties
The returned `Workspace` exposes:
* `workspace.url` - the workspace's URL slug (e.g. `my-workspace`).
* `workspace.name` - the workspace's display name.
* `workspace.list_projects()` - projects in the workspace, as a list of dicts.
* `workspace.projects()` - same data as `list_projects()` but returned as a `Project` object list (older alias).
* `workspace.list_folders()` - see [Manage Folders](https://docs.roboflow.com/datasets/manage/project-folders#python-sdk).
* `workspace.list_workflows()` - see [Manage Workflows](https://docs.roboflow.com/workflows/manage/manage-workflows#python-sdk).
* `workspace.get_plan()` and `workspace.get_usage()` - see [Workspace Plan and Usage](/platform/billing-and-plans/credits/view-credit-usage#python-sdk).
### List Projects and Versions
#### List Projects
Get the projects in your workspace:
```python
import roboflow
rf = roboflow.Roboflow(api_key="YOUR_API_KEY")
workspace = rf.workspace()
for project in workspace.list_projects():
print(project["id"], project["name"], project["type"])
```
Each entry includes the project's id (URL slug), display name, project type, image count, and a few other metadata fields.
To work against a public Universe workspace, pass its slug:
```python
universe_ws = rf.workspace("roboflow-100")
```
#### Get a Project
```python
project = workspace.project("my-detector")
```
Or use the top-level shortcut:
```python
project = rf.project("my-detector")
```
#### List Versions
```python
for version in project.versions():
print(version.version, version.name)
```
`project.versions()` returns `Version` objects you can call methods on directly (`download`, `train`, `delete`, etc.). For a lightweight dict response, use `project.list_versions()` or `project.get_version_information()`.
#### Get a Version
```python
version = project.version(3)
```
Numeric - versions are 1-indexed.
## CLI
### List Workspaces
You can retrieve a list of all Workspaces of which you are a member with the CLI.
To list Workspaces with the CLI, use the following command:
roboflow workspace list
This will return a list of Workspaces with their corresponding application links and Workspace IDs:
```
NAME ID DEFAULT
My Workspace my-workspace *
Other Workspace other-ws
```
To get the output as JSON (for use in scripts or AI agents):
```bash
roboflow workspace list --json
```
```json
[
{"name": "My Workspace", "url": "my-workspace", "link": "https://app.roboflow.com/my-workspace", "default": true},
{"name": "Other Workspace", "url": "other-ws", "link": "https://app.roboflow.com/other-ws", "default": false}
]
```
### List Projects in a Workspace
To list projects in a workspace, use the following command:
```bash
roboflow project list
```
If you have a default workspace configured, the `-w` flag is optional. Otherwise, specify it:
```bash
roboflow project list -w WORKSPACE_ID
```
This will return a table of Projects:
```
NAME ID TYPE VERSIONS IMAGES
my-dataset my-workspace/my-dataset object-detection 3 500
classifier my-workspace/classifier classification 1 200
```
To get the output as JSON:
```bash
roboflow project list --json
```
### Get a Project
To get detailed information about a project, use the following command:
```bash
roboflow project get PROJECT_ID
```
You can use the resource shorthand - no need to specify the workspace separately:
```bash
roboflow project get my-dataset # uses default workspace
roboflow project get my-workspace/my-dataset # explicit workspace
```
This will return information about the project including its versions:
```
Project: my-dataset
ID: my-workspace/my-dataset
Type: object-detection
Images: 500
Versions: 3
Classes: car (200), truck (150), bus (150)
Link: https://app.roboflow.com/my-workspace/my-dataset
```
To get the full JSON response:
```bash
roboflow project get my-dataset --json
```
## MCP Server
Connect your AI agent to the [MCP Server](/agents/mcp-server) and it can list what is in your workspace with these tools:
Tool
Description
projects_list
List projects in the workspace.
projects_get
Get project detail including versions, classes, splits, and trained models.
# Rename a Workspace
How to rename a workspace from Settings, and why renaming changes the workspace URL used in your scripts.
You can rename a Workspace from your Workspace Settings.
{% hint style="warning" %}
Renaming your Workspace will change your Workspace URL. This means that you will need to update all Workflow endpoints or Workspace references in your API or Inference scripts.\
\
If you rename a Workspace, any future script that calls a Workflow using your old Workspace URL will not work. You will need to update your scripts to use your new Workspace ID.
{% endhint %}
To rename a Workspace, click Settings in the Roboflow sidebar, then click "Plan & Billing":
Then, click the "Rename Workspace" button in the top right corner of the page:
You can then set a new name for your Workspace:
When you click "Rename Workspace", your Workspace will be immediately renamed. This action is irrevocable.
# Create a Workspace
Create a workspace to organize your projects and collaborate with your team.
All computer vision projects in Roboflow belong to a workspace. Creating a new workspace allows you to invite a separate group of teammates to collaborate on projects, and every workspace is billed separately with its own resources and API keys.
### Create a New Workspace
After log in, to create a new Workspace, click on the name of your workspace in the left side panel. Then, click the "+" icon:
### Workspace Setup
Name the Workspace and choose its plan on the first screen, then click "Continue". The name also becomes part of the `workspace ID`. To compare the available plans, check the [Pricing](https://roboflow.com/pricing) page.
Setup ends on the [Roboflow Agent](/agents/roboflow-agent) page, where you can start building right away.
To add teammates, [invite them](/platform/workspaces/team-members/invite-a-team-member) from the workspace settings Members page.
### Setup Questions
The first Workspace on a new account also asks three short questions: what you want to build, what should happen with the results, and what data you have. Answers are free text. Click "Use example" to drop a sample answer into the field, which you can then edit.
Roboflow passes your answers to the Agent as the first message of a new chat, so it can suggest a starting point without you describing the project again. Click "Skip" on any question to move on, or "Back" to change an earlier answer. If you skip every question, the Agent opens with an empty chat.
Workspaces you create later go straight from the plan screen to the Agent and do not ask these questions.
### **Renaming Workspaces**
Click the pencil-shaped icon next to the workspace name on the Agent page for the workspace.
Enter the new workspace name and click "Save"
Renaming a workspace
***Note:***** Renaming a workspace will update the workspace ID.**
### **Workspace Settings**
Select `Settings` in the left sidebar to open the Workspace Settings menu.
Workspace Settings Menu
* **Plan and Billing** - View your current workspace plan, how to add Billing Info, and more workspace upgrade options
* **Usage** - Workspace Features and Usage (all-time and by month)
* Team Members, Projects, Source Images, Generated Images, Inference Usage (view and download charts)
* **Members** - View workspace members, member roles, status of workspace invitations
* **Roboflow API** - View, copy and revoke Public and Private API Keys
* **Third Party Keys** - Integrations with Microsoft Azure, Amazon Web Services (AWS), Google Cloud Platforms (GCP) and OpenAI
* **Rename Workspace** - Give the workspace a new name. This will update the `workspace ID`
* **Delete Workspace** - This action is irreversible after confirming deletion. Proceed with caution.
* **Transfer of Ownership** - It is not possible to transfer the creator role. The creator role is a signatory role that is equivalent to an admin but cannot be removed. To have a new designated admin, have the creator of the workspace promote a user to admin or keep the creator email active.
### Deleting a Workspace
Once you are finished with your projects in Roboflow, you may delete your workspace. Deleting a workspace is a permanent action. To delete your workspace, click on the workspace settings menu and click **Delete Workspace**. As shown below, you will be required to confirm this action - deletion **cannot be reversed**.
Type in the name of the workspace to confirm deletion.
# Trash
Restore a deleted project, dataset version, training, or workflow within 30 days of deletion.
## About
Deleted projects, dataset versions, trainings, and workflows are moved to your workspace Trash for 30 days before they are permanently removed. You can restore an item from Trash at any time within the 30-day retention window, or permanently delete it immediately if you are certain you do not need it.
## Web App
### Open the Trash
Navigate to Settings in your workspace and select Trash from the sub-navigation. The page lists every deleted project, version, training, and workflow grouped by type, along with who deleted each item, when it was deleted, and how many days remain before permanent cleanup.
### Restore an item
Click Restore on a single row to restore that item, or use the checkboxes to select multiple items and click Restore to restore them all at once. Restore All restores every item in the workspace Trash.
Restored items immediately reappear in the workspace in the same location they were deleted from. Dataset versions can only be restored while their parent project is still active. If the parent project is also in Trash, restore the project first and then restore its versions. The same applies to trainings: restore the parent project and version first.
### Delete an item permanently
To skip the 30-day retention window and remove an item right away, click Delete Permanently on a single row, or select multiple items and click Delete Permanently. Empty Trash removes everything in the workspace Trash at once. Permanent deletion cannot be undone.
Permanent deletion is available only from this page in the web app. It is not exposed on the REST API, Python SDK, or CLI so that a stray script or automation cannot irrecoverably destroy data.
### What happens when you delete
When a project, version, training, or workflow is deleted:
* The item is hidden from the workspace and from all API listings.
* Any in-flight training jobs for the item are cancelled automatically so you do not keep spending credits on something you are deleting.
* For projects, the version's trained models stop serving.
* For trainings, the models produced by that run are hidden too, and the version's `{project}/{version}` model ID may switch to another model.
* Storage for the item still counts toward your workspace plan until the 30-day retention window expires or you permanently delete it.
If you checked "Also delete images from Asset Library" when deleting a project, an amber indicator on the Trash row shows that images belonging only to that project will also be removed when the project is permanently cleaned up. Images shared with other projects are always preserved.
### Who can use the Trash
Access to the Trash and its actions is controlled by role-based access control. The default Owner role grants all trash permissions. You can assign individual trash permissions (`view_trash`, `trash_dataset`, `restore_dataset`, `trash_version`, `restore_version`, `trash_training`, `restore_training`, `delete_training`, `trash_workflow`, `restore_workflow`) to custom roles from your workspace's Role-Based Access Control settings.
## HTTP API
Projects and dataset versions moved to Trash are retained for 30 days before being permanently cleaned up. You can delete, list, and restore items through the REST API; permanent deletion is web-UI only (see the [Permanent Deletion](#permanent-deletion) note at the bottom).
In-flight training jobs for a project or version are automatically cancelled when the item is moved to Trash.
### Delete a Project
{% tabs %}
{% tab title="REST API" %}
Move a project to Trash:
```url
https://api.roboflow.com/:workspace/:project
```
```bash
curl "https://api.roboflow.com/my-workspace/my-detector?api_key=$ROBOFLOW_API_KEY" \
-X DELETE
```
Example response:
```json
{
"deleted": true,
"type": "project",
"workspace": "my-workspace",
"project": "my-detector",
"projectId": "d_abc123",
"trash": true
}
```
The calling API key must have the `project:update` scope.
{% endtab %}
{% endtabs %}
### Delete a Version
{% tabs %}
{% tab title="REST API" %}
Move a single dataset version to Trash:
```url
https://api.roboflow.com/:workspace/:project/:version
```
```bash
curl "https://api.roboflow.com/my-workspace/my-detector/3?api_key=$ROBOFLOW_API_KEY" \
-X DELETE
```
Example response:
```json
{
"deleted": true,
"type": "version",
"workspace": "my-workspace",
"project": "my-detector",
"projectId": "d_abc123",
"version": "3",
"trash": true
}
```
The calling API key must have the `version:update` scope.
{% endtab %}
{% endtabs %}
### Delete a Workflow
{% tabs %}
{% tab title="REST API" %}
Move a workflow to Trash:
```url
https://api.roboflow.com/:workspace/workflows/:workflowUrl
```
```bash
curl "https://api.roboflow.com/my-workspace/workflows/slow-webhooks?api_key=$ROBOFLOW_API_KEY" \
-X DELETE
```
Example response:
```json
{
"deleted": true,
"type": "workflow",
"workspace": "my-workspace",
"workflow": "slow-webhooks",
"workflowId": "wf_abc123",
"trash": true
}
```
The calling API key must have the `workflow:update` scope.
{% endtab %}
{% endtabs %}
### List Items in Trash
{% tabs %}
{% tab title="REST API" %}
List everything currently in the workspace Trash:
```url
https://api.roboflow.com/:workspace/trash
```
```bash
curl "https://api.roboflow.com/my-workspace/trash?api_key=$ROBOFLOW_API_KEY"
```
Example response:
```json
{
"items": [
{
"type": "project",
"id": "d_abc123",
"name": "My Detector",
"url": "my-detector",
"deletedAt": "2026-04-20T17:05:33.000Z",
"scheduledCleanupAt": "2026-05-20T17:05:33.000Z",
"deletedBy": "uid-of-user",
"deletedByName": "Alice"
},
{
"type": "version",
"id": "3",
"name": "augmented-416",
"parentId": "d_xyz789",
"parentName": "My Other Project",
"parentUrl": "my-other-project",
"parentInTrash": false,
"deletedAt": "2026-04-21T12:14:02.000Z",
"scheduledCleanupAt": "2026-05-21T12:14:02.000Z"
}
],
"sections": {
"projects": [ ... ],
"versions": [ ... ],
"workflows": [ ... ],
"trainings": [ ... ]
}
}
```
Each item includes a `scheduledCleanupAt` timestamp - the point at which the item is eligible for permanent cleanup. Projects also carry a `cleanupDeleteImages` boolean indicating whether images exclusive to the project will be deleted along with it when cleanup runs.
The calling API key must have the `project:read` scope.
{% endtab %}
{% endtabs %}
### Restore an Item
{% tabs %}
{% tab title="REST API" %}
Restore a project, version, training, or workflow from Trash:
```url
https://api.roboflow.com/:workspace/trash/restore
```
```bash
curl "https://api.roboflow.com/my-workspace/trash/restore?api_key=$ROBOFLOW_API_KEY" \
-X POST \
-H "Content-Type: application/json" \
-d '{"type": "project", "id": "d_abc123"}'
```
For versions, you must also include the parent project id:
```bash
curl "https://api.roboflow.com/my-workspace/trash/restore?api_key=$ROBOFLOW_API_KEY" \
-X POST \
-H "Content-Type: application/json" \
-d '{"type": "version", "id": "3", "parentId": "d_abc123"}'
```
Restoring a version requires the parent project to still be active (not itself in Trash). If the parent is also in Trash, restore it first. Restoring a training requires both its project and its version to be active.
`type` must be one of `project`, `version`, `training`, or `workflow`. The required API-key scope is **per-type** - the request fails with 401 if the key doesn't carry the right scope for the item being restored:
| `type` | Required scope |
| ---------- | ----------------- |
| `project` | `project:update` |
| `version` | `version:update` |
| `training` | `version:update` |
| `workflow` | `workflow:update` |
The endpoint also verifies that `targetItem.owner === :workspace` before delegating, so a key valid in workspace A cannot restore an item that lives in workspace B.
{% endtab %}
{% endtabs %}
### Permanent Deletion
Permanent deletion is intentionally not available on the REST API. The actions to empty Trash and to immediately delete a single Trash item destroy data irrecoverably, and we don't want a stray curl or automation to be able to trigger them. These actions are available only through the Trash view in the Roboflow web app.
Items left in Trash are cleaned up automatically after the 30-day retention window.
## Python SDK
Projects and dataset versions deleted through the Python SDK are moved to the workspace **Trash** and retained for 30 days before being permanently cleaned up. Within the retention window you can restore them back to the workspace.
Any in-flight training jobs for a project or version are cancelled automatically when it is moved to Trash, so you don't continue spending credits.
### Delete a Project
```python
import roboflow
rf = roboflow.Roboflow(api_key="YOUR_API_KEY")
project = rf.workspace().project("my-detector")
project.delete()
```
The project is immediately hidden from the workspace project list and appears in the Trash view under Settings → Trash.
### Restore a Project
If you still have a reference to the `Project` object, call `restore()` on it:
```python
project.restore()
```
The SDK looks up the project in the workspace Trash by its slug and restores it. `RuntimeError` is raised if the project isn't currently in Trash.
### Delete a Version
Move a single dataset version to Trash. Any in-flight training on the version is cancelled.
```python
import roboflow
rf = roboflow.Roboflow(api_key="YOUR_API_KEY")
project = rf.workspace().project("my-detector")
version = project.version(3)
version.delete()
```
### Restore a Version
```python
version.restore()
```
The parent project must still be active (not itself in Trash) to restore a version. Restore the project first if necessary.
### List Items in Trash
Use `Workspace.trash()` to see what's currently in the workspace Trash:
```python
import roboflow
rf = roboflow.Roboflow(api_key="YOUR_API_KEY")
ws = rf.workspace()
trash = ws.trash()
for item in trash["items"]:
print(item["type"], item["name"], "cleanup:", item["scheduledCleanupAt"])
```
`trash["sections"]` groups the same items by `projects`, `versions`, and `workflows` for convenience.
### Restore by ID
If you don't already have a `Project` or `Version` handle (for example, you're restoring something that was deleted in a previous session), use `Workspace.restore_from_trash()` with the id returned by `trash()`:
```python
trash = ws.trash()
project_in_trash = trash["sections"]["projects"][0]
ws.restore_from_trash("project", project_in_trash["id"])
```
For versions, pass the parent project id:
```python
version_in_trash = trash["sections"]["versions"][0]
ws.restore_from_trash(
"version",
version_in_trash["id"],
parent_id=version_in_trash["parentId"],
)
```
### Workflows
The SDK doesn't currently expose a `Workflow` object, but you can soft-delete a workflow via the low-level `rfapi` helper and restore it with `Workspace.restore_from_trash("workflow", ...)`:
```python
from roboflow.adapters import rfapi
# Soft-delete - moves the workflow to Trash for 30 days.
rfapi.delete_workflow(api_key, ws.url, "slow-webhooks")
# Restore - look up the workflow's id in Trash first.
trash = ws.trash()
wf = next(w for w in trash["sections"]["workflows"] if w["url"] == "slow-webhooks")
ws.restore_from_trash("workflow", wf["id"])
```
### Permanent Deletion
Permanent deletion is intentionally not available from the SDK - the actions to empty Trash and to immediately delete a single Trash item destroy data irrecoverably, and we don't want a stray script to be able to trigger them. These actions are available only through the Trash view in the Roboflow web app, which has an explicit confirmation dialog.
Items left in Trash are cleaned up automatically after the 30-day retention window, so you rarely need to act on them manually.
## CLI
Projects, dataset versions, and workflows can all be moved to the workspace **Trash**, where they are retained for 30 days before being permanently cleaned up. Within the retention window you can restore them back to the workspace.
Any in-flight training jobs associated with a project or version are cancelled automatically when it is moved to Trash, so you don't continue spending credits on an item you're deleting.
### Delete a Project
Move a project to Trash:
```bash
roboflow project delete /
```
Example:
```bash
roboflow project delete my-workspace/my-detector
```
The command prompts for confirmation before moving the project. Pass `--yes` (or `-y`) to skip the prompt for scripted use:
```bash
roboflow project delete my-workspace/my-detector --yes
```
### Restore a Project
```bash
roboflow project restore /
```
Example:
```bash
roboflow project restore my-workspace/my-detector
```
The CLI looks the project up in the workspace Trash by its slug and restores it. If the project isn't currently in Trash, the command exits with an error.
### Delete a Version
Move a single dataset version to Trash. Any in-flight training on the version is cancelled.
```bash
roboflow version delete //
```
Example:
```bash
roboflow version delete my-workspace/my-detector/3
```
Pass `--yes` to skip confirmation.
### Restore a Version
```bash
roboflow version restore //
```
Example:
```bash
roboflow version restore my-workspace/my-detector/3
```
The parent project must still be active (not itself in Trash) - restore the project first if necessary.
### Delete a Workflow
Move a workflow to Trash:
```bash
roboflow workflow delete
```
Example:
```bash
roboflow workflow delete slow-webhooks
```
Pass `--yes` (or `-y`) to skip the confirmation prompt. You can pass either the workflow URL slug or its Firestore id.
### Restore a Workflow
```bash
roboflow workflow restore
```
Example:
```bash
roboflow workflow restore slow-webhooks
```
### List Items in Trash
List everything currently in the workspace Trash:
```bash
roboflow trash list
```
```
TYPE ID NAME DELETED CLEANUP_AT BY
dataset d_abc123 My Detector 2026-04-20 2026-05-20 Alice
version 3 My Detector - augmented-416 (v3) 2026-04-21 2026-05-21 Bob
workflow wf_def456 Preprocessing Pipeline 2026-04-19 2026-05-19 Alice
```
For structured output suitable for scripting:
```bash
roboflow --json trash list
```
### Permanent Deletion
Permanent deletion is intentionally not available from the CLI or SDK - emptying Trash and immediately deleting a single Trash item destroy data irrecoverably, and we don't want a stray script or typo to be able to trigger them. These actions are available only through the Trash view in the Roboflow web app, which has an explicit confirmation dialog.
Items left in Trash are cleaned up automatically after the 30-day retention window, so you rarely need to act on them manually.
## MCP Server
Connect your AI agent to the [MCP Server](/agents/mcp-server) and it can restore something you deleted with these tools:
Tool
Description
trash_list
List soft-deleted items currently in the workspace Trash.
trash_restore_project
Restore a deleted project.
trash_restore_version
Restore a deleted dataset version.
trash_restore_workflow
Restore a deleted Workflow.
trash_restore_training
Restore a deleted training run.
# Team Members
Understand how team members interact in a workspace.
Computer vision is better when you work together as a team!
Every plan allows your team to work together to label, train, and deploy models. Team members can always be managed from your [Workspace Settings](https://app.roboflow.com/settings/members) and they can be internal to your company or external partners that you work with.
Each team member is assigned a role according to the level of access that they need to have. The role that a team member can be assigned varies according to [Role Based Access Control](/platform/enterprise-features/role-based-access-control).
As a user of Roboflow, you can be a team member of an unlimited number of workspaces. However, each workspace does have a limit to the number of team members that can have access at the same time.
{% hint style="info" %}
The number of team member seats your workspace has available is dependent on the plan you have chosen.
For up-to-date information on our plans and their associated features, see our [pricing page](https://roboflow.com/pricing).
{% endhint %}
### Get Started
To get started with Team Members, learn how to:
* [Invite a Team Member](/platform/workspaces/team-members/invite-a-team-member)
* [Change a Team Member Role](/platform/workspaces/team-members/change-a-team-member-role)
* [Remove a Team Member](/platform/workspaces/team-members/remove-a-team-member)
# Change a Team Member Role
Learn how to change a team member's roles.
To change a team member's role, click on the three dots next to their name and role on the [Team Member settings page](https://app.roboflow.com/user-invite-testing/settings/members). Then, choose the "Change Role" option.\\
This will bring up a modal that allows you to select the new role you would like to assign to the team member.
{% hint style="danger" %}
An admin can never change their own role. To accomplish this, another admin will have to make the change.
{% endhint %}
# Invite a Team Member
Learn how to invite new team members to your workspace.
If you want to invite a Team Member to join your workspace, there are three possible ways to accomplish this.
First, navigate to the [Team Member management page](https://app.roboflow.com/settings/members), located under workspace settings.
## Invite via Email
Type multiple emails in a row, comma separated, and select a role to assign to each of these users. By clicking "Send Invites" you can send multiple invites simultaneously, as long as there are enough invites left.
Once invites have been sent, they can be tracked in the section below. From here, you can cancel or resend invites.
{% hint style="info" %}
A pending invite still counts against your team member seat limit, since the spot is being reserved.
{% endhint %}
## Invite via Link
You can always copy a link and share it directly with team members. A different URL is generated based on the selected role.
{% hint style="danger" %}
Be careful how you share your invite link! These links are static for your workspace and can't ever be changed.
{% endhint %}
## Allow Same Domain
If your workspace was created with a verified email (using Google sign in) you can always allow team members from the same domain (`company.com`) to have visibility into your workspace.
By flipping this switch, when a user first creates an account or creates a new workspace, they will be able to see the workspace from a list and request to join.
### Accepting the request to join
There are two ways to accept a user's request to join your workspace.
#### Team Member management
On the [Team Member management page](https://app.roboflow.com/settings/members) you can accept the team member as a specific role or decline their request.
#### Notifications
By clicking "Notifications" on the sidebar, you can see all incoming requests. From this modal, you can accept the user as a specific role or deny their request.
### Verifying Invitation Status
As an admin, you will receive confirmation emails letting you know when a new team member has joined your workspace.
You can also confirm their status by looking at the "Team Members with Access" section of the [Team Member management page](https://app.roboflow.com/settings/members). If their name and email appear in the list, they have access to the workspace!
## Troubleshooting
Having issues with team members getting access to your workspace? Check these common situations that can cause this to arise.
Workspace out of Team Member Seats
Check your [usage dashboard](https://app.roboflow.com/test-growth-plan/settings/usage) to see the number of team members in your workspace and your workspace's overall limits.
Workspace at the max limit of team members
If you're currently at the maximum number of seats, there are two ways to resolve the issue:
1. Upgrade your plan to a higher level.
2. Remove an existing team member.
Invite Expired
For security, invites sent via email expire after 3 days of not being accepted by a team member. This can cause invite links in their email to no longer work.
If the invite is old, there are three ways to resolve the issue:
* Click "Resend" on the pending invite.
* Cancel the pending invite and invite the team member via email again.
* Invite the user to the workspace with another method.
# Remove a Team Member
Learn how to remove team members from your workspace.
To remove a team member from a workspace, click on the three dots next to their name and role on the [Team Member settings page](https://app.roboflow.com/user-invite-testing/settings/members). Then, choose the "Remove From Workspace" option.\\
As an admin, or the sole team member in a workspace, you may also choose to leave a workspace.
# Enterprise Features
Security and governance features on Roboflow Enterprise plans, including single sign on, role based access control, and audit logs.
Roboflow Enterprise adds security and governance controls for larger teams. These pages cover single sign on, role based access control, and how to export audit logs to your SIEM.
# Audit Logs and SIEM Export
View a tamper-resistant workspace audit log of significant actions and stream events to your SIEM over OpenTelemetry.
{% hint style="warning" %}
Audit Logs is a **premium** feature.
For up-to-date information on our plans and their associated features, see our [pricing page](https://roboflow.com/pricing).
{% endhint %}
Audit Logs give administrators a tamper-resistant record of significant actions in a Roboflow workspace - who performed an action, what changed, and when. Events cover team membership, roles, projects, datasets, workflows, devices, API keys, OAuth apps, and exports.
### Accessing Audit Logs
1. Open your workspace.
2. Go to **Workspace Settings**.
3. Select **Audit Logs** from the sidebar.
The Audit Logs page opens on the **Logs** tab by default.
### Reading the log
Each row represents a single event and includes:
| Column | Description |
| ------------- | -------------------------------------------------------------------------- |
| **Timestamp** | When the action occurred (UTC). |
| **Actor** | The user, API key, or system that performed the action. |
| **Action** | What was done (created, updated, deleted, role changed, etc.). |
| **Resource** | The object that was acted on (member, project, workflow, device, role, …). |
| **Details** | Click a row to see the full change set, including previous and new values. |
#### Filtering
Three filters at the top of the table narrow the view:
* **Actor** - filter by an individual user, API key, or by actor type.
* **Action** - filter by action type (e.g. `member_added`, `project_deleted`).
* **Resource** - filter by a specific resource or by resource type.
The table loads more entries as you scroll. Audit Logs are queryable for the last **365 days** by default.
### What's recorded
Audit Logs cover the following categories of activity:
| Category | Examples |
| ---------------------- | ------------------------------------------------------------------------------------------------------------------------------------------------------------------------------------------------- |
| **Team members** | Member added or removed, invite sent or cancelled, role changed, default role changed, folder access changed |
| **Custom roles** | Custom roles enabled, role created, updated, or removed |
| **Projects** | Project created, updated, deleted, or restored |
| **Datasets & images** | Source images uploaded, images deleted, image approved, image added to or removed from a dataset, image split assigned, version deleted or restored |
| **Workflows** | Workflow created, updated, published, deleted, or restored; workflow block allowed or blocked for the workspace |
| **Training & exports** | Training run started or stopped, dataset exported, search exported, model weights downloaded |
| **Devices & streams** | Device created, updated, deleted; stream added, removed, paused, resumed, updated; device, command issued |
| **API keys** | API key created, updated, revoked, or rolled; covers workspace, folder, and device keys. Updates track renames, permission changes, metadata changes, default key assignment, and enable/disable. |
| **OAuth apps** | OAuth app created, updated, revoked; client secret rotated; app installed or install revoked; user consent granted or revoked; app access policy changed |
| **SIEM configuration** | SIEM Integration settings updated |
### SIEM Export
{% hint style="info" %}
SIEM Integration is a premium feature, available to select Enterprise plan customers. [Talk to our Sales team](https://roboflow.com/sales) to get access to SIEM Integration.
{% endhint %}
SIEM Integration streams enriched audit log events to your SIEM via OpenTelemetry (OTLP), so you can centralize Roboflow activity alongside the rest of your security telemetry.
#### Supported transports
| Protocol | Default port | Endpoint format |
| ----------------- | ------------ | -------------------------------------------------------- |
| **gRPC** | 4317 | Base URL only - `https://collector.example.com:4317` |
| **HTTP/Protobuf** | 4318 | Full path - `https://collector.example.com:4318/v1/logs` |
#### Configuring SIEM Integration
1. In **Workspace Settings → Audit Logs**, open the **SIEM Integration** tab.
2. Toggle **Enable SIEM Integration**.
3. Enter your **OTLP Endpoint URL**.
4. Select the **Protocol** (gRPC or HTTP/Protobuf).
5. (Optional) Enter **Headers** as JSON - typically a bearer token, e.g. `{"Authorization": "Bearer your-token"}`.
6. Click **Test Connection** to verify the collector accepts the request.
7. Click **Save**.
#### Test Connection
**Test Connection** sends a minimal OTLP request to your collector using the values currently in the form (without saving them). A successful test confirms the endpoint is reachable and the headers authenticate correctly.\
#### Troubleshooting
* **Connection refused / timeout** - check the endpoint host and port, and that your collector is reachable from the public internet.
* **401 / 403 from the collector** - verify the `Authorization` header value and that the bearer token is valid.
* **TLS errors** - ensure the collector presents a certificate trusted by public CAs.
* **HTTP/Protobuf path mismatch** - for HTTP/Protobuf, the endpoint must include the full logs path (e.g. `/v1/logs`); for gRPC, use the base URL only.
Changes you make on the SIEM Integration tab are themselves recorded in Audit Logs as `siem_config_updated` events.\
\
**Test Connection** sends a real OTLP log record to your collector using the values currently in the form (without saving them). So you can verify the integration end-to-end on the SIEM side, not just confirm the connection opened.
Within a few seconds, the test event appears in your SIEM. The screenshot below shows it arriving in Honeycomb; the same event will be visible in any OTLP-compatible backend (Splunk, Elastic, Datadog, an OTel collector, etc.) - search for `audit.action = test_connection`.
# Roboflow Enterprise
Roboflow Enterprise offers enhanced capabilities for our hosted and open source solutions.
### [Learn more about Enterprise Solutions](https://roboflow.com/enterprise).
#### [Discuss your use case with an expert.](https://roboflow.com/sales)
### Datasets
**Annotation Insights**: The Annotation Insights dashboard enables you to understand how an annotation team is working toward building a dataset. You’ll see statistics on annotation jobs for projects in your workspace by date, labeler, and project to see trends in your labeling operation over time.
**Role-based Access**: Ensure privacy and security for your data by giving each user in Roboflow specific access based on their role within the computer vision pipeline. Control which users can assign images for labeling, train models, access datasets, and utilize the labeling tools for annotation.
### Models
**Train Extra Large Model**: Access to training larger models for increased accuracy. Extra Large models require more GPU for training and inference.
**3rd Party Cloud Training**: Directly connect to your preferred cloud training environment for model training outside of Roboflow.
### Deployments
**Model License**: Full Commercial License for models deployed with Roboflow.
**Device Management**: Centrally hosted way of controlling model versions and deploying to many devices with a simple 12-character change in code for over-the-air updates to the field.
**Offline Mode**: Deploy models offline, in your VPC, on-premise, and entirely within your cloud.
**Managed CPU/GPU Cluster**: Dedicated compute specifically for your workloads, monitored and managed by Roboflow.
**Autobatch Inference**: Dynamically group requests in real time and take advantage of batching to increase GPU utilization and throughput to fully utilize GPUs.
**Model Monitoring**: An observability dashboard for viewing how your models are performing in production, with the ability to create custom alerts for anomaly detection
### Security & Support
**SSO**: Allows users to retrieve their SSH credentials via a single sign-on (SSO) system used by the rest of the organization.
**Dedicated Support**: Personalized technical onboarding session, use case and architecture co-building sessions, quarterly business reviews, end user training sessions, dedicated ML Field Engineer, direct email and phone support, in-application live chat support.
**Managed Services**: Custom implementation and integration into your proprietary systems, CV/ML model training and development support, image labeling support, hardware procurement and setup, model optimization, infrastructure build and optimization.
**AI Zero Data Retention**: All AI and LLM requests made through Roboflow (including the Workflows AI Assistant, workflow generation, and custom block agents) are routed with zero data retention enforced at the gateway level. This means third-party AI providers do not store or retain any of your data.
**Security Review**: Custom security review process for your organization on top of already available SOC II Type 2 Compliant, PCI compliant with Self-Assessment Questionnaire A and Attestation of Compliance, HIPAA Compliant infrastructure including the ability to execute BAAs. All data is encrypted in transit and at rest, with SSL transport receiving a grade A+ rating from Qualys.
**SLA**: 24/7 emergency assistance, Severity 1, 2, 3 specific SLAs.
# Role-Based Access Control (RBAC)
Keep your workspace secure and compliant with restrictive roles based on use.
{% hint style="info" %}
Role-Based Access Control is a **premium** feature. Without it, every user must be an Admin.
For up-to-date information on our plans and their associated features, see our [pricing page](https://roboflow.com/pricing).
{% endhint %}
Role-Based Access Control allows you to assign different access permissions to [team members](/platform/workspaces/team-members) in your workspace.
## Roles
Our Default Roles help facilitate better security practices while [building and improving computer vision models as a team](https://docs.roboflow.com/datasets/annotate/annotate/team-collaboration).
Roboflow supports three default roles:
* Creator/Admin - Full access to the platform
* Reviewer - Assign, review, and work on labeling jobs
* Labeler - Work on assigned labeling jobs
{% hint style="info" %}
The Creator role is an "honorific", signifying which account originally created the workspace. It has all the same permissions as the Admin role, but cannot be transferred or reassigned.
{% endhint %}
## Permissions
The permissions for these roles are broken out below:
| | Admin | Reviewer | Labeler | Custom |
| -------------------------------------------- | -------------------- | -------------------- | -------------------- | -------- |
| View assigned labeling jobs | :white\_check\_mark: | :white\_check\_mark: | :white\_check\_mark: | Optional |
| Label images | :white\_check\_mark: | :white\_check\_mark: | :white\_check\_mark: | Optional |
| Submit labeling jobs | :white\_check\_mark: | :white\_check\_mark: | :white\_check\_mark: | Optional |
| Review labeling jobs | :white\_check\_mark: | :white\_check\_mark: | | Optional |
| Assign labelers and reviewers | :white\_check\_mark: | :white\_check\_mark: | | Optional |
| Approve and reject labeled images | :white\_check\_mark: | :white\_check\_mark: | | Optional |
| Manage team members | :white\_check\_mark: | | | Optional |
| Upload, delete, and export images and labels | :white\_check\_mark: | | | Optional |
| Train models | :white\_check\_mark: | | | Optional |
| Build workflows | :white\_check\_mark: | | | Optional |
| Deploy models | :white\_check\_mark: | | | Optional |
| View API keys | :white\_check\_mark: | | | Optional |
| View Credit Usage | :white\_check\_mark: | | | Optional |
| Manage billing | :white\_check\_mark: | | | Optional |
## Custom Roles
{% hint style="info" %}
Custom roles is a premium feature, available to select Enterprise plan customers. [Talk to our Sales team](https://roboflow.com/sales) to get access to Custom Roles.
{% endhint %}
Once Custom Roles are enabled for your workspace, you can manage them from the Team Members settings page:
1. Navigate to your workspace settings
2. Select Team Members from the sidebar
3. Click on the Roles tab
The Roles tab displays all available roles in your workspace, including system roles (Admin, Labeler, Reviewer) and any custom roles you've created:
### Managing Roles
#### Viewing Roles
The Roles page shows:
* Default Role: The role automatically assigned to new workspace members
* Role List: All available roles with their folder access settings
* Each role displays whether it has "All Folder Access" enabled
System roles like Admin, Labeler, and Reviewer come pre-configured with standard permission sets optimized for common use cases.
{% hint style="info" %}
Folder Permissions is a premium feature, available to select Enterprise plan customers. [Talk to our Sales team](https://roboflow.com/sales) to get access to Folder Permissions.
{% endhint %}
#### Creating a Custom Role
To create a new custom role:
1. Click the + New Role button in the top-right corner
2. In the role creation dialog: - Enter a Role Name: Choose a descriptive name for the role - Duplicate Permissions From: Select an existing role to use as a template (e.g., Admin, Labeler, Reviewer) - Click Duplicate to copy the selected role's permissions
3. Configure permissions by checking or unchecking options: - Grant All Folder Access: Allows users to bypass folder permission restrictions and see all folders - Permission Categories: Organized by function (e.g., Dataset Management, Dataset Create, Dataset Delete, Dataset Overview) - Each permission includes a description of what it grants
4. Use Select All to quickly enable all permissions
5. Click Create Role to save
#### Editing Custom Roles
To modify an existing custom role:
1. Locate the role in the roles list
2. Click the ... menu button on the right side of the role row
3. Select Edit Role from the dropdown menu
4. Modify permissions as needed
5. Save your changes
Note: System roles (Admin, Labeler, Reviewer) cannot be edited. You can only create custom roles or edit roles you've previously created.
#### Deleting Custom Roles
To remove a custom role:
1. Locate the role in the roles list
2. Click the ... menu button on the right side of the role row
3. Select Delete Role from the dropdown menu
4. Confirm the deletion
Important: Before deleting a role, ensure no users are currently assigned to it, or reassign those users to another role first. System roles cannot be deleted.
#### Super User Roles
When using [SSO group mapping](/platform/enterprise-features/single-sign-on-sso#custom-role-mapping-via-sso-groups), you can flag a custom role as a Super User. A Super User role grants full access to the workspace, including actions normally restricted to owners.
To enable this:
1. Create or edit a custom role that has at least one SSO auth group mapped
2. Check the "Super User" toggle that appears above the permissions list
3. Save the role
When "Super User" is enabled, individual permission checkboxes are hidden because the role grants unrestricted access.
{% hint style="info" %}
The "Super User" toggle only appears on roles that have an SSO auth group mapping. Use a tightly-scoped identity provider group for this role, since every member of that group receives full workspace access.
{% endhint %}
#### Setting a Default Role
The default role is automatically assigned to new members when they join your workspace:
1. In the Default Role section at the top of the Roles tab
2. Click the dropdown menu
3. Select the role you want to use as the default
4. The change takes effect immediately for all future invitations
#### Assigning Custom Roles
Once Custom Roles are configured, you can assign them when inviting team members :
1. Navigate to the Members tab under Team Members
2. Click Invite Members
3. Choose the desired custom role from the role dropdown
4. Complete the invitation or update process
Custom Roles can be also assigned to existing members on same page:
#### Further Reading
For more information on team management and permissions, see:
* Inviting Team Members
* Folder Permissions
* Workspace Settings
Once Custom Roles are turned on, you can [Invite Team Members](/platform/workspaces/team-members/invite-a-team-member) as normal, specifying the Custom Role at time of invitation.
### Further Reading
# Single Sign On (SSO)
SSO is available for Roboflow Enterprise customers.
{% hint style="info" %}
Single Sign On (SSO) is a **premium** feature, only available for Enterprise.
For up-to-date information on our plans and their associated features, see our pricing page.
{% endhint %}
Enterprise customers can request Single Sign On authentication.
This is useful if you have enterprise authentication requirements around using software with SSO.
To learn more about Single Sign On, contact the [Roboflow sales team](https://roboflow.com/sales) or your account representative.
## Setup
### Before you start
\- Workspace Admin role access.
\- SSO enabled on your workspace by [Roboflow](https://roboflow.com/sales).
\- Access to your DNS provider for domain verification
### Step 1 - Verify your domain
\- Go to Settings → Members and Roles → SSO.
\- Click Verify domain → the SSO setup portal opens → add your email domain → copy the TXT record → add it at your DNS
\- Multiple domains are supported.
### Step 2 - Connect your identity provider
\- Once at least one domain is Verified, Set up SSO becomes clickable.
\- Click Set up SSO → the SSO setup portal opens on the connection page → pick SAML or OIDC and follow the provider-specific wizard.
### Step 3 - Test your first sign-in
\- Sign out of Roboflow.
\- Go to app.roboflow\.com, enter a work email on a verified domain.
\- Confirm you're redirected to your identity provider.
## Signing In with SSO
The Roboflow login page includes a "Continue with SSO" button alongside the Google, GitHub, and Email sign-in options. To sign in with SSO:
1. Click "Continue with SSO" on the login page.
2. Enter your work email address.
3. If your email domain has SSO configured, you are redirected to your organization's identity provider to complete authentication.
If your domain does not have SSO configured, an inline error is displayed. Contact your workspace admin or the [Roboflow sales team](https://roboflow.com/sales) to set up SSO for your organization.
## SSO Profile-Based Authorization Groups
Enterprise customers using SSO can configure **authorization group attributes** to automatically assign users to Roboflow authorization groups based on their identity provider (IdP) profile attributes, such as Active Directory (AD) group memberships.
When a user signs in via SSO, Roboflow reads the specified attributes from the SSO profile's `sign_in_attributes` and maps them to Roboflow authorization groups. This allows you to manage access control through your IdP rather than manually assigning groups in Roboflow.
## Workspace Access Gating by AD Group
Enterprise SSO environments support per-workspace access gating based on AD group membership. Each allowed workspace in your SSO environment can be configured with:
* **Required AD Groups**: Only users who belong to at least one of the specified AD groups can access the workspace. Users who no longer meet the requirement lose access on their next sign-in.
* **Auto-join**: When enabled, users who meet the required AD groups (or all SSO users, if no groups are configured) are automatically added to the workspace on sign-in, without needing an invite.
These options can be combined per workspace:
| Required AD Groups | Auto-join | Behavior |
| ------------------ | --------- | ---------------------------------------------------------------------------- |
| Not set | Off | Default: admin must invite users manually |
| Not set | On | All SSO users are auto-added to the workspace |
| Set | Off | Existing members who don't match are removed; new users still need an invite |
| Set | On | Matching users are auto-added; non-matching members are removed |
{% hint style="info" %}
Roboflow admins are exempt from AD group gating and always retain workspace access. The default workspace for the SSO environment is never gated.
{% endhint %}
AD group membership is refreshed each time a user signs in through your IdP. If a user is removed from a required AD group in your IdP, they will lose access to gated workspaces on their next Roboflow sign-in.
To configure workspace access gating, contact the [Roboflow sales team](https://roboflow.com/sales) or your account representative.
## Custom Role Mapping via SSO Groups
If your workspace has [Custom Roles](/platform/enterprise-features/role-based-access-control#custom-roles) enabled, you can map identity provider groups to custom roles. When a user signs in via SSO, Roboflow assigns the custom roles whose mapped groups match the user's identity provider group memberships.
Roles that have SSO group mappings are reconciled on each sign-in:
* Roles with matching groups are assigned automatically.
* Roles whose mapped groups no longer match the user are removed.
* Roles without any SSO group mapping (manually assigned roles) are preserved and not affected by SSO sync.
If a member loses all of their group-mapped roles and has no manually assigned roles, they are assigned the workspace's default role instead.
Members can hold multiple custom roles at once if their identity provider groups match more than one mapped role. The workspace Members page displays all of a member's current roles.
For custom roles with SSO group mapping, you can also enable a [Super User](/platform/enterprise-features/role-based-access-control#super-user-roles) flag to grant full workspace access through that role.
## Auth Groups
Auth groups are named sets of workspace members, so you can manage people by team instead of one at a time.
Workspaces with project folder permissions get an "Auth Groups" tab under Settings. Click "Create Auth Group" to name a group and list the identity provider group names it maps to.
Members you assign by hand get a "Manual" badge. Members whose identity provider groups match the mapping get an "SSO" badge, rechecked on each sign-in.
## Custom Branding
Enterprise SSO environments support custom branding so your Roboflow experience matches your organization's visual identity. Admins can configure branding through the SSO admin panel without engineering involvement.
Customizable elements include:
* **Login screen**: Organization logo, logo size, accent color, card background and border colors, button color, and Roboflow wordmark color.
* **Sidebar navigation**: Background hover color, text and icon colors for selected and unselected states, and logo border color.
Changes take effect immediately for all users in your SSO environment. Users outside your SSO environment are not affected.
To set up custom branding, contact the [Roboflow sales team](https://roboflow.com/sales) or your account representative.
# Billing & Plans
Manage your Roboflow plan and payment details, and track how your workspace spends credits.
Roboflow bills for usage in credits. These pages cover how credits work, how to buy a plan or prepaid credits, and where to find your invoices.
# Billing Folders
Billing Folders lets workspace administrators track and manage billable usage at the folder level.
## About
{% hint style="info" %}
Billing Folders is a **premium** feature available for Enterprise plans. To enable Billing Folders for your workspace, contact the [Roboflow sales team](https://roboflow.com/sales) or your account representative. For more information on available plans, visit [our pricing page](https://roboflow.com/pricing).
{% endhint %}
When enabled, all usage (ex: training, inference, image storage, labeling, and more) is automatically attributed to the folder that contains the project being used. This gives organizations granular cost visibility and spending control across teams, departments, or clients.
### How Usage Attribution Works
When Billing Folders is enabled, each folder in your workspace receives its own API key. All billable usage that occurs within a folder's projects is tracked against that folder's API key. This means you can see exactly how much each folder is consuming in your usage reports and dashboard.
{% hint style="info" %}
Usage attribution is automatic. You do not need to manually assign usage to folders. It flows from the project to its parent folder.
{% endhint %}
#### API or Deployment Usage
When you use Roboflow services using an API key (including, but not limited to, the Serverless Cloud API, Batch Processing, etc), the billing attribution follows the API key in the request, not the project's folder.
A request made with a workspace-level API key is attributed to the workspace, even if the model used belongs to a project that lives in a folder. To attribute direct API or batch usage to a folder, request with that folder's API key.
#### Image Storage Attribution
Image storage is attributed to the folder that contains the project(s) referencing the image.
If an image is shared across multiple projects within the same folder (or within subfolders of the same parent), storage is attributed to the deepest folder that contains all of the projects using that image:
```
Workspace
├── Folder A
│ ├── Project 1 ← image.jpg
│ └── Project 2 ← image.jpg (shared)
└── Folder B
└── Project 3
image.jpg storage is attributed to Folder A (the deepest folder containing all projects that reference it)
```
If an image is shared across projects in different root folders with no common parent folder, storage is attributed at the workspace level:
```
Workspace
├── Folder A
│ └── Project 1 ← image.jpg
└── Folder B
└── Project 2 ← image.jpg (shared)
image.jpg storage is attributed to the Workspace (no single folder contains both projects)
```
### Folder Action Menu
Folder controls live in the folder's action menu (the three-dot icon). You can open it from the folder list or from the header of the folder's projects page, next to the folder name. It holds "Folder Usage", "Folder API Key", and "Set Permissions".
### Viewing Usage
You can view usage, including broken down by folder, in your workspace's credit usage page and switch the attribution filter to **Folders**. Learn [how to filter usage to a billing folder](/platform/billing-and-plans/credits/view-credit-usage#usage-chart) or [how to view usage in general.](/platform/billing-and-plans/credits/view-credit-usage)
To jump straight to one folder's usage, select "Folder Usage" from that folder's action menu.
### Pausing and Resuming Folder Usage
Workspace administrators can temporarily pause all billable usage within a folder. This is useful for controlling costs or preventing accidental usage.
#### Pausing a Folder
To pause a folder, select "Folder API Key" from the folder's action menu, toggle "Pause Folder Usage", then confirm in the message that appears.
When a folder is paused:
* All API keys belonging to that folder are disabled
* Any API request that would incur usage against that folder is rejected with a `423 Locked` status code
* No new billable usage is recorded for the folder
You can also pause a folder and all of its descendant folders at once by toggling "Pause All Descendant Folders' Usage". This disables API keys for the selected folder and every folder nested beneath it.
#### Resuming a Folder
To resume a paused folder, reopen the "Folder API Key" modal, toggle the pause control off, then confirm. This re-enables the folder's API keys and restores normal operation. Similarly, you can resume a folder and all of its descendants at once.
Resuming only affects keys that were paused by the folder pause feature. Keys that were disabled for other reasons are not affected.
### Folder API Keys
When Billing Folders is enabled, each folder automatically receives its own API key. These keys are used internally to track which folder billable usage belongs to.
* **Viewing keys**: Select "Folder API Key" from the folder's action menu to see the API keys associated with a folder.
* **Automatic creation**: API keys are created automatically when folders are created or when Billing Folders is first enabled on your workspace. You do not need to create them manually.
### Common Scenarios
| Scenario | What Happens |
| ------------------------------------------ | --------------------------------------------------------------------------------------------------------------------------------------------------------------------- |
| **Moving a project to a different folder** | Future usage for that project is attributed to the new folder. Historical usage remains attributed to the original folder. |
| **Deleting a folder** | The folder is removed from your workspace. Child projects and sub-folders are reassigned to the parent folder. Historical usage data is preserved in billing reports. |
| **Creating new folders** | New folders automatically receive an API key for billing attribution. No additional setup is required. |
| **Disabling Billing Folders** | Folder-level attribution stops. New usage is tracked at the workspace level only. Historical usage data from the folder billing period is preserved. |
### Usage Report API
You can query billing usage data programmatically using the [billing usage report REST API](#http-api).
## HTTP API
**Endpoint**
`POST` `https://api.roboflow.com/{workspace_url}/billing-usage-report`
**Authentication**
API key with `workspaceStats.read` scope, passed as a query parameter (`?api_key=YOUR_API_KEY`).
**Rate Limit**
10 requests per minute per API key.
#### Request Parameters
All parameters are passed in the request body as JSON. All are optional.
| Parameter | Type | Default | Description |
| ------------------ | ------------------- | ------------ | --------------------------------------------------------------------------------------------------------------------------------------------------------------------- |
| `startAt` | string (ISO 8601) | 7 days ago | Start of the reporting period (inclusive) |
| `endAt` | string (ISO 8601) | Now | End of the reporting period (exclusive) |
| `api_key_prefixes` | string or string\[] | All keys | Filter to specific API key prefix(es). Each prefix is the first 5 characters of the full API key (e.g., `rf_ab` for key `rf_abCdEfGhIjK...`). Must be an exact match. |
| `features` | string or string\[] | All features | Filter to specific billing feature(s) |
#### Examples
{% tabs %}
{% tab title="Basic" %}
Default is last 7 days, all features, all api keys.
```shellscript
curl -X POST "https://api.roboflow.com/my-workspace/billing-usage-report?api_key=$ROBOFLOW_API_KEY"
```
{% endtab %}
{% tab title="Custom Date Range" %}
```shellscript
curl -X POST "https://api.roboflow.com/my-workspace/billing-usage-report?api_key=$ROBOFLOW_API_KEY" \
-H "Content-Type: application/json" \
-d '{
"startAt": "2025-01-01T00:00:00.000Z",
"endAt": "2025-02-01T00:00:00.000Z"
}'
```
{% endtab %}
{% tab title="Filter By Feature" %}
```shellscript
curl -X POST "https://api.roboflow.com/my-workspace/billing-usage-report?api_key=$ROBOFLOW_API_KEY" \
-H "Content-Type: application/json" \
-d '{
"features": ["train", "serverless-inference-run"]
}'
```
{% endtab %}
{% tab title="All Parameters" %}
```shellscript
curl -X POST "https://api.roboflow.com/my-workspace/billing-usage-report?api_key=$ROBOFLOW_API_KEY" \
-H "Content-Type: application/json" \
-d '{
"startAt": "2025-01-01T00:00:00.000Z",
"endAt": "2025-02-01T00:00:00.000Z",
"api_key_prefixes": ["rf_ab", "rf_de"],
"features": ["train", "serverless-inference-run"]
}'
```
{% endtab %}
{% endtabs %}
#### Response Schema
The API returns a JSON array of usage records:
```json
[
{
"api_key_prefix": "rf_ab",
"feature": "train",
"total_credits_used": 150.5,
"usage_events": 12,
"earliest_usage": "2025-01-02T10:30:00.000Z",
"latest_usage": "2025-01-28T14:15:00.000Z",
"billing_entity_id": "folder-id-123",
"billing_entity_name": "My Project Folder",
"billing_entity_type": "folder"
}
]
```
| Field | Type | Description |
| --------------------- | ------ | ------------------------------------------------------------------------------ |
| `api_key_prefix` | string | The first 5 characters of the API key associated with the usage |
| `feature` | string | The billing feature identifier (e.g., `"train"`, `"serverless-inference-run"`) |
| `total_credits_used` | number | Total credits consumed for this key/feature combination |
| `usage_events` | number | Count of individual usage events |
| `earliest_usage` | string | ISO timestamp of the first usage event in the range |
| `latest_usage` | string | ISO timestamp of the last usage event in the range |
| `billing_entity_id` | string | The folder ID or workspace ID that owns this usage |
| `billing_entity_name` | string | Human-readable name of the billing entity |
| `billing_entity_type` | string | Either `"folder"` or `"workspace"` |
#### Error Codes
| Status | Description |
| ------ | -------------------------------------------------------------------------------- |
| `400` | Billing Folders is not enabled for this workspace, or invalid request parameters |
| `401` | Invalid or missing API key, or insufficient permissions |
| `423` | The folder's usage is paused |
| `429` | Rate limit exceeded (10 requests per minute) |
# Premium Trial
Discover how Roboflow's premium trial works.
The Premium Trial is a limited, 14 day trial of premium features to help you assess whether or not Roboflow's computer vision platform is right for your use case.
## Trial Features
The trial gives you access to specific premium features in the application and $60 worth of [included credits](/platform/billing-and-plans/credits) to use. The trial does not map to a specific paid plan.
While using your trial, if there is a feature that you care most about, we've provided the below comparison table to make it easy to understand which plans will give you the equivalent level of access. When the plan name is listed with a `+`, the feature is available on the named plan and all higher plans.
{% hint style="warning" %}
For up-to-date information on our plans and their associated features, see our [pricing page](https://roboflow.com/pricing).
{% endhint %}
### Access
| Feature | Included | Plan Equivelant |
| ------------------------------------------------------------------------------------------- | -------------------- | --------------- |
| Private Data | :white\_check\_mark: | Core+ |
| [Included Credits](/platform/billing-and-plans/credits) | 15 | |
| [Team Members](/platform/workspaces/team-members) | 20 | Core+ |
| Projects | 50 | Core+ |
| [Role Based Access Control (RBAC)](/platform/enterprise-features/role-based-access-control) | :white\_check\_mark: | Enterprise |
### Data
| Feature | Included | Plan Equivelant |
| ---------------------------------------------------------------------------------------------------------------------------------------------- | -------------------- | --------------- |
| Workspace Dataset Size Limit | Uncapped | Basic+ |
| [Image Augmentations](https://docs.roboflow.com/datasets/versions/dataset-versions/image-augmentation) | 10x | Enterprise |
| [Enhanced Augmentations](https://docs.roboflow.com/datasets/versions/dataset-versions/image-augmentation#augmentation-options) & Preprocessing | :white\_check\_mark: | Basic+ |
### Label
| Feature | Included | Plan Equivelant |
| ----------------------------------------------------------------------------------------------------------------- | -------------------- | --------------- |
| Review Mode | :white\_check\_mark: | Enterprise |
| [Labeling History](https://docs.roboflow.com/datasets/annotate/annotate/use-roboflow-annotate/annotation-history) | :white\_check\_mark: | Enterprise |
### Train
| Feature | Included | Plan Equivelant |
| ------------------------ | -------------------- | --------------- |
| All Model Sizes | :white\_check\_mark: | Enterprise |
| Model Evaluation | :white\_check\_mark: | Enterprise |
| Concurrent Training Jobs | :white\_check\_mark: | Enterprise |
### Deploy
| Feature | Included | Plan Equivelant |
| -------------------------------------------------------------------------------------------------- | -------------------- | --------------- |
| [Model Monitoring](https://docs.roboflow.com/deployment/monitoring-and-analytics/model-monitoring) | 7 Days of Data | Enterprise |
| [Workflow Versions](https://docs.roboflow.com/workflows/manage/manage-workflow-versions) | :white\_check\_mark: | Enterprise |
### Support
| Feature | Included | Plan Equivelant |
| ------------- | -------------------- | --------------- |
| Email Support | :white\_check\_mark: | Enterprise |
| Live Chat | :white\_check\_mark: | Enterprise |
### Unsupported Features
There are some features of our paid plans that we don't offer as a part of the Premium Trial. To be abundantly clear about their exclusion, you can find these features listed below.
| Feature | Included | Plan Equivelant |
| --------------------------------------------------------------------------------------------------------------- | -------- | ------------------- |
| Purchasing Prepaid Credits | :x: | Basic+ |
| [Outsourced Labeling Services](https://docs.roboflow.com/datasets/annotate/annotate/roboflow-labeling-services) | :x: | Enterprise (Annual) |
| [Download Model Weights](https://docs.roboflow.com/models/model-weights/download-roboflow-model-weights) | :x: | Basic+ |
| Premium GPU Access for Training | :x: | Enterprise |
| [Train a SAM3 Model](https://docs.roboflow.com/models/supported-models/sam3) | :x: | Core+ |
| Inference Model License | :x: | Basic+ |
| Self-Hosted Model License | :x: | Enterprise |
| Onboarding Call | :x: | Enterprise |
| [Dedicated Deployment](https://docs.roboflow.com/deployment/roboflow-cloud/dedicated-deployments) | :x: | Enterprise |
## Trial Start
Most users that sign up to Roboflow will be automatically started on the trial, while some may have to explicitly opt into the trial. You can verify if you are on the Trial or not by going to the [Plan & Billing](https://app.roboflow.com/test-growth-trial/settings/plan) page.
## Trial End
When your trial expires, your account will automatically be put in a sandbox state. In this state, you cannot use platform until you perform at least one of the following actions:
* [Purchase a Plan](/platform/billing-and-plans/plans/purchase-a-plan)
* Select the Public Plan
As a part of selecting the public plan, you will be required to:
* Manually set any previously private datasets to public
* Remove projects and team members until you are under the Public Plan limits
{% hint style="info" %}
When your trial expires, your datasets only go public with your explicit consent. We require this extra action to ensure that your private datasets are not leaked to the public!
{% endhint %}
## Cancelling a Trial
If, for any reason, you would like to cancel a trial, you may do so at any time through the plan selection menu.
You can reach the plan selection screen through the Workspace Settings, through the "Purchase Plan" button, or through other prompts throughout the app.
{% columns %}
{% column width="41.66666666666667%" %}
{% endcolumn %}
{% column width="58.33333333333333%" %}
{% endcolumn %}
{% endcolumns %}
In order to cancel, you must select an alternative plan. You may either downgrade and switch to the free public plan or any other available plan.
# Credits
How Roboflow credits work across Data, Training, and Deployment, and the included, prepaid, and flex billing forms.
{% hint style="warning" %}
For up-to-date information on credits and their associated costs, see our [credits page](https://www.roboflow.com/credits).
{% endhint %}
The Roboflow platform uses credits to give you access to powerful features across Data, Training, and Deployment. You’re always in control and only pay for what you use, when you use it.
Features that use credits are broken up into three main categories:
* **Data** - Storing, augmenting, and labeling content
* **Training -** Training new models
* **Deployment** - Running workflows and models on cloud and self-hosted infrastructure
Each feature consumes a different amount of credits based on the resources used, like storage or compute, helping prices stay fair and predictable. Credits are consumed regardless of whether the feature is used locally or on our hosted servers. See our [credits page](https://www.roboflow.com/credits) for a breakdown of credit costs.
To understand how your workspace is using credits, you can always [view your Credit Usage](/platform/billing-and-plans/credits/view-credit-usage).
## Billing
{% hint style="info" %}
Credits can be purchased in bulk at a discounted rate by [talking with our Sales team](https://roboflow.com/sales).
{% endhint %}
For the purposes of billing, credits can come in three forms: included, prepaid, and flex. They are consumed in that order.
### Included Credits
Every [Roboflow plan](/platform/billing-and-plans/plans) comes with a number of included credits. Included credits reset either monthly or annually, depending on your workspace's billing cycle.
If you change plans mid-cycle, your billing cycle will reset, and so will your included credits.
{% hint style="info" %}
**Usage Alerts:** You'll see a warning banner in your workspace when you've used 80% of your included credits for the current billing cycle. The banner shows how many credits you've used and links to options for purchasing additional credits at a lower per-credit rate.
The platform also provides personalized recommendations based on your usage history. Depending on your plan and recent credit consumption, you may be prompted to [purchase prepaid credits](/platform/billing-and-plans/credits/purchase-prepaid-credits), upgrade your Core Plan tier, or contact Sales for a custom arrangement.
{% endhint %}
{% hint style="info" %}
**Tip:** Annual plans get a year's worth of credits upfront.
{% endhint %}
### Prepaid Credits
Prepaid Credits are credits purchased in advance. They are consumed after your workspace runs out of included credits and are designed to give greater predictability, especially if you know you're going to exceed your plan's included allocation.
Prepaid Credits can be purchased in bundles at graduated volume discounts ranging from 8% to 17% off the standard per-credit price. Larger bundles unlock deeper discounts, making prepaid the most cost-effective option for teams with predictable overage.
{% hint style="success" %}
As of March 28, 2026, Prepaid Credits are priced lower than Flex Usage at every bundle tier. For workspaces created before this date, the base per-credit rate for Prepaid and Flex starts at the same price, but any bundle purchase starting at 50 credits yields savings over Flex.
{% endhint %}
Learn about purchasing prepaid credits
### Flex Usage
Flex credits are consumed when flex billing is enabled, and after your workspace runs out of both included and prepaid credits.
{% hint style="warning" %}
Flex Usage is intended as a safety net to ensure uninterrupted access to the platform, not as a primary consumption method. Because Flex carries no volume discount, it is generally more expensive than purchasing Prepaid Credits.
{% endhint %}
We recommend enabling Flex as a fallback while relying on Prepaid Credit bundles for any anticipated overage.
By default, flex billing is enabled for all workspaces.
#### Flex Billing
For most monthly and annual plans, Flex Usage is billed on a monthly basis to the payment method on file. You can [manage Flex Billing in the workspace settings](/platform/billing-and-plans/credits/enable-or-disable-flex-billing), including enabling or disabling it and setting a monthly spending cap to control costs.
## How Billing Works
Credits are consumed/used in order of:
1. Included: Credits included with your plan are used first
2. Prepaid: Prepaid credits are used after you exhaust all of the credits in your plan
3. Flex: Flex credits are used after the included and prepaid credits are used.
{% hint style="info" %}
Enterprise plans may have custom billing arrangements that can differ.
{% endhint %}
### Flex Cap
You can set a flex cap to limit the maximum dollar amount your workspace spends on Flex Usage per billing cycle. When you enable Flex Billing, a default cap of $100 per month is applied. You can raise, lower, or remove the cap at any time from the [Flex Billing settings](/platform/billing-and-plans/credits/enable-or-disable-flex-billing).
# Manage Flex Billing
Enable or disable Flex Billing, set a monthly spending cap, and understand Flex Usage alerts.
Flex Billing controls are available on your workspace's [Plan & Billing page](https://app.roboflow.com/settings/plan). From there, you can enable or disable Flex Billing and set a spending cap.
## Enable Flex Billing
To enable Flex Billing, click "Enable" on the Flex Billing card in Plan & Billing settings. A confirmation dialog appears. Once confirmed, Flex Billing activates with a default cap of $100 per month ($1,200 per year for annual plans).
{% hint style="warning" %}
When Flex Billing is enabled, your payment method on file is automatically charged for any Flex Usage.
{% endhint %}
## Set a Flex Cap
The flex cap sets the maximum dollar amount your workspace can spend on Flex Usage per billing cycle. To set or change the cap:
1. Go to the Flex Billing card in [Plan & Billing settings](https://app.roboflow.com/settings/plan).
2. Enter a dollar amount of $1 or more in the cap input field. Enter `0` to disable Flex Billing (a confirmation dialog appears before it is turned off).
3. Click the save button, press Enter, or click outside the field to save.
For annual plans, the cap applies to the yearly billing cycle.
### Remove the Flex Cap
To allow unlimited Flex Usage, click "Remove cap" on the Flex Billing card. A confirmation dialog warns that there will be no spending limit on Flex Usage.
{% hint style="danger" %}
Removing the flex cap means there is no limit on how much your workspace can spend on Flex Usage per billing cycle.
{% endhint %}
## Disable Flex Billing
To disable Flex Billing, click "Disable" on the Flex Billing card, or set the flex cap to `0` and save. A confirmation dialog warns that in-flight training jobs and deployments will stop once credits run out.
{% hint style="danger" %}
If you disable Flex Billing, workspace features that require credits will stop working once your included and prepaid credits are used.
{% endhint %}
## Flex Usage Alerts
The platform displays alerts based on your Flex Usage:
* When you reach 80% of your flex cap, a warning appears with your current usage percentage and options to raise the cap or [purchase Prepaid Credits](/platform/billing-and-plans/credits/purchase-prepaid-credits).
* When you reach your flex cap, a notice indicates that usage requiring additional credits will be blocked until the cap is raised or the billing cycle resets.
* When flex credits are actively being consumed, an informational notice recommends [purchasing Prepaid Credits](/platform/billing-and-plans/credits/purchase-prepaid-credits) for a lower per-credit rate.
# Purchase Prepaid Credits
How to buy prepaid credit packs at volume discounts and verify them on your Plan & Billing page.
Prepaid credits are purchased as fixed-size **credit packs**. Larger packs include a volume discount, so the more credits you buy in a single pack, the lower the effective price per credit.
To purchase prepaid credits, go to your workspace's [Plan & Billing page](https://app.roboflow.com/settings/plan) and navigate to the section for Prepaid Credits. You can also access the purchase flow directly at `app.roboflow.com/get-more-credits`.
## Choose a Credit Pack
Select one of the available packs. Each pack displays the number of credits in the pack, the total price, and the volume discount (if any) versus the base per-credit rate.
If you're purchasing through a usage recommendation, the platform will pre-select the smallest pack that covers your recent overage.
For the exact prices and discount percentages available to your workspace, see the pack cards on your Plan & Billing page.
## Complete Checkout
Click the pack you want to purchase, then continue through the checkout page and provide your payment details.
After your payment has been approved, you'll see a confirmation screen.
## Verify Your Prepaid Credits
Back on the Plan & Billing page you can verify that the credits were added to your account by looking at the prepaid credit quantity. The full number of credits from the pack you purchased will be added to your prepaid balance.
# Usage Projection
Estimate a workspace's future credit usage by building, viewing, and saving projection scenarios.
Usage Projection helps you estimate how many credits a Workspace may use in a future period. It starts from the same usage records described in [View Your Credit Usage](/platform/billing-and-plans/credits/view-credit-usage), then lets you build a projection and view how that projection affects your credit allocation.
Open Workspace Settings, select "Usage", then select "Projection".
## Build a Projection
Usage Projection opens in the "Credit Calculator". This is the setup state where you choose the scenario, time window, display units, and usage assumptions before you view the chart.
The numbers labeled in the image corresponds to the numbered list below.
1. [**Modes**](#modes)
2. [**Configuration**](#configuration)**:** Add a new usage type, change the Projection Basis, Projection Length, and the configuration settings
3. [**Usage Type Assumptions**](#usage-type-assumptions)
4. [**Summary**](#usage-summary)**:** View the total projected credit usage over the specified projection length period.
### Modes
The mode controls how the calculator fills in usage assumptions.
| Mode | Use it when |
| ------------ | --------------------------------------------------------------------------------- |
| Current Rate | You want to project recent usage forward without changing individual usage types. |
| Customize | You want to start from current usage and adjust one or more usage types. |
| From Scratch | You want to start from zero and add only the usage types you expect to use. |
* **Current Rate:** is the fastest way to answer "what happens if usage keeps going like this?" The calculator uses the selected basis window to fill in the usage type rows.
* **Customize:** keeps the current usage types in the calculator, then lets you change individual rates. Use it when you expect a known change, such as more uploads, fewer inference requests, or a new deployment pattern. You can also add another usage type with the plus button or "Add usage type".
* **From Scratch:** starts with an empty "Build your projection" state. Use "Add usage type" to search or browse available usage types by category, such as Deploy, Training, and Dataset. Use it when you want to model a planned workflow or deployment that is different from current Workspace activity.
### Configuration
1. The plus icon can be used to add a new usage type
2. **Based on**: When using the "Customize" mode, you can set the length of historical usage to base projections on. The length to "look backwards" on.
3. **Length**: How long to project forward, based on the assumptions.
4. **Show as**: You can change how the projection scenario usage types are displayed
1. "Show values as": You have the option to set the usage scenario in either units of usage or the number of equivalent credits
2. "Timeframe": You can also configure whether to configure the frequency/interval between Day/Week/Month
### Usage Type Assumptions
The calculator groups usage types by category, such as Deploy or Dataset. Each row shows the estimated usage amount and the approximate credit value for that usage type.
1. **Starts at:** This sets the starting rate. Use the current rate when you want to start from observed usage, or enter a custom rate.
2. **Then:** This sets what happens after the starting rate. Choose "Stays the same" for a fixed rate, or "Changes" to model usage going up or down over time.
### Usage Summary
Use "Reset all" to clear custom assumptions and return to the default assumptions for the selected mode. The total at the bottom of the calculator updates as you change the mode, window, length, and usage assumptions.
Click "Show Projection" when the total represents the scenario you want to view.
## View the Projection
After you click "Show Projection", Usage Projection switches from the calculator to the projection view. This state shows the chart, summary cards, save controls, and the assumptions used for the projection.
The chart shows historical usage and projected usage in the same view. Use "Daily" to inspect day-by-day usage, or "Cumulative" to see the running total across the projection window. The dashed "Even-Pace Budget" line shows where usage would sit if you spent your included credits at an even rate across the billing cycle.
The controls above the chart keep the projection editable:
* "Based on" changes the historical window used for the starting rate.
* "Length" changes how far forward the projection runs.
* "Assumptions" shows whether the projection uses current usage or custom usage. Use "Customize Assumptions" to return to the Credit Calculator.
The summary cards translate the projection into billing planning.
| Summary | Meaning |
| ---------------------------- | ---------------------------------------------------------------------------------------------------------------------------------------------------------------------------------------------------- |
| Projected Credit Use | Credits already used in the current billing cycle plus the credits projected for the rest of the period. The card also shows the projected part on its own. |
| Projected Additional Credits | Credits projected above the available credits for the relevant billing cycle. Available credits include included credits and [Prepaid Credits](/platform/billing-and-plans/credits#prepaid-credits). |
If the projection stays within your available credits, the summary shows that the Workspace is expected to stay within its credit allocation. If the projection exceeds available credits, the summary shows the estimated additional credits. When [Flex Billing](/platform/billing-and-plans/credits/enable-or-disable-flex-billing) is enabled and the projection shows additional credits, the page can also show a prompt to contact Sales about volume rates.
### How the Estimate Works
Usage Projection calculates the daily average for each usage type in the "Based on" window. "Current Rate" projects those averages forward. "Customize" and "From Scratch" apply your fixed or gradual assumptions before the total is compared against the billing cycles covered by the projection length.
Choose a shorter basis window when recent usage is more representative than older usage. Choose a longer basis window when usage is uneven and you want the estimate to smooth out spikes.
Usage Projection is an estimate. Recent usage can take time to appear, and future activity can differ from the historical window you choose.
## Save and Share a Projection
Click "Save" to save a projection. In the "Save Calculation" modal, add a name and optional description, then save the calculation. Use the file icon to open an existing saved projection.
Saved projections preserve the scenario and a snapshot of the usage data, billing context, and feature catalog used for the estimate. This makes saved projections useful for comparing plans over time because later usage changes do not silently rewrite the original calculation.
Use "Open Saved Projection" to return to a saved calculation. After a projection is saved, "Copy link" becomes available so you can share the projection with someone who has access to the Workspace.
# View Your Credit Usage
Explore workspace credit usage with the usage chart, projections, cycle breakdown, and consumption audit log.
You can understand how you've used your credits, when you've used them and your historical usage patterns on the Credit Usage page. You can also ask the [Roboflow Agent](/agents/roboflow-agent) usage questions in chat (ex: "how many credits have I used this cycle?" or "show my usage over the last 30 days by API key"), which opens the Credit Usage Dashboard as a tab with the relevant filters applied.
{% hint style="info" %}
You can access the Credit Usage page from your Workspace Settings > "Credit Usage"
{% endhint %}
At the top, you'll see:
1. A link to a page explaining [how credits work within Roboflow](/platform/billing-and-plans/credits)
2. A button to the [Credit Consumption Audit Log](#credit-consumption-audit-log)
3. Your current Plan Cycle
{% hint style="info" %}
Some workspaces, including annual plans, have a "Flex Cycle" which means Flex Usage is billed on a separate interval from when their plan is billed. Learn more in the [Flex Usage section of the Credits page](/platform/billing-and-plans/credits#flex-usage).
{% endhint %}
There are four main tools you can use to understand your workspace's credit usage:
* [Usage Chart](#usage-chart)
* [Usage Projection](#usage-projection)
* [Current Cycle Breakdown](#current-cycle-breakdown)
* [Credit Consumption Audit Log](#credit-consumption-audit-log)
### Usage Chart
There are several features within the Usage Chart that you can use to get a better understanding of your workspace's credit usage: (numbers reflect the labels on the image above)
#### 1. Cumulative Mode Toggle
By default, the chart is set to show your credit usage cumulatively. This means that the "bars" on the chart reflect the credits you've used within the cycle. This means, for example, if the right-most "bar" is at 15 credits, you've used 15 credits this cycle.\
\
If it's off, it will represent the daily amount you've used on credits, and it will be easier to tell spikes in the days you've used your credits the most, like the image below:
#### 2. Date Range
You can select by Plan Cycle (your workspace plan billing/included-limits cycle) or a date timeframe
#### 3. Filters
You can select an "Attribution" filter and/or a "Usage Type" filter
Attribution Filter: Track workspace usage for a given folder or API key
Within the Attribution filter, you can select either filtering usage attributed to an API Key or a Folder within Roboflow.\
\
This gives you the ability to track workspace usage for a given folder (which can be assigned to a specific team, group, or department) or a specific API key (which can be assigned to a specific use case, device, or deployment).\
\
**API Key Filtering**
**Billing Folders**
This displays a hierarchical tree view of your workspace's folder structure with usage data for each folder. You can:
* Expand and collapse folders to drill into sub-folder usage
* Select or deselect folders to filter the usage chart
Usage is rolled up by default: You can deselect a parent folder to exclude its direct usage from the chart and view only its children's usage.
{% hint style="info" %}
Billing Folders are a premium feature. Learn more [here](/platform/billing-and-plans/billing-folders)
{% endhint %}
Usage Type Filter: Filter different categories of usage or by specific features
You can filter usage to different categories or a specific feature that has credit usage. Click on the dropdowns to expand more granular options.\
\

{% hint style="info" %}
Only categories and features that have had credit usage will appear in this filter.
{% endhint %}
#### 4. Display Mode
You can choose to display by either Credits (which is the default) or Dollars, depending on your workspace's price-per-credit (which can differ by workspace, plan, and custom agreement)
### Usage Projection
The "Projection" tab lets you project your future credit usage based on recent activity.
When you open the Projection tab, you'll see:
* **Projected Credit Use** totals how many credits you're on track to consume
* **Projected Additional Credits** warns you if your usage is likely to exceed your included credits
#### Customize a Projection
Click "Customize Assumptions" to open the Scenario Builder, where you can:
* **Set the projection length** to your current cycle end, next cycle end, 3 months, 1 year, or a custom date
* **Change the basis period** to control which historical usage data informs the projection
* **Adjust per-feature usage rates** to model "what if" scenarios (for example, increasing inference volume or adding a new feature)
You can build scenarios from your current rate, customize individual feature rates, or start from scratch.
#### Save, Share, and Publish Projections
You can save a projection for future reference, share it with teammates via a link, or publish it publicly. Saved projections are accessible from the Projection tab and retain all your custom assumptions.
### Current Cycle Breakdown
In the Current Cycle Breakdown, you can see an overview of credit spend for the current billing cycle.
You can see a breakdown of the credits you've used in the current billing cycle, summarized by feature and broken out across Dataset, Train and Deploy
At the bottom of the page, you can see how close you are to Workspace Limits for:
* Team Members
* Projects
At the bottom of the page, expand "Training Cost Estimator" to predict how long a training job will take and how many credits it will cost for a given model type, epoch count, and dataset shape.
### Credit Consumption Audit Log
If you want to see detailed usage of your credits, click "Audit Log" at the top.
On this screen, select the date range you want to view and click Search.
This view will show you the exact feature and timestamp associated with credit usage to help give you a better idea of what actions are using credits.
## Python SDK
`Workspace.get_plan()` returns the workspace's billing plan, included credits, and feature limits. `Workspace.get_usage()` returns the corresponding usage report (inference calls, training credits, image counts).
These are useful for embedding billing dashboards in internal tools and for guard-railing automation that consumes paid credits.
### Get plan
```python
import roboflow
rf = roboflow.Roboflow(api_key="YOUR_API_KEY")
workspace = rf.workspace()
plan = workspace.get_plan()
print(plan["name"]) # e.g. "growth"
print(plan.get("limits", {})) # included image / inference / training quotas
```
### Get usage
```python
usage = workspace.get_usage()
print(usage)
```
The response is the same JSON that drives the workspace's [billing usage report in the web app](https://app.roboflow.com/) - month-to-date image uploads, training credits consumed, and hosted/dedicated inference counts.
## HTTP API
The same data is exposed at:
* `GET /usage/plan` - plan info
* `POST /:workspace/billing-usage-report` - usage breakdown
See [Billing Folders Usage Report](/platform/billing-and-plans/billing-folders#http-api) for the raw REST endpoint.
## CLI
```bash
roboflow workspace plan
roboflow workspace usage
```
# Plans
Understand the plans that Roboflow has available.
{% hint style="success" %}
For the most up-to-date information on our plans, pricing, limits and their associated features, see our [pricing page](https://roboflow.com/pricing).
{% endhint %}
## Paid Plans
Roboflow offers tiers of paid plans:
* Core - For teams getting started with computer vision
* Enterprise - For large organizations relying on computer vision to power operations
Each plan offers access to distinct features in the platform and upgraded limits.
## Public Plan
Roboflow's free plan is called the Public Plan. This plan gives you basic functionality of the platform with:
* All of your datasets and models listed publicly on [Universe](https://universe.roboflow.com/)
* Credits that refresh every month
* Support from our [Community Forum](https://discuss.roboflow.com/)
Each user can only create one workspace with a Public Plan.
[See our pricing page](https://roboflow.com/pricing) for the latest information on credit rates and limits!
## Manage Your Plan
* [Purchase a Plan](/platform/billing-and-plans/plans/purchase-a-plan)
* [Cancel a Plan](/platform/billing-and-plans/plans/cancel-a-plan)
* [Update Payment Method](/platform/billing-and-plans/plans/update-payment-method)
* [Update Billing Details](/platform/billing-and-plans/plans/update-billing-details)
* [View Invoices](/platform/billing-and-plans/plans/view-invoices)
# Cancel a Plan
How to cancel a paid plan and keep access until the end of the current billing cycle.
To cancel a paid plan, go to your workspace's [Plan & Billing page](https://app.roboflow.com/the-analytics-zone/settings/plan) and select "Cancel Plan".
On the next screen, confirm that you're sure you want to cancel your plan.
You'll receive a confirmation that your plan has been downgraded.
{% hint style="info" %}
When you cancel your plan, you'll continue to have access to Roboflow at your current plan level until the end of your current billing cycle.
{% endhint %}
# Purchase a Plan
How to purchase a new paid plan.
To purchase or upgrade a paid plan, go to your workspace's [Plan & Billing page](https://app.roboflow.com/the-analytics-zone/settings/plan) and select either "Purchase Plan" or "Change Plan"
This will open a screen that presents you with all of the possible plan options. Select the plan and billing cycle you would prefer.
You'll be redirect to a checkout page. From this screen you'll need to:
* Fill out your payment method.
* Agree to the terms of subscription
* Click Subscribe
Once subscribed, you'll be redirected into the application with a confirmation of new plan!
# Update Billing Details
Update your billing email, address, and tax ID information.
1. To update a billing details, go to your workspace's [Plan & Billing page](https://app.roboflow.com/the-analytics-zone/settings/plan) and select "Go to Portal".
2. In the billing portal, select "Update Information"
3. Update all of the fields you would like to change and click "Save".
# Update Payment Method
Add or change the payment method on file for your workspace through the billing portal.
1. To update your payment method, go to your workspace's [Plan & Billing page](https://app.roboflow.com/the-analytics-zone/settings/plan) and select "Go to Portal".
2. In the billing portal, select "Add payment method"
3. Enter in all the details from your payment method and click "Add". If you want to use the the payment method as the default method, also check this box.
# View Invoices
View, download, and inspect past invoices and receipts from the workspace billing portal.
1. To view past invoices, go to your workspace's [Plan & Billing page](https://app.roboflow.com/the-analytics-zone/settings/plan) and select "Go to Portal".
2. In the billing portal, click on any of the available invoices. You can click "view more" to show more invoices or click the search icon to find a specific invoice.
This screen will present you with three options:
* Downalod your Invoice
* Download Receipt
* View Invoice and Payment details
By clicking on the last option you can see the invoice in it's entirety to understand how your account was charged.
# Support
Get help with Roboflow, check platform status, and manage your account.
These pages cover how to reach Roboflow Support and what to include in a request, so you get an answer faster. They also cover account tasks (ex: deleting your account, applying for research credits).
# Delete Your Roboflow Account
If you need to delete your account for any reason, you can do so within the app.
{% hint style="danger" %}
**Please note that deleting your account is an irrevocable step.** We cannot restore any data, images, annotations, or projects once your account has been deleted.
{% endhint %}
You can delete your account by going to your [Account Settings](https://app.roboflow.com/settings/account). You can navigate here by:
* Clicking your name on the sidebar
* Clicking Account Settings
On this page, click "Delete Account"
Depending on the state of your account and the workspaces you're a part of, you may be shown prompts to confirm the deletion of your data. This is to ensure that your data is not accidentally deleted.
You cannot delete your account while you are the sole owner of a Workspace on an Enterprise plan. Contact to delete that Workspace first, or add another owner to it.
# Apply for Research Credits
How students and researchers can apply for a free Roboflow research plan with extra monthly credits.
We offer additional platform credits for students and researchers in academia.
These credits are available for anyone with an academic email address and who is using Roboflow for non-commercial work related to research or academia.
### Research Plan
The following plan is available for students and researchers:
| Plan Features |
| ---------------------------- |
| Enhanced image augmentations |
| 50 credits per month |
| 15 team members |
| 20 projects |
By applying for a research plan, all data in the workspace where you make your application will be made public on [Roboflow Universe](https://universe.roboflow.com/). Making the projects open-source on Universe ensures that the entire computer vision community and beyond can benefit.
{% hint style="info" %}
If you are looking for data privacy, you will need to subscribe to a paid plan. See our latest plans and pricing on [our pricing page](https://roboflow.com/pricing).
{% endhint %}
### Apply for Research Credits
To apply for research credits, go to [**Plan & Billing Settings**](https://app.roboflow.com/settings/plan) (or go there through "Settings" -> "Plan & Billing")
Scroll down to the bottom of the Plan & Billing page to the "Using Roboflow for research or education?" option, then click "Request Access":
Request Access to the Edu/Research plan inside Plan & Billing Settings
{% hint style="warning" %}
You may not see the section and the "Request Access" button if you are currently on a paid plan or a trial for a paid plan. If you are on a trial, you can [cancel your trial](/platform/billing-and-plans/premium-trial#cancelling-a-trial).
{% endhint %}
A window will then appear from which you can choose your plan, and confirm you want to upgrade your Workspace.
### Roboflow in the Classroom
Students and teachers using Roboflow in the classroom are encouraged to contact us for help developing course materials or ensuring account access meets the needs of your class. Hobbyists working on projects can earn additional image and training credits by sharing work in blog posts, videos, forum discussions, and more.
# What to Include in a Support Request
The faster we can reproduce your problem, the faster we can fix it. Each category below lists the specific information that accelerates investigation and avoids back-and-forth.
The Roboflow Support team resolves issues faster when a request includes enough detail to reproduce the problem. Find your situation below and include the listed information when you reach out.
## What to Always Include
Regardless of the problem type, these five things speed up every support case:
1. **Project and workspace**: the workspace ID or a direct link to the affected project or workspace. (Needed when you submit by email; otherwise we usually have it automatically.)
2. **Workspace access**: [grant the Roboflow Support team access to your workspace](/platform/support/sharing-a-workspace-with-roboflow-support).
3. **Exact error**: the verbatim error message or response body, not a paraphrase.
4. **Time window**: specific UTC timestamps, not "yesterday."
5. **What you tried**: each attempt and its result.
## Inference API Errors
Your production application starts receiving HTTP 4xx or 5xx responses from `serverless.roboflow.com`. Error messages may include "Internal error," "Model is temporarily not ready - retry request," "Could not acquire model manager lock," or timeouts after 30 seconds. Failure rates spike suddenly, often within a narrow window of time.
These errors can stem from platform-side infrastructure incidents, model eviction from memory under load, or client-side request patterns that overwhelm capacity. Without a time window and a request log, it is difficult to zero in on the specific issue.
What helps most:
* Exact time window of the failures, including timezone or UTC offset. ("2026-05-22 12:30–12:40 UTC" is far easier to act on than "this morning".)
* The full inference endpoint URL (ex: `https://serverless.roboflow.com/test-endpoint/11` for the [Serverless Cloud API](https://docs.roboflow.com/deployment/roboflow-cloud/serverless-api), or `name.deployment@roboflow.com` for a [dedicated deployment](https://docs.roboflow.com/deployment/roboflow-cloud/dedicated-deployments)).
* A screenshot or log export of the error responses, showing HTTP status codes, response bodies, and timestamps. A screenshot of your application or monitoring dashboard showing the event is ideal.
* Approximate request volume during the window: total requests sent, how many failed, and the sending pattern (burst vs. steady).
* Whether failures are still ongoing or have resolved.
* Whether credits were consumed for failed requests.
Example submission:
> "We saw a \~90% failure rate hitting `https://serverless.roboflow.com/test-endpoint/11` between 11:20 and 11:35 AM UTC on 2026-05-22. We were sending roughly 150 requests/hour at the time. The errors returned HTTP 503 with body {"message":"Internal error."}. Attached is a screenshot of our application log. The failure appears to have self-resolved around 11:40 AM. Our workspace id is fleet-pulse. Were we billed for the failed requests?"
## Inference Performance Problems
The inference server runs correctly but consumes more memory than expected, grows over time, slows down under load, or produces unacceptably high latency for your use case. Common variants include memory growing unboundedly over hours on a Jetson device, a large model taking too long to load on first request, or throughput degrading under parallel batch requests.
Memory and latency depend on model architecture, batch size, concurrency settings, image dimensions, hardware, and [inference server](https://docs.roboflow.com/deployment/self-hosted/self-hosted) version. Almost every variable matters.
What helps most:
* Inference server version: the exact Docker image tag (ex: `roboflow/roboflow-inference-server-jetson-5.1.1:1.2.6`).
* Hardware specs: GPU model, total RAM, and whether you are on Jetson and which JetPack version.
* Model IDs and types of every model loaded (ex: `object-detection-5gavt/16`, YOLOv8-s, ViT 224×224), plus whether TRT packages exist for the device.
* Client configuration: `max_concurrent_requests`, `max_batch_size`, and how batches are constructed on the client side.
* A memory or CPU usage graph over time showing the degradation pattern (ex: a screenshot from `jtop`, `htop`, or a monitoring tool showing memory over roughly one hour).
* Typical image size in KB, or exact pixel dimensions if known.
* Environment variable overrides in use (ex: `USE_INFERENCE_MODELS=True/False`).
* Steps already tried, including version rollbacks and flag changes, and the effect of each.
Example submission:
> "We're running roboflow/roboflow-inference-server-jetson-5.1.1:1.2.6 on an NVIDIA Jetson AGX Orin (JetPack 5.1.1). We load 7 models simultaneously: 2 YOLOv8-s object detection and 5 ViT classification models. After \~2 hours under production load (max\_concurrent\_requests=10, max\_batch\_size=100, image size \~50KB), memory climbs from 8GB to \~15GB. Attached is a jtop graph. We tried setting USE\_INFERENCE\_MODELS=False, which roughly halved memory but also reduced accuracy."
## Serverless Workflow Errors
A Roboflow [Workflow](https://docs.roboflow.com/workflows) (accessed via the Workflows UI or `serverless.roboflow.com/infer/workflows/...`) returns errors, times out, or produces unexpected results. Errors may be HTTP 500 "Internal error," 502 "Bad gateway," or silent failures where jobs appear to run but return no data. This is distinct from simple model inference failures: it typically involves multi-step pipelines, custom Python blocks, or complex block chains.
Workflows can fail at any step in the pipeline. Knowing which block is at fault, how many requests were sent and in what pattern, and the exact workflow definition narrows down the root cause.
What helps most:
* The full workflow URL (ex: `https://serverless.roboflow.com/infer/workflows/test/test-workflow`).
* A breakdown of when failures occurred, including timestamps and approximate request counts per time window.
* HTTP status codes and full response bodies for the failing requests. "500 Internal Error" alone is far less useful than the full response body.
* Whether failures are total (all requests fail) or partial (some succeed).
* [Workspace access for the Roboflow Support team](/platform/support/sharing-a-workspace-with-roboflow-support), so we can inspect the workflow definition and server-side logs.
* Any recent changes to the workflow before the failures started (new blocks added, models swapped, image inputs changed).
* For batch jobs: the [batch job](https://docs.roboflow.com/deployment/roboflow-cloud/batch-processing) ID from the "Activity" section, expected vs. actual output record count, and job duration.
Example submission:
> "Our workflow at `https://serverless.roboflow.com/infer/workflows/my-workspace/classifier-pipeline` returned 170 HTTP 500 responses out of 195 requests between 12:33 and 12:40 UTC on 2026-05-25. Requests came in bursts of \~15 at a time. The response body was {"message":"Internal error."} for all failures. The workflow recovered on its own after \~10 minutes. We haven't changed the workflow recently. I've granted workspace access to ."
## Model Training Issues
A [training](https://docs.roboflow.com/models) job fails outright, gets stuck, produces a generic error popup with no details, consumes credits without producing a trained model, or the model behaves unexpectedly after training (ex: max detections are lower than expected, or training on a large dataset hangs during version generation).
Training failures can come from dataset characteristics (corrupt images, label format problems, class imbalances), resource constraints, or platform bugs. The support team needs to look at your specific project and dataset.
What helps most:
* The model type and size you attempted to train (ex: RF-DETR Nano, YOLOv8-L, SAM3).
* The model name or a direct link to the affected model (ex: `app.roboflow.com/my-workspace/my-project/models/my-model`).
* The dataset version number used for training.
* The error message verbatim, copied and pasted in full rather than paraphrased. If it appears in a popup, screenshot it.
* The training job ID if visible in the UI.
* Whether credits were charged for the failed attempt.
* Number of images and classes in the dataset version.
* Any recent changes to the dataset before the failure (new images added, class names changed, preprocessing settings altered).
* For foundation model fine-tuning (ex: SAM): the dataset size, prompt type used, and where in the process it crashed.
Example submission:
> "Training job for model YOLOv8-L on dataset version 3 of project foo-bar in workspace baz-co fails every time with a generic popup error, no further detail shown. The dataset has \~2,400 images across 12 classes. I've been charged credits for two failed attempts. Here is a screenshot of the error popup. Workspace access has been granted to support."
## Dataset & Image Visibility Issues
Images that were uploaded do not appear in the dataset view (the header count differs from the number actually visible when browsing), images added to a dataset after labeling disappear, a dataset version preparation hangs indefinitely, or a batch ZIP upload appears to succeed but images are not accessible.
These issues often require backend log inspection. The support team needs a precise project identifier and ideally a record of the specific upload event.
What helps most:
* The discrepancy in numbers: how many images the platform shows vs. how many are actually visible when you browse the dataset tab (ex: "Header says 1,004 images but only 368 show when browsing").
* When the upload occurred, which helps correlate with platform events.
* The upload method used: drag-and-drop in the browser, Python SDK, REST API, ZIP upload, or mobile app.
* For batch or ZIP uploads: the batch job ID from the "Activity" section if available.
* A screenshot showing the discrepancy (header count vs. browse view).
Example submission:
> "My project foo\_bar\_2 in workspace abc\_def shows 1,004 images in the project header but only 368 are visible when I click into the dataset tab. I uploaded the images via drag-and-drop on 2026-05-25 around 9 AM EST. Workspace access has been granted. Screenshot attached."
## Roboflow App UI Errors
Something in the Roboflow web app isn't working as expected outside of the annotation editor: pages fail to load or stay stuck on a spinner, actions like deleting a dataset version appear to complete but have no effect, settings panels don't open, uploads stall in the activity queue, the usage dashboard won't render, or buttons trigger no response.
UI bugs are frequently caused by a failing or slow network request happening behind the scenes, or a JavaScript error, something the visible interface doesn't surface directly. The browser's developer tools expose what's going wrong at the network and JavaScript level.
What helps most:
* A screen recording (Loom, video, or GIF) demonstrating the bug. This is the single most valuable artifact for these cases.
* A screenshot of the browser network request log, which shows whether any requests are failing or long-running. See [Chrome's network panel documentation](https://developer.chrome.com/docs/devtools/network) for how to open it; other browsers have similar tools.
* Any errors in the browser console log. See [Chrome's console documentation](https://developer.chrome.com/docs/devtools/console/log) for how to access it; other browsers have similar tools.
* Your browser name and version (ex: Chrome 124 on macOS 14.4).
* Step-by-step reproduction steps: what you clicked, in what order, starting from a fresh page load.
* Whether the bug appeared recently, and whether it coincides with a platform update you noticed.
* The exact expected behavior vs. actual behavior.
* Whether the issue is consistent or intermittent.
Example submission:
> "On the dataset tab of project `test-project` (workspace `test-workspace`), clicking 'Delete version' on version 3 shows a success toast but the version remains listed. The network log screenshot shows a `DELETE` request returning `500 Internal Server Error`. The console shows `Uncaught TypeError: Cannot read properties of undefined`. Browser: Firefox 126 on Ubuntu 22.04. Reproduced in both normal and private windows. Screen recording attached."
## Annotation Tool Bugs
A tool in the Roboflow annotation editor behaves incorrectly: keyboard shortcuts stop working, selecting one tool reverts to another, undo (Ctrl+Z) deletes more than expected, Label Assist keeps loading indefinitely, or annotations are not saved when they should be.
Annotation bugs are often browser-specific, OS-specific, or caused by recent platform deployments. A screen recording is almost always more informative than a written description.
What helps most:
* A screen recording (Loom, video, or GIF) demonstrating the bug. Annotation behavior is difficult to describe in words and easy to show, so this is the single most valuable artifact for these cases.
* A screenshot of the browser network request log, which shows whether any requests are failing or long-running. See [Chrome's network panel documentation](https://developer.chrome.com/docs/devtools/network) for how to open it; other browsers have similar tools.
* Any errors in the browser console log. See [Chrome's console documentation](https://developer.chrome.com/docs/devtools/console/log) for how to access it; other browsers have similar tools.
* Your browser name and version (ex: Chrome 124 on macOS 14.4).
* The project type (Object Detection, Instance Segmentation, Classification, etc.) and the specific annotation tool in use (polygon, polyline, bounding box, smart polygon).
* The keyboard shortcut or action that triggers the bug, with step-by-step reproduction steps.
* Whether the issue affects all images or specific ones. If specific, share the project link and image name or ID.
* Whether the bug appeared recently, and whether it coincides with a platform update you noticed.
* The exact behavior expected vs. what actually happens.
* Whether the issue is consistent or intermittent.
Example submission:
> "In projects my-test-project and my-other-test-project (workspace test-workspace), the polyline tool has three bugs introduced recently: (1) zooming with Ctrl+scroll while the polyline tool is active switches to the bounding box tool; (2) Ctrl+Z now deletes the entire annotation instead of just the last point; (3) pressing Esc now saves the annotation instead of discarding it. Here are two Loom recordings showing each behavior: \[link 1], \[link 2]. Browser: Chrome 124 on Windows 11."
## API Authentication Errors
API calls to model inference endpoints, the Roboflow Python SDK, or the HTTP API return 403 Forbidden with a message like "Missing or insufficient permissions." This may happen immediately after upgrading a plan, when trying to access a private model, or after an API key was rotated.
403 errors can be caused by an incorrect or expired API key, using a workspace-level key instead of a project-level key (or vice versa), accessing a model from a plan that doesn't include that feature, or a delay in permissions propagating after a plan upgrade.
What helps most:
* The full error response: the complete HTTP status code and response body, not just the status code. For SDK errors, the full Python traceback.
* The endpoint or SDK method being called (ex: `serverless.roboflow.com/model-name/version`, `InferenceHTTPClient`, `CLIENT.infer()`).
* The model ID and version number.
* The type of API key in use, workspace or project. Do not share the key itself, just specify the type.
* Whether the key was recently rotated or the plan was recently changed.
* A redacted code snippet showing how you construct the API call, with the actual key replaced by a placeholder like `YOUR_API_KEY`.
* Whether this worked before, and what changed.
Example submission:
> "I'm getting HTTPError: 403 Client Error: Forbidden when calling `https://serverless.roboflow.com/test-endpoint/1` with the `Authorization: Bearer YOUR_API_KEY` header. I'm using the workspace-level API key. This started after I upgraded from the Free Plan to Core yesterday. The model is private. Here is the full Python traceback: \[paste]. The workspace is my-test-workspace. Workspace access granted."
## Account Access Problems
You're unable to log in to Roboflow: the login page keeps loading, a Google [SSO](/platform/enterprise-features/single-sign-on-sso) login is blocked, a forgotten-password reset isn't working, or an account is locked because a connected Google account is unavailable.
Access issues are often tied to the specific email or identity provider in use. They can also be caused by OAuth scope changes on Google's end or by browser or extension interference.
What helps most:
* The email address associated with the account you're trying to access.
* The login method: email and password, Google SSO, or GitHub SSO.
* The exact error message or behavior: "page keeps loading," "invalid credentials," "account not found," or a specific error code.
* A screenshot of the error state.
* Browser name and version, and whether you've tried an incognito/private window or a different browser.
* Whether this is a new issue or has always been this way (ex: a newly created account vs. an existing one that stopped working).
## Workspace & Project Management Issues
You can't [delete a workspace](/platform/workspaces/delete-a-workspace) or project (the deletion button appears to do nothing or returns an error), a workspace accidentally upgraded to the wrong plan, ownership won't transfer, projects become inaccessible after a billing failure, an image upload limit is hit, or a [public project](https://docs.roboflow.com/datasets/manage/make-a-project-public) accidentally exposes private data.
What helps most:
* The specific action that's failing and the error message or behavior observed.
* A screenshot of the error state or the undesired project state.
* For deletion issues: confirmation that you've already deleted all projects and images within the workspace, a common prerequisite.
* For accidental upgrades: the workspace IDs for both the one that was upgraded and the one that was intended, and the approximate time of the change.
* For image limit issues: how many images are in the workspace currently and what the limit shown is.
## Credits & Usage Issues
Credits deplete faster than expected, credits are charged for failed training jobs or failed inference, or the [usage dashboard](/platform/billing-and-plans/credits/view-credit-usage) isn't loading.
What helps most:
* The workspace name where the credit issue occurred.
* The approximate date and time of the unexpected credit consumption.
* What operation consumed the credits: inference calls, training, or batch processing.
* Whether a known [platform incident](/platform/support/roboflow-status-and-uptime) coincides with the consumption spike, and whether you saw errors at that time.
* A screenshot of the usage dashboard showing the consumption spike.
## Data Privacy & Account Deletion
Requests to [delete an account](/platform/support/account-deletion) and all associated personal data (GDPR erasure requests), incomplete data deletion where images remain publicly accessible after account deletion, or requests to remove a specific project from public Universe.
What helps most:
* The email address of the account to be deleted.
* Confirmation that all projects and workspaces have been deleted from within the account first, which is required before account deletion can proceed.
* For GDPR requests: a statement of the legal basis for the request and a description of what data you believe remains accessible.
* A link to any specific public Universe resource that should be removed, with an explanation of why.
## Security Issues
An API key was accidentally exposed (ex: committed to a public GitHub repo or shared in a chat), or a security researcher found a vulnerability in the Roboflow platform.
{% hint style="warning" %}
If a key is exposed, immediately rotate it in your Roboflow workspace settings. Rotating invalidates the compromised key. Then notify support with the approximate time of exposure so we can audit for any unauthorized use.
{% endhint %}
For exposed keys, include:
* Confirmation that the key has already been rotated.
* The approximate date and time the key was exposed, and through what channel.
* Whether there is evidence of unauthorized API usage during the exposure window.
For vulnerability reports, email with a clear description of the vulnerability, reproduction steps, and the potential impact.
# Roboflow Status and Uptime
Check whether Roboflow is down or having issues. Live status, uptime, and what to do if the app or API isn't working.
***
### Roboflow Status
Need to know if Roboflow is down? Check the live status page first.
[**status.roboflow.com**](https://status.roboflow.com/) shows real-time uptime for the Roboflow App, Hosted Inference API, REST API, and Universe.
### Is Roboflow down right now?
If the [status page](https://status.roboflow.com/) shows **All Systems Operational**, the platform is up. A problem you're seeing is most likely local - check the troubleshooting steps below.
If the status page reports a degradation or outage, we're on it.
### Check a specific service
The status page tracks each component independently:
| Service | What it covers |
| -------------------- | ---------------------------------------------------- |
| Roboflow App | `app.roboflow.com` - dashboard, training, annotation |
| Hosted Inference API | `detect.roboflow.com` - model predictions |
| REST API | dataset, project, and workspace endpoints |
| Universe | `universe.roboflow.com` - public datasets and models |
| Serverless Cloud API | serverless inference |
### Roboflow not working? Try this first
Before assuming an outage, rule out a local issue:
1. **Confirm the** [**status page**](https://status.roboflow.com/) **is green.** If it's not, it's us.
2. **Check your** [**API key**](https://app.roboflow.com/settings/api)**.** A `401`/`403` is an auth problem, not an outage.
3. **Hard refresh** (`Cmd/Ctrl + Shift + R`) and clear cache if the app won't load.
4. **Retry on a `5xx`.** Server errors are usually transient - back off and retry.
5. **Update your SDK:** `pip install --upgrade roboflow inference`.
6. **Check your network** - VPNs and corporate firewalls can block `*.roboflow.com`.
Still stuck? Search the [Community Forum](https://discuss.roboflow.com/) or, on a paid plan, reach out via in-app live chat.
### FAQ
**Is Roboflow down?** Check [status.roboflow.com](https://status.roboflow.com/) for the live answer. Green means the platform is operational.
**Why is Roboflow slow or not loading?** If the status page is green, it's likely local - hard refresh, clear cache, and check your network. Persistent issues during a green status are worth posting on the [forum](https://discuss.roboflow.com/).
**Is the Roboflow API down?** The Hosted Inference API and REST API are tracked separately on the [status page](https://status.roboflow.com/). A `5xx` is server-side; a `401`/`403` is an auth issue with your API key.
**Is Roboflow Universe down?** Universe (`universe.roboflow.com`) has its own line item on the [status page](https://status.roboflow.com/).
**How do I get notified about outages?** Subscribe on the [status page](https://status.roboflow.com/) for email/SMS/Slack/webhook alerts on new incidents.
# Share a Workspace with Support
How to authorize the Roboflow Support team to access your workspace for debugging, via chat, email, or a ticket.
Authorize the Roboflow Support team to access your workspace. This authorization allows our team to directly review the projects in your workspace and help with debugging and/or issue resolution.
{% hint style="info" %}
Only accounts with **admin** or **creator** privileges are capable of granting workspace access to Roboflow Support.
{% endhint %}
If your account has **labeler** or **reviewer** permissions, please have an admin or creator from your workspace reach out to to grant workspace access.
### In App Chat
In the chat flow, you will be prompted with the question below:
Grant access to Roboflow Support
Select **"Yes, provide support access"** to authorize the Roboflow Support team to access the projects in your workspace and help with debugging and/or issue resolution.
### Email
When contacting Roboflow Support (), please include the sentence: **"I grant Roboflow Support permission to access the workspace."**
This explicitly authorizes the Roboflow Support team to access the projects in your workspace and help with debugging and/or issue resolution.
### Ticket
In the ticket submission flow, you will be prompted with the question below:
Grant access to Roboflow Support
Select the "Grant Roboflow Support access" checkbox to authorize the Roboflow Support team to access the projects in your workspace and help with debugging and/or issue resolution.
### See and Remove Support Access
Roboflow staff are listed apart from your own team. On the [Members settings page](https://app.roboflow.com/settings/members), open the "Roboflow Support Users" section to see everyone from Roboflow who has access. To remove one, click the three dots next to their name and choose "Remove From Workspace". Only a workspace owner can remove them.
Support users do not appear in the team avatars at the top of the Projects and Workflows tabs, and they do not count against your [team member seat limit](/platform/workspaces/team-members).
# Deploy a Model or Workflow
Learn how to deploy workflows and models trained on or uploaded to Roboflow.
We support both managed deployments and self-hosted deployment of both models and workflows. You reference a trained model by its [model ID](https://docs.roboflow.com/models/model-ids) when you deploy it or run inference.
## Managed Deployments
These options leverage Roboflow's cloud infrastructure to run your models and workflows, eliminating the need for you to manage your own hardware or software.
## Self-Hosted Deployment
Run Inference on infrastructure you manage. Start with a runtime, then add Deployment Manager if you need to manage a fleet of devices.
Cover image
Run Inference
Choose Inference Server, Inference Library, or another SDK.
{% hint style="info" %}
Deployment Manager is available on Enterprise plans. Both options run on infrastructure you manage.
{% endhint %}
What is Inference?
{% hint style="info" %}
In computer vision, inference refers to the process of using a trained model to analyze new images or videos and make predictions. For example, an object detection model might be used to identify and locate objects in a video stream, or a classification model might be used to categorize images based on their content.
{% endhint %}
[***Roboflow Inference***](/deployment/self-hosted/self-hosted) is an open-source project that provides a powerful and flexible framework for deploying computer vision models and workflows. It is the engine that powers most of Roboflow's managed deployment services. You can also self host it or use it to deploy your vision workflows to edge devices. Roboflow Inference offers a range of features and capabilities, including:
* Support for various model architectures and tasks, including object detection, classification, instance segmentation, and more.
* Workflows, which lets you build computer vision applications by combining different models, pre-built logic, and external applications by choosing from hundreds of building Blocks.
* Hardware acceleration for optimized performance on different devices, including CPUs, GPUs, and edge devices like NVIDIA Jetson.
* Multiprocessing for efficient use of resources.
* Video decoding for seamless processing of video streams.
* HTTP interface, APIs and docker images to simplify deployment
* Integration with Roboflow's hosted deployment options and the Roboflow platform.
What is a Workflow?
[Workflows](https://docs.roboflow.com/workflows) enable you to build complex computer vision applications by combining different models, pre-built logic, and external applications. They provide a visual, low-code environment for designing and deploying sophisticated computer vision pipelines.
With Workflows, you can:
* Chain multiple models together to perform complex tasks.
* Add custom logic and decision-making to your applications.
* Integrate with external systems and APIs.
* Track, count, time, measure, and visualize objects in images and videos.
## Choosing the Right Deployment Option
The best deployment option depends on whether your workload is real-time or bulk, how much latency you can tolerate, where your data lives, and how much infrastructure you want to manage. See [Choosing a Deployment Option](/deployment/choosing-a-deployment) for a side-by-side comparison of every option and a short decision flow to help you pick.
## Going to Production
Before you ship, walk through the [Production Readiness Checklist](/deployment/production-checklist) for error handling, retries, timeouts, rate limits, and scaling guidance.
# Choosing a Deployment Option
Compare Roboflow's deployment options - Serverless Cloud API, Dedicated Deployments, Batch Processing, Self-Hosted Inference, and edge devices - and pick the right one for your use case.
Roboflow offers several ways to run your models and [Workflows](https://docs.roboflow.com/workflows), from fully managed cloud APIs to inference on your own hardware. The right choice depends on whether your workload is real-time or bulk, how much latency you can tolerate, where your data is allowed to live, and how much infrastructure you want to manage.
Use the tables to compare options at a glance, then follow the decision flow below to narrow down.
## Roboflow Cloud
Roboflow runs the infrastructure. You send data to an API endpoint and get predictions back.
Roboflow cloud, with infrastructure auto-provisioned per job
GPU
Yes: GPU-accelerated and auto-scaling
CPU (dev-cpu / prod-cpu) or GPU (dev-gpu / prod-gpu)
CPU or GPU, selected per job
Latency profile
Real-time, synchronous. The first request to a model that isn't already loaded incurs a warmup of several seconds, then later requests are fast while the model stays cached.
Consistent, dedicated performance. Deployments auto-pause after a period of inactivity (fixed at 1 hour for dev-cpu / dev-gpu) and resume when you send a request.
Asynchronous, not suitable for real-time. Machines are provisioned when resources are available, typically after a few minutes, with no guaranteed exact start time.
Getting started quickly and scaling automatically for real-time single-image or Workflow inference, when the deployment device has a persistent internet connection.
Predictable or production workloads, resource isolation, and large models that need GPU acceleration (ex: Florence-2, SAM2).
Cost-effective processing of large volumes of stored images and videos with a Workflow.
## Self-Hosted
You run inference on your own hardware, so data never has to leave your network.
All plans (open source). TensorRT private-model packages and licensing to run on more than one device require Enterprise.
Enterprise only.
Best for
On-prem, edge, air-gapped, or VPC-bound workloads where you want maximum control over environment and latency.
Setting up, deploying, and monitoring a fleet of edge devices at scale.
## Capabilities at a glance
| | Serverless | Dedicated | Self-Hosted |
| ----------------------------------------------------- | ---------- | --------- | ---------------------------------------------------------------- |
| Fine-tuned and pre-trained models | Yes | Yes | Yes |
| Workflows | Yes | Yes | Yes |
| Heavy foundation models (SAM2, Florence-2, PaliGemma) | No | Yes | Yes |
| Cloud-hosted VLMs (GPT, Claude, Gemini blocks) | Yes | Yes | Yes |
| Video streaming | No | Yes | Yes |
| Custom Python blocks and extra dependencies | No | Yes | Yes |
| Runs offline | No | No | Yes |
| Billing | Per call | Hourly | Free plus [metered](https://roboflow.com/pricing) cloud features |
Scale-up behavior differs too: the Serverless Cloud API scales to zero when idle and back up under load with a cold start of a few seconds, while a Dedicated Deployment takes a minute or two to start. Ephemeral `dev-cpu` and `dev-gpu` deployments are limited to short sessions and may be evicted when capacity is needed for higher-priority work; the persistent `prod-*` types have guaranteed capacity and no session limit.
## Bring your own cloud
If compliance policies require workloads to stay inside your own infrastructure, you can run Inference on your own AWS, Azure, or GCP account: see [Deploy in Your Own Cloud](/deployment/self-hosted/inference-server/install/cloud). Billing is the same as self-hosting on an edge device, and you pay your cloud provider for the machine.
## Decision flow
1. **Real-time or bulk?** If you need results as data arrives - live video, interactive apps, per-request inference - take the real-time path. If you're processing a large backlog of stored images or videos, use [Batch Processing](/deployment/roboflow-cloud/batch-processing).
2. **Sync or async?** Real-time inference is synchronous: you send a request and get a response. Batch Processing is asynchronous: you submit a job and collect results when it finishes, so don't depend on an exact start time.
3. **Cloud or on-prem?** If your data can leave your network and you want zero infrastructure to manage, use a Roboflow-hosted cloud option. If your workload must stay on-prem, on the edge, or air-gapped, run [Self-Hosted Inference](/deployment/self-hosted/self-hosted).
4. **Managed or self-managed?**
* In the cloud, choose [Dedicated Deployments](/deployment/roboflow-cloud/dedicated-deployments) when you need predictable dedicated performance or a pinned GPU type; otherwise the [Serverless Cloud API](/deployment/roboflow-cloud/serverless-api) is the simplest default.
* On your own hardware, use [Deployment Manager](/deployment/self-hosted/enterprise/deployment-manager) (Enterprise) when you want Roboflow to manage and monitor a fleet of edge devices for you; otherwise manage the [Self-Hosted Inference](/deployment/self-hosted/self-hosted) server yourself.
Once you've picked an option, see the [Production Readiness Checklist](/deployment/production-checklist) for error handling, retries, rate limits, and replica sizing.
## Inference vs other deployment stacks
Roboflow Inference overlaps with several other tools. This table summarizes when another stack is the better fit, and what you give up by choosing it.
### Inference servers
| Tool | How it compares | Choose it if |
| ---------------------- | --------------------------------------------------------------------------------------------------------------------------------------------------------------------------------------------------------------------------- | -------------------------------------------------------------------------------------------------------------------- |
| **NVIDIA Triton** | A powerhouse for ML experts deploying at scale, focused on extremely optimized pipelines on NVIDIA hardware. It trades simplicity and iteration speed for raw speed, and its model ensembles are more rigid than Workflows. | You are an ML expert on a tightly defined project that values speed on NVIDIA GPUs above all else. |
| **Lightning LitServe** | Lightweight, customizable, and task-agnostic (NLP, audio, tabular as well as vision), so it is not as feature-rich for computer vision and has no built-in video streaming or model-chaining abstraction. | You are working on general-purpose ML tasks and want a featureful starting point instead of rolling your own server. |
| **TensorFlow Serving** | Good if you are deeply invested in TensorFlow across modalities. It can be complex to set up and lacks table-stakes features like pre- and post-processing, which often need custom code. | The TensorFlow ecosystem matters a lot to you and you are willing to do the legwork. |
| **TorchServe** | The PyTorch equivalent, optimized for serving PyTorch models across vision, NLP, tabular data, and audio. Designed for large-scale cloud deployments and light on vision-specific features like video streaming. | You want to scale and customize PyTorch model deployment and do not need vision-specific functionality. |
| **FastAPI or Flask** | Rolling your own. Inference's own HTTP interface is built on FastAPI, so starting from scratch means reinventing solved problems. | Your main goal is learning the intricacies of building an inference server. |
### Edge deployment
| Tool | How it compares | Choose it if |
| --------------------- | --------------------------------------------------------------------------------------------------------------------------------------------------------------------------------------------------------------------------------------- | --------------------------------------------------------------------------------------------------------------------- |
| **Edge Impulse** | Focused on very low-power edge devices and embedded systems, and uniquely good with microcontrollers. Its TinyML focus makes it less suited to video processing and modern state-of-the-art models, and it has no Workflows equivalent. | You are building an IoT or wearable device that cannot run more powerful models. |
| **NVIDIA DeepStream** | NVIDIA's platform for highly optimized video pipelines using TensorRT and CUDA, targeting many of the same problems as Inference. It has a steep learning curve, requires familiarity with NVIDIA tooling, and is not open source. | You are an expert willing to invest heavily in optimizing a single project where throughput is the primary objective. |
# Project Deployment API
Find the API operations that manage a Project's base Workflow.
A Project's hosted model endpoint is backed by a base Workflow. The API operations for reading that Workflow and selecting its model are documented in [Manage Workflows](https://docs.roboflow.com/workflows/manage/manage-workflows#project-base-workflows).
# Production Readiness Checklist
Production readiness for Roboflow deployments - HTTP error handling and retries, timeouts and cold starts, rate limits, and Dedicated Deployment replica sizing.
Once you've [chosen a deployment option](/deployment/choosing-a-deployment), use this page to harden your integration before it carries production traffic. It covers error handling and retries, timeouts and cold starts, rate limits, and replica sizing for [Dedicated Deployments](/deployment/roboflow-cloud/dedicated-deployments).
## HTTP errors and retries
Roboflow's inference and management APIs use standard HTTP status codes. The full cross-tool table (REST status codes, SDK exceptions, and CLI exit codes) lives in [Errors and Status Codes](https://docs.roboflow.com/reference/errors-and-status-codes). The key rule for production is to retry only what's actually retryable:
| Status | Retry? | Guidance |
| ------------- | ------ | -------------------------------------------------------------------------------------------------------------------------------------- |
| `200` / `204` | - | Success. |
| `400` | No | Malformed request - fix the payload; retrying sends the same bad request. |
| `401` / `403` | No | Authentication or access failure. The key won't become valid on retry; check the API key and its scopes. |
| `402` / `423` | No | Plan limitation, quota reached, or paused billing. Resolve on the [billing](https://roboflow.com/pricing) side, don't retry in a loop. |
| `404` | No | Resource doesn't exist or isn't visible to your key. |
| `429` | Yes | Rate limited. Back off and retry with exponential backoff (see [Rate limits](#rate-limits)). |
| `5xx` | Yes | Transient server error. Safe to retry with backoff. |
**Backoff pattern.** For `429` and `5xx`, retry with exponential backoff and jitter (for example, 1s, 2s, 4s, 8s with a random offset), capping the number of attempts. Never retry `401`/`403`/`404`/`400` automatically - surface those to your application instead.
When you call the [Dedicated Deployments](/deployment/roboflow-cloud/dedicated-deployments#http-api) management service (`https://roboflow.cloud`), check the response code explicitly: a `200` returns a JSON body, and any other code returns an error message as a string.
## Timeouts and cold starts
The [Serverless Cloud API](/deployment/roboflow-cloud/serverless-api) loads models on demand. The first request to a model that isn't already resident on a server ("warmup") can take several seconds, and a model that has been idle (for example, \~10 minutes between inferences) may be unloaded and need to be reloaded on the next call.
* **Set generous client timeouts.** A client timeout that's tight enough to trip on a cold start will fail requests that would otherwise have succeeded. Allow headroom for warmup on the first request and after idle periods.
* **Prime the model.** If predictable latency matters, send a warmup request before your latency-sensitive traffic so the model is already cached.
* **Watch the response headers.** Serverless responses include `x-model-cold-start` (whether this request paid the load cost) and `x-processing-time`. Use them to monitor cold-start frequency and processing time. See [Serverless pricing](/deployment/roboflow-cloud/serverless-api/pricing) for how these headers factor into billing.
* **Keep uploads under the limit.** The Serverless Cloud API accepts file uploads up to **20 MB**; larger images are rejected. Downsize images before sending (the Python SDK does this automatically), which usually doesn't hurt accuracy because images are resized to the model's input size anyway. Batch Processing enforces the same 20 MB per-image limit.
For sustained low latency without cold starts, use [Dedicated Deployments](/deployment/roboflow-cloud/dedicated-deployments) or [Self-Hosted Inference](/deployment/self-hosted/self-hosted) instead of the shared serverless endpoint.
## Rate limits
* **Serverless Cloud API.** On a `429`, slow down and retry with exponential backoff. If you consistently hit limits or need higher throughput, reach out to your enterprise support contact or the [Roboflow forum](https://discuss.roboflow.com), or move to a [Dedicated Deployment](/deployment/roboflow-cloud/dedicated-deployments).
* **Deployment Manager API.** The edge-device management endpoints enforce explicit per-endpoint limits and return `429` when exceeded - for example, device logs are limited to **5 requests per minute per IP** and **50 per minute globally**, and telemetry reads to **60 requests per minute per device** with a 10-request burst over 10 seconds. See the [Deployment Manager API](/deployment/self-hosted/enterprise/deployment-manager#errors) for the exact limits and error shapes before you build polling into an integration.
When a documented number doesn't exist for your path, treat `429` as the signal to back off rather than assuming a fixed budget, and [contact support](https://roboflow.com/sales) if you need a higher limit.
## Dedicated Deployment replica sizing
When you create a [Dedicated Deployment](/deployment/roboflow-cloud/dedicated-deployments#http-api), you can set `min_replicas` and `max_replicas` (both default to `1`):
* **`min_replicas`** is the number of replicas kept running. A higher minimum reduces cold-start latency under bursty load at the cost of always-on capacity.
* **`max_replicas`** caps how far the deployment scales out under load. Raise it for higher peak throughput.
For steady traffic, `min_replicas` and `max_replicas` of `1` is the simplest starting point; increase `max_replicas` when a single replica can't keep up with peak load, and raise `min_replicas` if the first request after a lull is too slow.
### Interaction with auto-pause
Dedicated Deployments **auto-pause after a period of inactivity** - fixed at 1 hour for `dev-cpu` and `dev-gpu` types - and resume when you send a request with your API key. A paused deployment isn't serving replicas, so the request that resumes it pays a resume latency.
* Use the **persistent `prod-cpu` / `prod-gpu`** types for production traffic that must always be ready.
* Reserve the ephemeral `dev-cpu` / `dev-gpu` types for testing and prototyping - they are also automatically deleted after a few hours.
* If you need billing based on request count rather than uptime, or a custom pause/replica policy, [contact sales](https://roboflow.com/sales).
## Before you go live
* Retries wrap every outbound call, retrying only `429` and `5xx` with backoff.
* Client timeouts are generous enough to absorb serverless cold starts.
* Images are downsized to stay under the 20 MB upload limit.
* API keys use the minimum required [scopes](https://docs.roboflow.com/reference/authentication/authentication/scoped-api-keys) and are stored as secrets, not hard-coded.
* For Dedicated Deployments, `min_replicas` / `max_replicas` are sized for your load and you've chosen a `prod-*` type for always-on traffic.
* You monitor deployments - see [Model Monitoring](/deployment/monitoring-and-analytics/model-monitoring) - and alert on error-rate and latency regressions.
# Serverless Cloud API
Run Workflows and Model Inference on GPU-accelerated auto-scaling infrastructure in the Roboflow cloud.
## About
Models deployed to Roboflow have a REST API available through which you can run inference on images. This deployment method is ideal for environments where you have a persistent internet connection on your deployment device.
In the app, this endpoint is labeled "Serverless Cloud API", or "Cloud API" where space is tight (ex: the Workflow editor runtime picker). A [Dedicated Deployment](/deployment/roboflow-cloud/dedicated-deployments) endpoint (`*.roboflow.cloud`) is labeled "Dedicated Cloud API", and the older v1 endpoint is labeled "Hosted API (Legacy)". These labels replace the earlier "Serverless Hosted API" and "Serverless API V2" names.
You can use Serverless Cloud API:
* [in Workflows](/deployment/roboflow-cloud/serverless-api/use-in-a-workflow)
* [with the REST API](#http-api)
* with the [Inference Python SDK](#python-sdk)
### Inference server
Our Serverless Cloud API is powered by the [Inference Server](https://docs.roboflow.com/reference/platform/rest-api/inference-server-openapi). This means you can easily switch between our Serverless Cloud API and self-hosting option and vice versa, as shown below:
```python
from inference_sdk import InferenceHTTPClient, InferenceConfiguration
CLIENT = InferenceHTTPClient(
# api_url="http://localhost:9001" # Self-hosted Inference server
api_url="https://serverless.roboflow.com", # Our Serverless Cloud API
api_key="API_KEY" # optional to access your private models and data
).configure(InferenceConfiguration(api_key_transport="header"))
result = CLIENT.infer("image.jpg", model_id="model-id/1")
print(result)
```
The `api_key_transport="header"` setting sends the key only as an `Authorization: Bearer` header, keeping it out of URLs and logs: recommended for all new code. Servers older than Inference 1.5.0 do not read the header; use `api_key_transport="both"` while you still call one. See [API key transport](https://docs.roboflow.com/reference/inference/inference-sdk/configuration#api-key-transport).
### Limits
Our Serverless Cloud API supports file uploads up to 20MB. You may run into limitations with higher resolution images. Should you run into an issue, please reach out to your enterprise support contact or post a message to the [forum](https://discuss.roboflow.com).
{% hint style="info" %}
In the cases that requests are too large, we recommend downsizing any attached images. This usually will not result in poor performance as images are downsized regardless after they've been received on our servers to the input size that the model architecture accepts.\
\
Some of our SDKs, like the Python SDK, automatically downsize images to the model architecture's input size before they are sent to the API.
{% endhint %}
***
See [Serverless Cloud API v1](/deployment/legacy/legacy-serverless) for the legacy API documentation.
## HTTP API
### Use with the REST API
The Serverless Cloud API has one endpoint for all models and Workflows:
```
https://serverless.roboflow.com
```
#### HTTP endpoints
## Legacy Infer From Request
> Legacy inference endpoint for object detection, instance segmentation, and classification.\
> \
> Args:\
> background\_tasks: (BackgroundTasks) pool of fastapi background tasks\
> dataset\_id (str): ID of a Roboflow dataset corresponding to the model to use for inference OR workspace ID\
> version\_id (str): ID of a Roboflow dataset version corresponding to the model to use for inference OR model ID\
> api\_key (Optional\[str], default None): Roboflow API Key passed to the model during initialization for artifact retrieval.\
> \# Other parameters described in the function signature...\
> \
> Returns:\
> Union\[InstanceSegmentationInferenceResponse, KeypointsDetectionInferenceRequest, ObjectDetectionInferenceResponse, ClassificationInferenceResponse, MultiLabelClassificationInferenceResponse, SemanticSegmentationInferenceResponse, Any]: The response containing the inference results.
```json
{"openapi":"3.1.0","info":{"title":"Roboflow Inference Server","version":"1.5.0-post2"},"paths":{"/{dataset_id}/{version_id}":{"post":{"summary":"Legacy Infer From Request","description":"Legacy inference endpoint for object detection, instance segmentation, and classification.\n\nArgs:\n background_tasks: (BackgroundTasks) pool of fastapi background tasks\n dataset_id (str): ID of a Roboflow dataset corresponding to the model to use for inference OR workspace ID\n version_id (str): ID of a Roboflow dataset version corresponding to the model to use for inference OR model ID\n api_key (Optional[str], default None): Roboflow API Key passed to the model during initialization for artifact retrieval.\n # Other parameters described in the function signature...\n\nReturns:\n Union[InstanceSegmentationInferenceResponse, KeypointsDetectionInferenceRequest, ObjectDetectionInferenceResponse, ClassificationInferenceResponse, MultiLabelClassificationInferenceResponse, SemanticSegmentationInferenceResponse, Any]: The response containing the inference results.","operationId":"legacy_infer_from_request__dataset_id___version_id__post","parameters":[{"name":"dataset_id","in":"path","required":true,"schema":{"type":"string","description":"ID of a Roboflow dataset corresponding to the model to use for inference OR workspace ID","title":"Dataset Id"},"description":"ID of a Roboflow dataset corresponding to the model to use for inference OR workspace ID"},{"name":"version_id","in":"path","required":true,"schema":{"type":"string","description":"ID of a Roboflow dataset version corresponding to the model to use for inference OR model ID","title":"Version Id"},"description":"ID of a Roboflow dataset version corresponding to the model to use for inference OR model ID"},{"name":"api_key","in":"query","required":false,"schema":{"anyOf":[{"type":"string"},{"type":"null"}],"description":"Roboflow API Key that will be passed to the model during initialization for artifact retrieval","title":"Api Key"},"description":"Roboflow API Key that will be passed to the model during initialization for artifact retrieval"},{"name":"confidence","in":"query","required":false,"schema":{"anyOf":[{"type":"number"},{"enum":["best","default"],"type":"string"}],"description":"The confidence threshold used to filter out predictions. Pass a float in [0, 1], or \"best\" to use F1-optimal thresholds from model evaluation, or \"default\" to use the model's built-in default.","default":0.4,"title":"Confidence"},"description":"The confidence threshold used to filter out predictions. Pass a float in [0, 1], or \"best\" to use F1-optimal thresholds from model evaluation, or \"default\" to use the model's built-in default."},{"name":"keypoint_confidence","in":"query","required":false,"schema":{"type":"number","description":"The confidence threshold used to filter out keypoints that are not visible based on model confidence","default":0,"title":"Keypoint Confidence"},"description":"The confidence threshold used to filter out keypoints that are not visible based on model confidence"},{"name":"format","in":"query","required":false,"schema":{"type":"string","description":"One of 'json' or 'image'. If 'json' prediction data is return as a JSON string. If 'image' prediction data is visualized and overlayed on the original input image.","default":"json","title":"Format"},"description":"One of 'json' or 'image'. If 'json' prediction data is return as a JSON string. If 'image' prediction data is visualized and overlayed on the original input image."},{"name":"image","in":"query","required":false,"schema":{"anyOf":[{"type":"string"},{"type":"null"}],"description":"The publically accessible URL of an image to use for inference.","title":"Image"},"description":"The publically accessible URL of an image to use for inference."},{"name":"image_type","in":"query","required":false,"schema":{"anyOf":[{"type":"string"},{"type":"null"}],"description":"One of base64 or numpy. Note, numpy input is not supported for Roboflow Hosted Inference.","default":"base64","title":"Image Type"},"description":"One of base64 or numpy. Note, numpy input is not supported for Roboflow Hosted Inference."},{"name":"labels","in":"query","required":false,"schema":{"anyOf":[{"type":"boolean"},{"type":"null"}],"description":"If true, labels will be include in any inference visualization.","default":false,"title":"Labels"},"description":"If true, labels will be include in any inference visualization."},{"name":"mask_decode_mode","in":"query","required":false,"schema":{"anyOf":[{"type":"string"},{"type":"null"}],"description":"One of 'accurate' or 'fast'. If 'accurate' the mask will be decoded using the original image size. If 'fast' the mask will be decoded using the original mask size. 'accurate' is slower but more accurate.","default":"accurate","title":"Mask Decode Mode"},"description":"One of 'accurate' or 'fast'. If 'accurate' the mask will be decoded using the original image size. If 'fast' the mask will be decoded using the original mask size. 'accurate' is slower but more accurate."},{"name":"tradeoff_factor","in":"query","required":false,"schema":{"anyOf":[{"type":"number"},{"type":"null"}],"description":"The amount to tradeoff between 0='fast' and 1='accurate'","default":0,"title":"Tradeoff Factor"},"description":"The amount to tradeoff between 0='fast' and 1='accurate'"},{"name":"max_detections","in":"query","required":false,"schema":{"type":"integer","description":"The maximum number of detections to return. This is used to limit the number of predictions returned by the model. The model may return more predictions than this number, but only the top `max_detections` predictions will be returned.","default":300,"title":"Max Detections"},"description":"The maximum number of detections to return. This is used to limit the number of predictions returned by the model. The model may return more predictions than this number, but only the top `max_detections` predictions will be returned."},{"name":"overlap","in":"query","required":false,"schema":{"type":"number","description":"The IoU threhsold that must be met for a box pair to be considered duplicate during NMS","default":0.3,"title":"Overlap"},"description":"The IoU threhsold that must be met for a box pair to be considered duplicate during NMS"},{"name":"stroke","in":"query","required":false,"schema":{"type":"integer","description":"The stroke width used when visualizing predictions","default":1,"title":"Stroke"},"description":"The stroke width used when visualizing predictions"},{"name":"disable_preproc_auto_orient","in":"query","required":false,"schema":{"anyOf":[{"type":"boolean"},{"type":"null"}],"description":"If true, disables automatic image orientation","default":false,"title":"Disable Preproc Auto Orient"},"description":"If true, disables automatic image orientation"},{"name":"disable_preproc_contrast","in":"query","required":false,"schema":{"anyOf":[{"type":"boolean"},{"type":"null"}],"description":"If true, disables automatic contrast adjustment","default":false,"title":"Disable Preproc Contrast"},"description":"If true, disables automatic contrast adjustment"},{"name":"disable_preproc_grayscale","in":"query","required":false,"schema":{"anyOf":[{"type":"boolean"},{"type":"null"}],"description":"If true, disables automatic grayscale conversion","default":false,"title":"Disable Preproc Grayscale"},"description":"If true, disables automatic grayscale conversion"},{"name":"disable_preproc_static_crop","in":"query","required":false,"schema":{"anyOf":[{"type":"boolean"},{"type":"null"}],"description":"If true, disables automatic static crop","default":false,"title":"Disable Preproc Static Crop"},"description":"If true, disables automatic static crop"},{"name":"disable_active_learning","in":"query","required":false,"schema":{"anyOf":[{"type":"boolean"},{"type":"null"}],"description":"If true, the predictions will be prevented from registration by Active Learning (if the functionality is enabled)","default":false,"title":"Disable Active Learning"},"description":"If true, the predictions will be prevented from registration by Active Learning (if the functionality is enabled)"},{"name":"active_learning_target_dataset","in":"query","required":false,"schema":{"anyOf":[{"type":"string"},{"type":"null"}],"description":"Parameter to be used when Active Learning data registration should happen against different dataset than the one pointed by model_id","title":"Active Learning Target Dataset"},"description":"Parameter to be used when Active Learning data registration should happen against different dataset than the one pointed by model_id"},{"name":"source","in":"query","required":false,"schema":{"anyOf":[{"type":"string"},{"type":"null"}],"description":"The source of the inference request","default":"external","title":"Source"},"description":"The source of the inference request"},{"name":"source_info","in":"query","required":false,"schema":{"anyOf":[{"type":"string"},{"type":"null"}],"description":"The detailed source information of the inference request","default":"external","title":"Source Info"},"description":"The detailed source information of the inference request"},{"name":"response_mask_format","in":"query","required":false,"schema":{"anyOf":[{"enum":["polygon","rle"],"type":"string"},{"type":"null"}],"description":"The format of the prediction mask - polygon (default) or rle - applicable for instance segmentation models.","default":"polygon","title":"Response Mask Format"},"description":"The format of the prediction mask - polygon (default) or rle - applicable for instance segmentation models."}],"responses":{"200":{"description":"Successful Response","content":{"application/json":{"schema":{"anyOf":[{"$ref":"#/components/schemas/InstanceSegmentationInferenceResponse"},{"$ref":"#/components/schemas/KeypointsDetectionInferenceResponse"},{"$ref":"#/components/schemas/ObjectDetectionInferenceResponse"},{"$ref":"#/components/schemas/ClassificationInferenceResponse"},{"$ref":"#/components/schemas/MultiLabelClassificationInferenceResponse"},{"$ref":"#/components/schemas/SemanticSegmentationInferenceResponse"},{"$ref":"#/components/schemas/StubResponse"},{}],"title":"Response Legacy Infer From Request Dataset Id Version Id Post"}}}},"422":{"description":"Validation Error","content":{"application/json":{"schema":{"$ref":"#/components/schemas/HTTPValidationError"}}}}}}}},"components":{"schemas":{"InstanceSegmentationInferenceResponse":{"properties":{"visualization":{"anyOf":[{"type":"string"},{"type":"null"}],"title":"Visualization","description":"Base64 encoded string containing prediction visualization image data"},"inference_id":{"anyOf":[{"type":"string"},{"type":"null"}],"title":"Inference Id","description":"Unique identifier of inference"},"frame_id":{"anyOf":[{"type":"integer"},{"type":"null"}],"title":"Frame Id","description":"The frame id of the image used in inference if the input was a video"},"time":{"anyOf":[{"type":"number"},{"type":"null"}],"title":"Time","description":"The time in seconds it took to produce the predictions including image preprocessing"},"image":{"anyOf":[{"items":{"$ref":"#/components/schemas/InferenceResponseImage"},"type":"array"},{"$ref":"#/components/schemas/InferenceResponseImage"}],"title":"Image"},"predictions":{"items":{"anyOf":[{"$ref":"#/components/schemas/InstanceSegmentationPrediction"},{"$ref":"#/components/schemas/InstanceSegmentationRLEPrediction"}]},"type":"array","title":"Predictions"}},"type":"object","required":["image","predictions"],"title":"InstanceSegmentationInferenceResponse","description":"Instance Segmentation inference response.\n\nAttributes:\n predictions (List[Union[\n inference.core.entities.responses.inference.InstanceSegmentationPrediction,\n inference.core.entities.responses.inference.InstanceSegmentationRLEPrediction\n ]]): List of instance segmentation predictions."},"InferenceResponseImage":{"properties":{"width":{"type":"integer","title":"Width","description":"The original width of the image used in inference"},"height":{"type":"integer","title":"Height","description":"The original height of the image used in inference"}},"type":"object","required":["width","height"],"title":"InferenceResponseImage","description":"Inference response image information.\n\nAttributes:\n width (int): The original width of the image used in inference.\n height (int): The original height of the image used in inference."},"InstanceSegmentationPrediction":{"properties":{"x":{"type":"number","title":"X","description":"The center x-axis pixel coordinate of the prediction"},"y":{"type":"number","title":"Y","description":"The center y-axis pixel coordinate of the prediction"},"width":{"type":"number","title":"Width","description":"The width of the prediction bounding box in number of pixels"},"height":{"type":"number","title":"Height","description":"The height of the prediction bounding box in number of pixels"},"confidence":{"type":"number","title":"Confidence","description":"The detection confidence as a fraction between 0 and 1"},"class":{"type":"string","title":"Class","description":"The predicted class label"},"class_id":{"type":"integer","title":"Class Id","description":"The class id of the prediction"},"detection_id":{"type":"string","title":"Detection Id","description":"Unique identifier of detection"},"parent_id":{"anyOf":[{"type":"string"},{"type":"null"}],"title":"Parent Id","description":"Identifier of parent image region"},"class_confidence":{"anyOf":[{"type":"number"},{"type":"null"}],"title":"Class Confidence","description":"The class label confidence as a fraction between 0 and 1"},"points":{"items":{"$ref":"#/components/schemas/Point-Output"},"type":"array","title":"Points","description":"The list of points that make up the instance polygon"},"mask_format":{"type":"string","const":"polygon","title":"Mask Format","description":"Type of mask format","default":"polygon"}},"type":"object","required":["x","y","width","height","confidence","class","class_id","points"],"title":"InstanceSegmentationPrediction"},"Point-Output":{"properties":{"x":{"type":"number","title":"X","description":"The x-axis pixel coordinate of the point"},"y":{"type":"number","title":"Y","description":"The y-axis pixel coordinate of the point"}},"type":"object","required":["x","y"],"title":"Point","description":"Point coordinates.\n\nAttributes:\n x (float): The x-axis pixel coordinate of the point.\n y (float): The y-axis pixel coordinate of the point."},"InstanceSegmentationRLEPrediction":{"properties":{"x":{"type":"number","title":"X","description":"The center x-axis pixel coordinate of the prediction"},"y":{"type":"number","title":"Y","description":"The center y-axis pixel coordinate of the prediction"},"width":{"type":"number","title":"Width","description":"The width of the prediction bounding box in number of pixels"},"height":{"type":"number","title":"Height","description":"The height of the prediction bounding box in number of pixels"},"confidence":{"type":"number","title":"Confidence","description":"The detection confidence as a fraction between 0 and 1"},"class":{"type":"string","title":"Class","description":"The predicted class label"},"class_id":{"type":"integer","title":"Class Id","description":"The class id of the prediction"},"detection_id":{"type":"string","title":"Detection Id","description":"Unique identifier of detection"},"parent_id":{"anyOf":[{"type":"string"},{"type":"null"}],"title":"Parent Id","description":"Identifier of parent image region"},"rle":{"additionalProperties":true,"type":"object","title":"Rle","description":"RLE-encoded mask in COCO format: {'size': [H, W], 'counts': '...'}"},"mask_format":{"type":"string","const":"rle","title":"Mask Format","description":"Type of mask format","default":"rle"}},"type":"object","required":["x","y","width","height","confidence","class","class_id","rle"],"title":"InstanceSegmentationRLEPrediction"},"KeypointsDetectionInferenceResponse":{"properties":{"visualization":{"anyOf":[{"type":"string"},{"type":"null"}],"title":"Visualization","description":"Base64 encoded string containing prediction visualization image data"},"inference_id":{"anyOf":[{"type":"string"},{"type":"null"}],"title":"Inference Id","description":"Unique identifier of inference"},"frame_id":{"anyOf":[{"type":"integer"},{"type":"null"}],"title":"Frame Id","description":"The frame id of the image used in inference if the input was a video"},"time":{"anyOf":[{"type":"number"},{"type":"null"}],"title":"Time","description":"The time in seconds it took to produce the predictions including image preprocessing"},"image":{"anyOf":[{"items":{"$ref":"#/components/schemas/InferenceResponseImage"},"type":"array"},{"$ref":"#/components/schemas/InferenceResponseImage"}],"title":"Image"},"predictions":{"items":{"$ref":"#/components/schemas/KeypointsPrediction"},"type":"array","title":"Predictions"}},"type":"object","required":["image","predictions"],"title":"KeypointsDetectionInferenceResponse"},"KeypointsPrediction":{"properties":{"x":{"type":"number","title":"X","description":"The center x-axis pixel coordinate of the prediction"},"y":{"type":"number","title":"Y","description":"The center y-axis pixel coordinate of the prediction"},"width":{"type":"number","title":"Width","description":"The width of the prediction bounding box in number of pixels"},"height":{"type":"number","title":"Height","description":"The height of the prediction bounding box in number of pixels"},"confidence":{"type":"number","title":"Confidence","description":"The detection confidence as a fraction between 0 and 1"},"class":{"type":"string","title":"Class","description":"The predicted class label"},"class_confidence":{"anyOf":[{"type":"number"},{"type":"null"}],"title":"Class Confidence","description":"The class label confidence as a fraction between 0 and 1"},"class_id":{"type":"integer","title":"Class Id","description":"The class id of the prediction"},"tracker_id":{"anyOf":[{"type":"integer"},{"type":"null"}],"title":"Tracker Id","description":"The tracker id of the prediction if tracking is enabled"},"detection_id":{"type":"string","title":"Detection Id","description":"Unique identifier of detection"},"parent_id":{"anyOf":[{"type":"string"},{"type":"null"}],"title":"Parent Id","description":"Identifier of parent image region. Useful when stack of detection-models is in use to refer the RoI being the input to inference"},"keypoints":{"items":{"$ref":"#/components/schemas/Keypoint"},"type":"array","title":"Keypoints"}},"type":"object","required":["x","y","width","height","confidence","class","class_id","keypoints"],"title":"KeypointsPrediction"},"Keypoint":{"properties":{"x":{"type":"number","title":"X","description":"The x-axis pixel coordinate of the point"},"y":{"type":"number","title":"Y","description":"The y-axis pixel coordinate of the point"},"confidence":{"type":"number","title":"Confidence","description":"Model confidence regarding keypoint visibility."},"class_id":{"type":"integer","title":"Class Id","description":"Identifier of keypoint."},"class":{"type":"string","title":"Class","description":"Type of keypoint."}},"type":"object","required":["x","y","confidence","class_id","class"],"title":"Keypoint"},"ObjectDetectionInferenceResponse":{"properties":{"visualization":{"anyOf":[{"type":"string"},{"type":"null"}],"title":"Visualization","description":"Base64 encoded string containing prediction visualization image data"},"inference_id":{"anyOf":[{"type":"string"},{"type":"null"}],"title":"Inference Id","description":"Unique identifier of inference"},"frame_id":{"anyOf":[{"type":"integer"},{"type":"null"}],"title":"Frame Id","description":"The frame id of the image used in inference if the input was a video"},"time":{"anyOf":[{"type":"number"},{"type":"null"}],"title":"Time","description":"The time in seconds it took to produce the predictions including image preprocessing"},"image":{"anyOf":[{"items":{"$ref":"#/components/schemas/InferenceResponseImage"},"type":"array"},{"$ref":"#/components/schemas/InferenceResponseImage"}],"title":"Image"},"predictions":{"items":{"$ref":"#/components/schemas/ObjectDetectionPrediction"},"type":"array","title":"Predictions"}},"type":"object","required":["image","predictions"],"title":"ObjectDetectionInferenceResponse","description":"Object Detection inference response.\n\nAttributes:\n predictions (List[inference.core.entities.responses.inference.ObjectDetectionPrediction]): List of object detection predictions."},"ObjectDetectionPrediction":{"properties":{"x":{"type":"number","title":"X","description":"The center x-axis pixel coordinate of the prediction"},"y":{"type":"number","title":"Y","description":"The center y-axis pixel coordinate of the prediction"},"width":{"type":"number","title":"Width","description":"The width of the prediction bounding box in number of pixels"},"height":{"type":"number","title":"Height","description":"The height of the prediction bounding box in number of pixels"},"confidence":{"type":"number","title":"Confidence","description":"The detection confidence as a fraction between 0 and 1"},"class":{"type":"string","title":"Class","description":"The predicted class label"},"class_confidence":{"anyOf":[{"type":"number"},{"type":"null"}],"title":"Class Confidence","description":"The class label confidence as a fraction between 0 and 1"},"class_id":{"type":"integer","title":"Class Id","description":"The class id of the prediction"},"tracker_id":{"anyOf":[{"type":"integer"},{"type":"null"}],"title":"Tracker Id","description":"The tracker id of the prediction if tracking is enabled"},"detection_id":{"type":"string","title":"Detection Id","description":"Unique identifier of detection"},"parent_id":{"anyOf":[{"type":"string"},{"type":"null"}],"title":"Parent Id","description":"Identifier of parent image region. Useful when stack of detection-models is in use to refer the RoI being the input to inference"}},"type":"object","required":["x","y","width","height","confidence","class","class_id"],"title":"ObjectDetectionPrediction","description":"Object Detection prediction.\n\nAttributes:\n x (float): The center x-axis pixel coordinate of the prediction.\n y (float): The center y-axis pixel coordinate of the prediction.\n width (float): The width of the prediction bounding box in number of pixels.\n height (float): The height of the prediction bounding box in number of pixels.\n confidence (float): The detection confidence as a fraction between 0 and 1.\n class_name (str): The predicted class label.\n class_confidence (Union[float, None]): The class label confidence as a fraction between 0 and 1.\n class_id (int): The class id of the prediction"},"ClassificationInferenceResponse":{"properties":{"visualization":{"anyOf":[{"type":"string"},{"type":"null"}],"title":"Visualization","description":"Base64 encoded string containing prediction visualization image data"},"inference_id":{"anyOf":[{"type":"string"},{"type":"null"}],"title":"Inference Id","description":"Unique identifier of inference"},"frame_id":{"anyOf":[{"type":"integer"},{"type":"null"}],"title":"Frame Id","description":"The frame id of the image used in inference if the input was a video"},"time":{"anyOf":[{"type":"number"},{"type":"null"}],"title":"Time","description":"The time in seconds it took to produce the predictions including image preprocessing"},"image":{"anyOf":[{"items":{"$ref":"#/components/schemas/InferenceResponseImage"},"type":"array"},{"$ref":"#/components/schemas/InferenceResponseImage"}],"title":"Image"},"predictions":{"items":{"$ref":"#/components/schemas/ClassificationPrediction"},"type":"array","title":"Predictions"},"top":{"type":"string","title":"Top","description":"The top predicted class label","default":""},"confidence":{"type":"number","title":"Confidence","description":"The confidence of the top predicted class label","default":0},"parent_id":{"anyOf":[{"type":"string"},{"type":"null"}],"title":"Parent Id","description":"Identifier of parent image region. Useful when stack of detection-models is in use to refer the RoI being the input to inference"}},"type":"object","required":["image","predictions"],"title":"ClassificationInferenceResponse","description":"Classification inference response.\n\nAttributes:\n predictions (List[inference.core.entities.responses.inference.ClassificationPrediction]): List of classification predictions.\n top (str): The top predicted class label.\n confidence (float): The confidence of the top predicted class label."},"ClassificationPrediction":{"properties":{"class":{"type":"string","title":"Class","description":"The predicted class label"},"class_id":{"type":"integer","title":"Class Id","description":"Numeric ID associated with the class label"},"confidence":{"type":"number","title":"Confidence","description":"The class label confidence as a fraction between 0 and 1"}},"type":"object","required":["class","class_id","confidence"],"title":"ClassificationPrediction","description":"Classification prediction.\n\nAttributes:\n class_name (str): The predicted class label.\n class_id (int): Numeric ID associated with the class label.\n confidence (float): The class label confidence as a fraction between 0 and 1."},"MultiLabelClassificationInferenceResponse":{"properties":{"visualization":{"anyOf":[{"type":"string"},{"type":"null"}],"title":"Visualization","description":"Base64 encoded string containing prediction visualization image data"},"inference_id":{"anyOf":[{"type":"string"},{"type":"null"}],"title":"Inference Id","description":"Unique identifier of inference"},"frame_id":{"anyOf":[{"type":"integer"},{"type":"null"}],"title":"Frame Id","description":"The frame id of the image used in inference if the input was a video"},"time":{"anyOf":[{"type":"number"},{"type":"null"}],"title":"Time","description":"The time in seconds it took to produce the predictions including image preprocessing"},"image":{"anyOf":[{"items":{"$ref":"#/components/schemas/InferenceResponseImage"},"type":"array"},{"$ref":"#/components/schemas/InferenceResponseImage"}],"title":"Image"},"predictions":{"additionalProperties":{"$ref":"#/components/schemas/MultiLabelClassificationPrediction"},"type":"object","title":"Predictions"},"predicted_classes":{"items":{"type":"string"},"type":"array","title":"Predicted Classes","description":"The list of predicted classes"},"parent_id":{"anyOf":[{"type":"string"},{"type":"null"}],"title":"Parent Id","description":"Identifier of parent image region. Useful when stack of detection-models is in use to refer the RoI being the input to inference"}},"type":"object","required":["image","predictions","predicted_classes"],"title":"MultiLabelClassificationInferenceResponse","description":"Multi-label Classification inference response.\n\nAttributes:\n predictions (Dict[str, inference.core.entities.responses.inference.MultiLabelClassificationPrediction]): Dictionary of multi-label classification predictions.\n predicted_classes (List[str]): The list of predicted classes."},"MultiLabelClassificationPrediction":{"properties":{"confidence":{"type":"number","title":"Confidence","description":"The class label confidence as a fraction between 0 and 1"},"class_id":{"type":"integer","title":"Class Id","description":"Numeric ID associated with the class label"}},"type":"object","required":["confidence","class_id"],"title":"MultiLabelClassificationPrediction","description":"Multi-label Classification prediction.\n\nAttributes:\n confidence (float): The class label confidence as a fraction between 0 and 1."},"SemanticSegmentationInferenceResponse":{"properties":{"visualization":{"anyOf":[{"type":"string"},{"type":"null"}],"title":"Visualization","description":"Base64 encoded string containing prediction visualization image data"},"inference_id":{"anyOf":[{"type":"string"},{"type":"null"}],"title":"Inference Id","description":"Unique identifier of inference"},"frame_id":{"anyOf":[{"type":"integer"},{"type":"null"}],"title":"Frame Id","description":"The frame id of the image used in inference if the input was a video"},"time":{"anyOf":[{"type":"number"},{"type":"null"}],"title":"Time","description":"The time in seconds it took to produce the predictions including image preprocessing"},"image":{"anyOf":[{"items":{"$ref":"#/components/schemas/InferenceResponseImage"},"type":"array"},{"$ref":"#/components/schemas/InferenceResponseImage"}],"title":"Image"},"predictions":{"$ref":"#/components/schemas/SemanticSegmentationPrediction"}},"type":"object","required":["image","predictions"],"title":"SemanticSegmentationInferenceResponse","description":"Semantic Segmentation inference response.\n\nAttributes:\n predictions (inference.core.entities.responses.inference.SemanticSegmentationPrediction): Semantic segmentation predictions."},"SemanticSegmentationPrediction":{"properties":{"segmentation_mask":{"type":"string","title":"Segmentation Mask","description":"base64-encoded PNG of predicted class label at each pixel. When the request sets response_mask_format='numpy' (in-process fast path), this carries the raw uint8 numpy label map instead; JSON serialization always yields the base64 PNG string."},"class_map":{"additionalProperties":{"type":"string"},"type":"object","title":"Class Map","description":"Map of pixel intensity value to class label"},"confidence_mask":{"type":"string","title":"Confidence Mask","description":"base64-encoded PNG of predicted class confidence at each pixel. When the request sets response_mask_format='numpy' (in-process fast path), this carries the raw uint8 numpy confidence map instead; JSON serialization always yields the base64 PNG string."},"present_class_ids":{"anyOf":[{"items":{"type":"integer"},"type":"array"},{"type":"null"}],"title":"Present Class Ids","description":"Sorted list of pixel values present in segmentation_mask, including background (0) when present. Optimization hint that lets consumers skip scanning the full-resolution mask; consumers must fall back to scanning when this field is absent."}},"type":"object","required":["segmentation_mask","class_map","confidence_mask"],"title":"SemanticSegmentationPrediction"},"StubResponse":{"properties":{"visualization":{"anyOf":[{"type":"string"},{"type":"null"}],"title":"Visualization","description":"Base64 encoded string containing prediction visualization image data"},"inference_id":{"anyOf":[{"type":"string"},{"type":"null"}],"title":"Inference Id","description":"Unique identifier of inference"},"frame_id":{"anyOf":[{"type":"integer"},{"type":"null"}],"title":"Frame Id","description":"The frame id of the image used in inference if the input was a video"},"time":{"anyOf":[{"type":"number"},{"type":"null"}],"title":"Time","description":"The time in seconds it took to produce the predictions including image preprocessing"},"is_stub":{"type":"boolean","title":"Is Stub","description":"Field to mark prediction type as stub"},"model_id":{"type":"string","title":"Model Id","description":"Identifier of a model stub that was called"},"task_type":{"type":"string","title":"Task Type","description":"Task type of the project"}},"type":"object","required":["is_stub","model_id","task_type"],"title":"StubResponse"},"HTTPValidationError":{"properties":{"detail":{"items":{"$ref":"#/components/schemas/ValidationError"},"type":"array","title":"Detail"}},"type":"object","title":"HTTPValidationError"},"ValidationError":{"properties":{"loc":{"items":{"anyOf":[{"type":"string"},{"type":"integer"}]},"type":"array","title":"Location"},"msg":{"type":"string","title":"Message"},"type":{"type":"string","title":"Error Type"},"input":{"title":"Input"},"ctx":{"type":"object","title":"Context"}},"type":"object","required":["loc","msg","type"],"title":"ValidationError"}}}}
```
### Run a Model on an Image
Roboflow exposes inference through several runtimes - the right choice depends on whether you're calling a single model or a Workflow, how much throughput you need, and where the workload runs.
This page is a brief overview. The detailed inference reference lives in the [product documentation](/deployment), which is part of the same docs site. Cross-links are provided where the deeper material lives.
#### Inference runtimes
| Runtime | Use when | Reference |
| ---------------------------------------------------- | ---------------------------------------------------------------------------------------------------- | ----------------------------------------------------------------------------------------------------------------------------------------------------------- |
| **Serverless Cloud API** (`serverless.roboflow.com`) | Default. Hosted, auto-scaling, supports models and Workflows. | [Serverless Cloud API](/deployment/roboflow-cloud/serverless-api) |
| **Dedicated Deployments** | You need predictable latency, high throughput, or pinned GPU type. Managed by Roboflow. | [Dedicated Deployments](/deployment/roboflow-cloud/dedicated-deployments#http-api) and [product overview](/deployment/roboflow-cloud/dedicated-deployments) |
| **Roboflow Inference** (self-hosted) | On-prem, edge devices, air-gapped environments, or workloads that can't leave your VPC. Open source. | [Self-Hosted Deployment](/deployment/self-hosted/self-hosted) |
#### Calling the Serverless Cloud API
Run a model:
```bash
curl -F "file=@photo.jpg" \
-H "Authorization: Bearer $ROBOFLOW_API_KEY" \
"https://serverless.roboflow.com//?confidence=0.5"
```
Run a Workflow:
```bash
curl -X POST "https://serverless.roboflow.com/infer/workflows//" \
-H "Authorization: Bearer $ROBOFLOW_API_KEY" \
-H "Content-Type: application/json" \
-d '{
"inputs": { "image": { "type": "url", "value": "https://example.com/photo.jpg" } }
}'
```
{% hint style="info" %}
Sending the key as an `?api_key=` query parameter or `api_key` body field is the legacy channel. It still works, but the `Authorization: Bearer` header keeps your key out of URLs and logs. See [Authenticate with the REST API](https://docs.roboflow.com/reference/platform/rest-api/authenticate-with-the-rest-api).
{% endhint %}
For live video, see the [Serverless Video Streaming API](/deployment/roboflow-cloud/serverless-api/serverless-video-streaming-api). For asynchronous processing of large image and video sets, see [Batch Processing](/deployment/roboflow-cloud/batch-processing).
#### Deprecated: Serverless v1
The legacy task-specific endpoints - `detect.roboflow.com`, `classify.roboflow.com`, `outline.roboflow.com`, `segment.roboflow.com` - are **deprecated**. They still respond for backwards compatibility but new code should use `serverless.roboflow.com` instead.
If you find a snippet pointing to a `*.roboflow.com` task host, treat it as legacy and translate it to the Serverless Cloud API form above.
## Python SDK
### Use with Python SDK
If you are working in Python, the most convenient way to interact with the Serverless Cloud API is to use the Inference Python SDK.
To use the [Inference SDK](https://docs.roboflow.com/reference/inference/inference-sdk), first install it:
```
pip install inference-sdk
```
To make a request to the Serverless Cloud API, use the following code:
from inference_sdk import InferenceHTTPClient, InferenceConfiguration

CLIENT = InferenceHTTPClient(
    api_url="https://serverless.roboflow.com",
    api_key="API_KEY"
).configure(InferenceConfiguration(api_key_transport="header"))

result = CLIENT.infer("image.jpg", model_id="model-id/1")
print(result)
Above, specify your [model ID](https://docs.roboflow.com/reference/authentication/authentication/workspace-and-project-ids) and [API key](https://docs.roboflow.com/reference/authentication/authentication/find-your-roboflow-api-key). This code will run your model and return the results.
#### Roboflow Instant Model
Serverless Cloud API also supports running Roboflow [Instant Model](https://docs.roboflow.com/models/train/roboflow-instant). You can run Instant Model just like any other model, just note that the confidence threshold can be sensitive for Instant Models.
{% hint style="info" %}
An optimal confidence depends on the number of images the model has been trained on. Optimal confidence thresholds usually range from 0.85 to 0.99.
{% endhint %}
```python
configuration = InferenceConfiguration(
confidence_threshold=0.95,
api_key_transport="header",
)
CLIENT.configure(configuration)
result = CLIENT.infer("image.jpg", model_id="roboflow-instant-model-id/1")
```
`configure(...)` replaces the whole configuration, so keep `api_key_transport` in any configuration you apply.
### Stream video with Python SDK
Use the Inference SDK WebRTC client to run an object detection model on a video. The Serverless Video Streaming API processes the video in the Roboflow Cloud and returns predictions for each frame.
Install the SDK with its WebRTC dependencies and `supervision`:
```bash
pip install "inference-sdk[webrtc]" supervision
```
```python
import cv2
import supervision as sv
from inference_sdk import InferenceHTTPClient
from inference_sdk.webrtc import VideoFileSource
client = InferenceHTTPClient(
api_url="https://serverless.roboflow.com",
api_key="API_KEY",
)
session = client.webrtc.stream(
source=VideoFileSource("video.mp4"),
model_id="model-id/1",
)
box_annotator = sv.BoxAnnotator()
label_annotator = sv.LabelAnnotator()
@session.on_frame
def show(frame, data):
if data is None:
return
detections = sv.Detections.from_inference(data)
annotated = box_annotator.annotate(frame.copy(), detections)
annotated = label_annotator.annotate(annotated, detections)
cv2.imshow("Predictions", annotated)
if cv2.waitKey(1) & 0xFF == ord("q"):
session.close()
session.run()
cv2.destroyAllWindows()
```
Replace `API_KEY` and `model-id/1` with your API key and model ID. Learn how to stream from webcams and RTSP cameras, process every frame, or run a Workflow in the [Serverless Video Streaming API guide](/deployment/roboflow-cloud/serverless-api/serverless-video-streaming-api).
## CLI
You can use the Roboflow CLI to run a model trained on Roboflow, or with open source models available on [Roboflow Universe](https://universe.roboflow.com).
By running `roboflow infer` in the command line, the CLI sends the image to the Roboflow API and prints the predictions.
### Command
```bash
roboflow infer -m
```
#### Options
| Flag | Description |
| -------------------- | ---------------------------------------------------------------------------------------------------------------------------------------------- |
| `-m`, `--model` | Model ID in `project/version` format (required) |
| `-c`, `--confidence` | Confidence threshold, 0.0–1.0 (default: 0.5) |
| `-o`, `--overlap` | Overlap/NMS threshold, 0.0–1.0 (default: 0.5) |
| `-t`, `--type` | Model type (skip auto-detection): `object-detection`, `classification`, `instance-segmentation`, `semantic-segmentation`, `keypoint-detection` |
### Examples
Run inference using an open source model from Roboflow Universe - for example, the [poker-cards](https://universe.roboflow.com/roboflow-100/poker-cards-cxcvz/model/1) dataset:
```bash
roboflow infer ~/Downloads/ace.jpg -m poker-cards-cxcvz/1 -c 0.7
```
The workspace defaults to your configured workspace. To use a model from a different workspace:
```bash
roboflow infer photo.jpg -m poker-cards-cxcvz/1 -w roboflow-100
```
Specify the model type to skip the auto-detection API call:
```bash
roboflow infer photo.jpg -m my-project/3 -t object-detection
```
### JSON Output
Use `--json` to get structured prediction data for scripting and automation:
```bash
roboflow infer photo.jpg -m my-project/3 --json
```
```json
{
"predictions": [
{
"x": 1230.0,
"y": 814.5,
"width": 840.0,
"height": 1273.0,
"confidence": 0.882,
"class": "Scissors",
"class_id": 2
}
]
}
```
See all supported parameters with `roboflow infer --help`.
## MCP Server
Connect your AI agent to the [MCP Server](https://docs.roboflow.com/agents/mcp-server) and it can run a model on an image with these tools:
Tool
Description
models_infer
Run hosted inference on an image using a trained model.
workflows_run
Execute a saved Workflow on one or more images.
project_deployment_run
Run inference through the project's stable live endpoint.
# Pricing
How Serverless Cloud API inference is priced in credits, using the credits-per-inference-second formula.
The [roboflow.com/credits](https://roboflow.com/credits) page mentions that 1 credit corresponds to 500 seconds of inference time. A more accurate formula is the following:
```matlab
if x-remote-processing-time header is set:
credits = (100ms + x-remote-processing-time) / 500,000ms
else:
credits = max(x-processing-time, 100ms) / 500,000ms
```
Where `x-processing-time` and `x-remote-processing-time` are HTTP Response headers, in float format (seconds). See [roboflow.com/pricing](https://roboflow.com/pricing) for credit pricing.
### Model Inference
In the example below, we run inference on [coco/39 model](https://universe.roboflow.com/microsoft/coco/model/39) (RF-DETR Small, 560x560). In response headers we can find `x-processing-time` , which is 81ms. In this case, we'd have `credits = max(81, 100) / 500,000 = 0.0002 credits` , or 0.2 credits per 1000 images.
```shellscript
curl -X POST -H "Authorization: Bearer $ROBOFLOW_API_KEY" "https://serverless.roboflow.com/coco/39?image=https://media.roboflow.com/notebooks/examples/dog.jpeg" -I
HTTP/2 200
content-type: application/json
content-length: 995
x-model-cold-start: false
x-model-id: coco/39
x-processing-time: 0.08100700378417969
x-workspace-id: my-workspace-id
```
#### Cold start
If you run the same request a 10 minutes later, it could happen that the model has been unloaded and needs to be loaded to the GPU again - a cold start. Model loading can take up to a few seconds, and is highly correlated with the delay between inferences.
```bash
curl -X POST -H "Authorization: Bearer $ROBOFLOW_API_KEY" "https://serverless.roboflow.com/coco/39?image=https://media.roboflow.com/notebooks/examples/dog.jpeg" -I
HTTP/2 200
content-type: application/json
content-length: 995
x-model-cold-start: true
x-model-id: coco/39
x-model-load-details: [{"m": "coco/39", "t": 0.7791134570725262}]
x-model-load-time: 0.5791134570725262
x-processing-time: 1.1060344696044922
x-workspace-id: my-workspace-id
```
**Formula**: `credits = max(1106, 100)/500,000 = 0.0022` , or **2.2 credits per 1000** (cold start) images.
### Workflow run
For Workflows, we split model inference from general Workflow processing. This means that Workflow itself will be executed on (cheaper) CPU-only machines, and only use GPU machines for model inference, resulting in a more cost-effective processing.
License plate recognition Workflow with 2x object detection model, dynamic cropping, multiple visualizations, and Gemini for OCR
```bash
curl --location 'https://serverless.roboflow.com/my-workspace-id/workflows/lpr-workflow' -i \
--header 'Authorization: Bearer API_KEY' \
--header 'Content-Type: application/json' \
--data '{
"inputs": {
"image": {"type": "url", "value": "https://media.roboflow.com/docs/cars-highway.png"}
}
}'
HTTP/2 200
content-type: application/json
content-length: 2277416
x-model-cold-start: false
x-processing-time: 6.334797143936157
x-remote-processing-time: 1.0542614459991455
x-remote-processing-times: [{"m": "vehicle-detection-bz0yu/4", "t": 1.0091230869293213}, {"m": "license-plate-w8chc/1", "t": 0.017786026000976562}, {"m": "license-plate-w8chc/1", "t": 0.01506495475769043}, {"m": "license-plate-w8chc/1", "t": 0.012287378311157227}]
x-workspace-id: my-workspace-id
```
**Formula**: `credits = (100ms + 1054ms)/500,000` , so **0.0023 credits** for processing, and some tiny amount for the Gemini API call (depending on token count, see [roboflow.com/credits](https://roboflow.com/credits)).
### Failed requests
Requests that fail with status `402`, `408`, `409`, `423`, `429`, or any `5xx` code do not use credits. These cover server errors, timeouts, and rate limits.
Other failures, such as `401`, `403`, and `404`, still use credits.
# Serverless Video Streaming
Stream webcams, RTSP cameras, and video files through models or Workflows on Roboflow Cloud with WebRTC.
## About
The Serverless Video Streaming API uses WebRTC to stream video from webcams, RTSP cameras, or video files to Roboflow Cloud. You can run one model or a [Workflow](https://docs.roboflow.com/workflows) and receive processed frames plus prediction data in your application.
Use the Inference SDK WebRTC client for both models and Workflows. Set `api_url` to `https://serverless.roboflow.com`. The same client works with a [self-hosted Inference Server](/deployment/self-hosted/inference-server) when you change the URL.
Supported input sources:
* Webcam: a browser or device camera
* RTSP: an IP camera or other RTSP-compatible source
* Video file: a stored video uploaded through the data channel
When Serverless connects directly to an RTSP source, its URL must be publicly accessible. If the camera is available only on your local network, use `LocalStreamSource` to capture it on the client and forward the frames.
## How it works
When you start a streaming session, the SDK calls Roboflow's API to initialize a WebRTC connection. The API spawns a serverless function that runs your Workflow. Once connected, data flows through two WebRTC channels:
### Video track
Streams video frames bidirectionally. You send frames from your webcam or video file, and receive annotated/processed frames back. The Video Track is optimized for real-time display: it adjusts resolution and may drop frames based on available bandwidth. Quality ramps up as the connection stabilizes.
Due to WebRTC congestion control, it can take up to a minute for quality and FPS to ramp up to full capacity, especially at higher resolutions like 1920×1080 at 30 FPS.
### Data channel
Sends structured inference results as JSON messages. This includes all Workflow output data like predictions, coordinates, and classifications. Unlike the Video Track, the Data Channel provides reliable, ordered delivery without any optimizations to keep up with the live camera feed. To process video files, you can upload the file via the Data Channel and consume results the same way to fully process the video.
You can use both channels simultaneously, for example displaying annotated video while also processing the structured prediction data in your application.
## Regions and GPU plans
Specify `requested_region` and `requested_plan` in your configuration to control where and how your stream is processed.
Regions: `us` (United States), `eu` (Europe), `ap` (Asia Pacific)
Choose the region closest to your users or video source to minimize latency.
GPU plans:
* `webrtc-gpu-medium`: Default and recommended for most workflows
* `webrtc-gpu-small`: Lower cost. Try this after confirming Medium works well for your use case.
* `webrtc-gpu-large`: Required for SAM3 and Rapid Models that use SAM3 (expect \~5 FPS)
## Concurrency limits
Each workspace is limited to 10 concurrent streams by default.
If you require a higher limit, please contact our sales team; we'll be happy to adjust it based on your needs.
## Pricing
Billed per hour based on your selected GPU plan. Billing starts once the serverless function spawns and the WebRTC connection is established. See [roboflow.com/credits](https://roboflow.com/credits) for current rates.
## SDKs
### JavaScript
For web browsers and React Native applications.
```bash
npm install @roboflow/inference-sdk
```
Do not expose your API key in frontend code. Use a backend proxy endpoint to keep it secure.
* [NPM package](https://www.npmjs.com/package/@roboflow/inference-sdk)
* [Sample application](https://github.com/roboflow/inferenceSampleApp)
* [Documentation](/deployment/self-hosted/sdks/web-browser/web-inference-sdk)
### Python
For models and Workflows in Python applications:
```bash
pip install inference-sdk[webrtc]
```
* [PyPI package](https://pypi.org/project/inference-sdk/)
* [WebRTC Streaming reference](https://docs.roboflow.com/reference/inference/inference-sdk/webrtc)
* [Example scripts](https://github.com/roboflow/inference/tree/main/examples/webrtc_sdk) (webcam, RTSP, video file)
## Configuration
When creating a streaming session, pass a `StreamConfig` object to control behavior:
* `stream_output`: List of Workflow output names to stream via Video Track
* `data_output`: List of Workflow output names to send via Data Channel
* `requested_plan`: GPU plan (see above)
* `requested_region`: Region code (`us`, `eu`, or `ap`)
* `realtime_processing`: If `True` (default), drop frames when processing can't keep up
* `workflow_parameters`: Dictionary of parameters to pass to the Workflow
## Test without code
You can test streaming directly in the Roboflow web interface:
1. Go to [app.roboflow.com](https://app.roboflow.com)
2. Open the "Workflows" tab
3. Select a Workflow and click "Test Workflow"
4. Choose your source (Webcam, RTSP, or Video File) and configure GPU/region settings
5. Click "Run"
# Use in a Workflow
You can use Serverless Cloud API with Roboflow Workflows.
The Serverless Cloud API can be selected in the Runtime option of your Workflow. It's the default option.
Then choose "Cloud API":
### Video streaming
For video streaming, please refer to [Serverless Video Streaming API](/deployment/roboflow-cloud/serverless-api/serverless-video-streaming-api).
# Batch Processing
Run Workflows on large batches of images and stored videos with cloud infrastructure provisioned for you.
## About
Batch Processing is a cost-effective way to run [Workflows](https://docs.roboflow.com/workflows) on batches of images and stored videos. It's ideal for asynchronously processing large amounts of data.
Batch Processing automatically provisions the infrastructure needed to run a large batch.
{% hint style="info" %}
Batch Processing is available on Growth and Enterprise plans. You can start a job from the "Batch Processing" tab, or run a Workflow on a selection in the [Asset Library](https://docs.roboflow.com/platform/workspaces/asset-library).
{% endhint %}
You can configure a Batch Processing job through the Roboflow web interface or through our API (via the CLI).
When you start a job, machines will be provisioned in the cloud to process your data. You will then receive a JSON file with the output from the Workflow you chose to run on your data.
The following video explains Batch Processing in depth:
{% embed url="" %}
## Web App
### Create a Batch Processing Job
To create a Batch Processing job, click Deployments in the left sidebar of your Roboflow dashboard. Then, click on the "Batch Processing" tab:
Click "New Batch Job" to create a Batch Processing job.
A window will open in which you can configure your job:
#### Choose a Workflow
To start configuring a job, first select a Workflow. If you do not already have a Workflow, refer to our Workflows documentation to get started.
#### Upload Images or Videos
Next, you need to upload the images or videos on which you want to run your Workflow.
#### Configure Hardware
You can run your Batch Processing job on a CPU or a GPU. GPU jobs are faster but more expensive.
For pricing information, refer to the Roboflow pricing documentation.
Select either a CPU or GPU for your job:
Several advanced configuration options are also available under the "Advanced Options" tab. We recommend leaving these options as the default.
#### Start the Job
To start the Batch Processing job, click "Create Batch Job".
The infrastructure for your job will be provisioned and processing will begin.
### Monitor Job Progress
When you start your job, a status indicator will appear indicating when processing is being configured, when the batch data is being processed, and when the job is complete.
You can monitor how much of a batch has been processed in real time.
The amount of time it will take to process your data depends on how many images or videos you are processing, the complexity of your Workflow, and whether you selected CPU or GPU hardware.
Open a job to view its details, including the "Input Source" that shows which images the job ran on: the [Asset Library](https://docs.roboflow.com/platform/workspaces/asset-library) search query used to select them (with a link to reopen that selection), or the number of images picked manually.
### Run a Workflow from the App
Besides the [API](#http-api) and [CLI](#cli), you can start a Batch Processing job directly from the Roboflow app to run a [Workflow](https://docs.roboflow.com/workflows) over large sets of stored images. There are two ways to do this:
* On demand, from the Asset Library.
* Automatically, each time a [Datasource](https://docs.roboflow.com/datasets/create-and-upload/adding-data/datasources) mirrors new images from a cloud bucket.
#### From the Asset Library
The [Asset Library](https://docs.roboflow.com/platform/workspaces/asset-library) lets you run a Workflow on the images you select, on demand.
Select images manually, or select all images matching your current search, then click "Run Workflow". For the full flow, including how to write results back onto your images, see [Running a Workflow](https://docs.roboflow.com/platform/workspaces/asset-library#running-a-workflow).
#### Automatically When a Datasource Mirrors
A [Datasource](https://docs.roboflow.com/datasets/create-and-upload/adding-data/datasources) mirrors images and metadata from a cloud bucket into your Workspace. You can automatically run a Workflow over the new images each mirror imports. This keeps enrichment such as tagging, quality scoring, or pre-labeling up to date as new data arrives, with no manual step.
You configure these automations in the "Workflow runs" section of your [Datasources](https://app.roboflow.com/settings/datasources) page.
{% hint style="info" %}
Managing Workflow runs requires a Workspace role with permission to manage batch automations. If you do not see the "Workflow runs" section, ask a Workspace admin.
{% endhint %}
To add an automation:
1. In the "Workflow runs" section, click "Add workflow run".
2. Enter a Name for the automation.
3. Under "Run when", choose "On Sync" and select the [Datasources](https://docs.roboflow.com/datasets/create-and-upload/adding-data/datasources) that should trigger it.
4. Select the Workflow to run. It must have exactly one `image` input.
5. Choose a Machine type (CPU or GPU).
6. Click "Create".
Each time one of the selected Datasources mirrors, the automation runs the Workflow as a Batch Processing job over the images that mirror imported. Track progress in the Activity Center and on the "Batch Processing" tab under Deployments, the same as any other Batch Processing job.
To have a Workflow write its results back onto your images so you can search for them in the Asset Library, see [Writing results back to the Asset Library](https://docs.roboflow.com/platform/workspaces/asset-library#writing-results-back-to-the-asset-library).
### Run a Job with the API or CLI
To create and run a Batch Processing job programmatically, see the [HTTP API](#http-api) and [CLI](#cli) sections below. For debugging common issues, see [Troubleshooting](/deployment/roboflow-cloud/batch-processing/troubleshooting).
## HTTP API
**Quick Links:**
* [Ingest Data](#ingest-data) (video, single image, images)
* [Check Batch Status](#check-batch-status) (item count, shard details)
* [Start a Job](#start-a-job)
* [Monitor Job Progress](#monitor-job-progress) (job status, stages, tasks)
* [Export Results](#export-results) (output parts, download URLs)
* [Webhook Notifications](#webhook-notifications)
### Ingest Data
#### Upload Video
## Upload a video
> Request a signed URL to upload a video file. After receiving the response, PUT the video to the \`uploadURL\` with the provided \`extensionHeaders\`.
```json
{"openapi":"3.0.3","info":{"title":"Roboflow Batch Processing API","version":"1.0"},"tags":[{"name":"Data Ingestion","description":"Upload images and videos to Data Staging before processing."}],"servers":[{"url":"https://api.roboflow.com"}],"paths":{"/data-staging/v1/external/{workspace}/batches/{batch_id}/upload/video":{"post":{"operationId":"uploadVideo","tags":["Data Ingestion"],"summary":"Upload a video","description":"Request a signed URL to upload a video file. After receiving the response, PUT the video to the `uploadURL` with the provided `extensionHeaders`.\n","parameters":[{"$ref":"#/components/parameters/workspace"},{"$ref":"#/components/parameters/batch_id"},{"$ref":"#/components/parameters/api_key"},{"name":"fileName","in":"query","required":true,"schema":{"type":"string"},"description":"Name of the video file (e.g. `my_video.mp4`)."}],"responses":{"200":{"description":"Signed URL details for uploading the video.","content":{"application/json":{"schema":{"type":"object","properties":{"status":{"type":"string"},"signedURLDetails":{"type":"object","properties":{"uploadURL":{"type":"string","description":"PUT the video file to this URL."},"method":{"type":"string","description":"HTTP method to use for the upload."},"extensionHeaders":{"type":"object","additionalProperties":{"type":"string"},"description":"Include these headers in the PUT request."},"maxFileSize":{"type":"integer","description":"Maximum file size in bytes."}}}}}}}}}}}},"components":{"parameters":{"workspace":{"name":"workspace","in":"path","required":true,"schema":{"type":"string"},"description":"Your Roboflow workspace identifier."},"batch_id":{"name":"batch_id","in":"path","required":true,"schema":{"type":"string","maxLength":64,"pattern":"^[a-z0-9_-]+$"},"description":"Batch identifier. Lowercase, max 64 chars: letters, digits, hyphens, underscores."},"api_key":{"name":"api_key","in":"query","required":true,"schema":{"type":"string"},"description":"Your Roboflow API key."}}}}
```
#### Upload Image
## Upload a single image
> Upload a single image via multipart form data. Best for batches up to 5,000 images.\
> \
> \*\*Note:\*\* Single-image and bulk uploads cannot be combined for the same batch.
```json
{"openapi":"3.0.3","info":{"title":"Roboflow Batch Processing API","version":"1.0"},"tags":[{"name":"Data Ingestion","description":"Upload images and videos to Data Staging before processing."}],"servers":[{"url":"https://api.roboflow.com"}],"paths":{"/data-staging/v1/external/{workspace}/batches/{batch_id}/upload/image":{"post":{"operationId":"uploadImage","tags":["Data Ingestion"],"summary":"Upload a single image","description":"Upload a single image via multipart form data. Best for batches up to 5,000 images.\n\n**Note:** Single-image and bulk uploads cannot be combined for the same batch.\n","parameters":[{"$ref":"#/components/parameters/workspace"},{"$ref":"#/components/parameters/batch_id"},{"$ref":"#/components/parameters/api_key"},{"name":"fileName","in":"query","required":true,"schema":{"type":"string"},"description":"Name of the image file."}],"requestBody":{"required":true,"content":{"multipart/form-data":{"schema":{"type":"object","properties":{"file":{"type":"string","format":"binary","description":"The image file to upload."}}}}}},"responses":{"200":{"description":"Image uploaded successfully.","content":{"application/json":{"schema":{"type":"object","properties":{"status":{"type":"string"}}}}}}}}}},"components":{"parameters":{"workspace":{"name":"workspace","in":"path","required":true,"schema":{"type":"string"},"description":"Your Roboflow workspace identifier."},"batch_id":{"name":"batch_id","in":"path","required":true,"schema":{"type":"string","maxLength":64,"pattern":"^[a-z0-9_-]+$"},"description":"Batch identifier. Lowercase, max 64 chars: letters, digits, hyphens, underscores."},"api_key":{"name":"api_key","in":"query","required":true,"schema":{"type":"string"},"description":"Your Roboflow API key."}}}}
```
#### Bulk Upload Images
## Bulk upload images
> Request a signed URL for uploading a \`.tar\` archive of images. Recommended for batches exceeding 5,000 images. Bundle up to 500 images per archive.\
> \
> The response contains a signed URL and extension headers. Pack images into a \`.tar\` archive and PUT it to the signed URL.\
> \
> \*\*Note:\*\* Bulk and single-image uploads cannot be combined for the same batch.\
> \
> When performing bulk ingestion, data is indexed in the background. There may be a short delay before all data is available.
```json
{"openapi":"3.0.3","info":{"title":"Roboflow Batch Processing API","version":"1.0"},"tags":[{"name":"Data Ingestion","description":"Upload images and videos to Data Staging before processing."}],"servers":[{"url":"https://api.roboflow.com"}],"paths":{"/data-staging/v1/external/{workspace}/batches/{batch_id}/bulk-upload/image-files":{"post":{"operationId":"bulkUploadImages","tags":["Data Ingestion"],"summary":"Bulk upload images","description":"Request a signed URL for uploading a `.tar` archive of images. Recommended for batches exceeding 5,000 images. Bundle up to 500 images per archive.\n\nThe response contains a signed URL and extension headers. Pack images into a `.tar` archive and PUT it to the signed URL.\n\n**Note:** Bulk and single-image uploads cannot be combined for the same batch.\n\nWhen performing bulk ingestion, data is indexed in the background. There may be a short delay before all data is available.\n","parameters":[{"$ref":"#/components/parameters/workspace"},{"$ref":"#/components/parameters/batch_id"},{"$ref":"#/components/parameters/api_key"}],"responses":{"200":{"description":"Signed URL details for uploading a tar archive.","content":{"application/json":{"schema":{"type":"object","properties":{"status":{"type":"string"},"signedURLDetails":{"type":"object","properties":{"shardId":{"type":"string","format":"uuid","description":"Unique identifier for this shard upload."},"uploadURL":{"type":"string","description":"PUT the tar archive to this URL."},"method":{"type":"string","description":"HTTP method to use for the upload."},"extensionHeaders":{"type":"object","additionalProperties":{"type":"string"},"description":"Include these headers in the PUT request."},"maxNumberOfImages":{"type":"integer","description":"Maximum number of images per tar archive."},"maxShardSize":{"type":"integer","description":"Maximum tar archive size in bytes."}}}}}}}}}}}},"components":{"parameters":{"workspace":{"name":"workspace","in":"path","required":true,"schema":{"type":"string"},"description":"Your Roboflow workspace identifier."},"batch_id":{"name":"batch_id","in":"path","required":true,"schema":{"type":"string","maxLength":64,"pattern":"^[a-z0-9_-]+$"},"description":"Batch identifier. Lowercase, max 64 chars: letters, digits, hyphens, underscores."},"api_key":{"name":"api_key","in":"query","required":true,"schema":{"type":"string"},"description":"Your Roboflow API key."}}}}
```
### Check Batch Status
## Get batch item count
> Returns the count of ingested items in a batch. Use this to verify all data has been ingested before starting a job.
```json
{"openapi":"3.0.3","info":{"title":"Roboflow Batch Processing API","version":"1.0"},"tags":[{"name":"Batch Status","description":"Inspect staged data and batch contents."}],"servers":[{"url":"https://api.roboflow.com"}],"paths":{"/data-staging/v1/external/{workspace}/batches/{batch_id}/count":{"get":{"operationId":"getBatchCount","tags":["Batch Status"],"summary":"Get batch item count","description":"Returns the count of ingested items in a batch. Use this to verify all data has been ingested before starting a job.\n","parameters":[{"$ref":"#/components/parameters/workspace"},{"$ref":"#/components/parameters/batch_id"},{"$ref":"#/components/parameters/api_key"}],"responses":{"200":{"description":"Batch item count.","content":{"application/json":{"schema":{"type":"object","properties":{"status":{"type":"string"},"count":{"type":"integer","description":"Number of items in the batch."}}}}}}}}}},"components":{"parameters":{"workspace":{"name":"workspace","in":"path","required":true,"schema":{"type":"string"},"description":"Your Roboflow workspace identifier."},"batch_id":{"name":"batch_id","in":"path","required":true,"schema":{"type":"string","maxLength":64,"pattern":"^[a-z0-9_-]+$"},"description":"Batch identifier. Lowercase, max 64 chars: letters, digits, hyphens, underscores."},"api_key":{"name":"api_key","in":"query","required":true,"schema":{"type":"string"},"description":"Your Roboflow API key."}}}}
```
#### Check Shard Upload Details
## List batch shards
> Returns shard details for a bulk-upload batch. Paginated — use \`nextPageToken\` from the response to fetch subsequent pages.
```json
{"openapi":"3.0.3","info":{"title":"Roboflow Batch Processing API","version":"1.0"},"tags":[{"name":"Batch Status","description":"Inspect staged data and batch contents."}],"servers":[{"url":"https://api.roboflow.com"}],"paths":{"/data-staging/v1/external/{workspace}/batches/{batch_id}/shards":{"get":{"operationId":"getBatchShards","tags":["Batch Status"],"summary":"List batch shards","description":"Returns shard details for a bulk-upload batch. Paginated — use `nextPageToken` from the response to fetch subsequent pages.\n","parameters":[{"$ref":"#/components/parameters/workspace"},{"$ref":"#/components/parameters/batch_id"},{"$ref":"#/components/parameters/api_key"},{"$ref":"#/components/parameters/nextPageToken"}],"responses":{"200":{"description":"Paginated list of batch shards.","content":{"application/json":{"schema":{"type":"object","properties":{"status":{"type":"string"},"shards":{"type":"array","items":{"type":"object"},"description":"List of shard objects."},"nextPageToken":{"type":"string","nullable":true,"description":"Token for fetching the next page of results. `null` if no more pages."}}}}}}}}}},"components":{"parameters":{"workspace":{"name":"workspace","in":"path","required":true,"schema":{"type":"string"},"description":"Your Roboflow workspace identifier."},"batch_id":{"name":"batch_id","in":"path","required":true,"schema":{"type":"string","maxLength":64,"pattern":"^[a-z0-9_-]+$"},"description":"Batch identifier. Lowercase, max 64 chars: letters, digits, hyphens, underscores."},"api_key":{"name":"api_key","in":"query","required":true,"schema":{"type":"string"},"description":"Your Roboflow API key."},"nextPageToken":{"name":"nextPageToken","in":"query","required":false,"schema":{"type":"string"},"description":"Pagination token from a previous response."}}}}
```
### Start a Job
## Start a batch processing job
> Start a batch processing job that runs a Workflow against staged data.\
> \
> \*\*Job ID constraints:\*\* Lowercase letters, digits, hyphens, and underscores only. Maximum 20 characters.
```json
{"openapi":"3.0.3","info":{"title":"Roboflow Batch Processing API","version":"1.0"},"tags":[{"name":"Processing","description":"Start and monitor batch processing jobs."}],"servers":[{"url":"https://api.roboflow.com"}],"paths":{"/batch-processing/v1/external/{workspace}/jobs/{job_id}":{"post":{"operationId":"startJob","tags":["Processing"],"summary":"Start a batch processing job","description":"Start a batch processing job that runs a Workflow against staged data.\n\n**Job ID constraints:** Lowercase letters, digits, hyphens, and underscores only. Maximum 20 characters.\n","parameters":[{"$ref":"#/components/parameters/workspace"},{"$ref":"#/components/parameters/job_id"},{"$ref":"#/components/parameters/api_key"}],"requestBody":{"required":true,"content":{"application/json":{"schema":{"$ref":"#/components/schemas/JobStartRequest"}}}},"responses":{"200":{"description":"Job started successfully.","content":{"application/json":{"schema":{"type":"object","properties":{"status":{"type":"string"}}}}}}}}}},"components":{"parameters":{"workspace":{"name":"workspace","in":"path","required":true,"schema":{"type":"string"},"description":"Your Roboflow workspace identifier."},"job_id":{"name":"job_id","in":"path","required":true,"schema":{"type":"string","maxLength":20,"pattern":"^[a-z0-9_-]+$"},"description":"Job identifier. Lowercase, max 20 chars: letters, digits, hyphens, underscores."},"api_key":{"name":"api_key","in":"query","required":true,"schema":{"type":"string"},"description":"Your Roboflow API key."}},"schemas":{"JobStartRequest":{"type":"object","required":["type","jobInput","computeConfiguration","processingSpecification"],"properties":{"type":{"type":"string","enum":["simple-image-processing-v1"],"description":"Job type."},"jobInput":{"type":"object","required":["type","batchId"],"properties":{"type":{"type":"string","enum":["staging-batch-input-v1"],"description":"Input type."},"batchId":{"type":"string","description":"The batch ID containing the data to process."}}},"computeConfiguration":{"type":"object","required":["type","machineType"],"properties":{"type":{"type":"string","enum":["compute-configuration-v2"],"description":"Configuration type."},"machineType":{"type":"string","enum":["cpu","gpu"],"description":"Machine type. Use `gpu` for Workflows with multiple or large models."},"workersPerMachine":{"type":"integer","default":4,"description":"Number of parallel workers per machine. Reduce for memory-intensive Workflows."}}},"processingTimeoutSeconds":{"type":"integer","default":3600,"description":"Maximum cumulative machine runtime in seconds across all parallel workers."},"processingSpecification":{"type":"object","required":["type","workspace","workflowId"],"properties":{"type":{"type":"string","enum":["workflows-processing-specification-v1"],"description":"Processing specification type."},"workspace":{"type":"string","description":"Workspace containing the Workflow."},"workflowId":{"type":"string","description":"The Workflow to run. Find this in the Workflow Editor under \"Deploy\"."},"aggregationFormat":{"type":"string","enum":["jsonl","csv"],"default":"jsonl","description":"Output format for aggregated results."}}},"notificationsURL":{"type":"string","format":"uri","description":"Webhook URL for job completion notifications. Custom webhook headers are not yet supported. The only header sent is `Authorization: Bearer rf_{workspace_id}`."}}}}}}
```
### Monitor Job Progress
#### Get Job Status
## Get job status
> Returns the current status of a batch processing job.
```json
{"openapi":"3.0.3","info":{"title":"Roboflow Batch Processing API","version":"1.0"},"tags":[{"name":"Processing","description":"Start and monitor batch processing jobs."}],"servers":[{"url":"https://api.roboflow.com"}],"paths":{"/batch-processing/v1/external/{workspace}/jobs/{job_id}":{"get":{"operationId":"getJobStatus","tags":["Processing"],"summary":"Get job status","description":"Returns the current status of a batch processing job.","parameters":[{"$ref":"#/components/parameters/workspace"},{"$ref":"#/components/parameters/job_id"},{"$ref":"#/components/parameters/api_key"}],"responses":{"200":{"description":"Job status details.","content":{"application/json":{"schema":{"type":"object","properties":{"status":{"type":"string"},"jobStatus":{"type":"string","description":"Current job status (e.g. `pending`, `processing`, `completed`, `failed`)."},"progress":{"type":"number","description":"Processing progress as a fraction between 0 and 1."}}}}}}}}}},"components":{"parameters":{"workspace":{"name":"workspace","in":"path","required":true,"schema":{"type":"string"},"description":"Your Roboflow workspace identifier."},"job_id":{"name":"job_id","in":"path","required":true,"schema":{"type":"string","maxLength":20,"pattern":"^[a-z0-9_-]+$"},"description":"Job identifier. Lowercase, max 20 chars: letters, digits, hyphens, underscores."},"api_key":{"name":"api_key","in":"query","required":true,"schema":{"type":"string"},"description":"Your Roboflow API key."}}}}
```
#### List Job Stages
## List job stages
> Returns the list of stages for a job. Each job typically has \`processing\` and \`export\` stages, each producing an output batch.
```json
{"openapi":"3.0.3","info":{"title":"Roboflow Batch Processing API","version":"1.0"},"tags":[{"name":"Processing","description":"Start and monitor batch processing jobs."}],"servers":[{"url":"https://api.roboflow.com"}],"paths":{"/batch-processing/v1/external/{workspace}/jobs/{job_id}/stages":{"get":{"operationId":"getJobStages","tags":["Processing"],"summary":"List job stages","description":"Returns the list of stages for a job. Each job typically has `processing` and `export` stages, each producing an output batch.\n","parameters":[{"$ref":"#/components/parameters/workspace"},{"$ref":"#/components/parameters/job_id"},{"$ref":"#/components/parameters/api_key"}],"responses":{"200":{"description":"List of job stages.","content":{"application/json":{"schema":{"type":"object","properties":{"status":{"type":"string"},"stages":{"type":"array","items":{"type":"object"},"description":"List of stage objects. Each stage has an ID and an output batch ID."}}}}}}}}}},"components":{"parameters":{"workspace":{"name":"workspace","in":"path","required":true,"schema":{"type":"string"},"description":"Your Roboflow workspace identifier."},"job_id":{"name":"job_id","in":"path","required":true,"schema":{"type":"string","maxLength":20,"pattern":"^[a-z0-9_-]+$"},"description":"Job identifier. Lowercase, max 20 chars: letters, digits, hyphens, underscores."},"api_key":{"name":"api_key","in":"query","required":true,"schema":{"type":"string"},"description":"Your Roboflow API key."}}}}
```
#### List Stage Tasks
## List tasks for a stage
> Returns the list of tasks for a specific job stage. Paginated — use \`nextPageToken\` from the response to fetch subsequent pages.
```json
{"openapi":"3.0.3","info":{"title":"Roboflow Batch Processing API","version":"1.0"},"tags":[{"name":"Processing","description":"Start and monitor batch processing jobs."}],"servers":[{"url":"https://api.roboflow.com"}],"paths":{"/batch-processing/v1/external/{workspace}/jobs/{job_id}/stages/{stage_id}/tasks":{"get":{"operationId":"getStageTasks","tags":["Processing"],"summary":"List tasks for a stage","description":"Returns the list of tasks for a specific job stage. Paginated — use `nextPageToken` from the response to fetch subsequent pages.\n","parameters":[{"$ref":"#/components/parameters/workspace"},{"$ref":"#/components/parameters/job_id"},{"name":"stage_id","in":"path","required":true,"schema":{"type":"string"},"description":"The stage identifier."},{"$ref":"#/components/parameters/api_key"},{"$ref":"#/components/parameters/nextPageToken"}],"responses":{"200":{"description":"Paginated list of tasks.","content":{"application/json":{"schema":{"type":"object","properties":{"status":{"type":"string"},"tasks":{"type":"array","items":{"type":"object"},"description":"List of task objects."},"nextPageToken":{"type":"string","nullable":true,"description":"Token for fetching the next page of results. `null` if no more pages."}}}}}}}}}},"components":{"parameters":{"workspace":{"name":"workspace","in":"path","required":true,"schema":{"type":"string"},"description":"Your Roboflow workspace identifier."},"job_id":{"name":"job_id","in":"path","required":true,"schema":{"type":"string","maxLength":20,"pattern":"^[a-z0-9_-]+$"},"description":"Job identifier. Lowercase, max 20 chars: letters, digits, hyphens, underscores."},"api_key":{"name":"api_key","in":"query","required":true,"schema":{"type":"string"},"description":"Your Roboflow API key."},"nextPageToken":{"name":"nextPageToken","in":"query","required":false,"schema":{"type":"string"},"description":"Pagination token from a previous response."}}}}
```
### Export Results
#### List Output Parts
## List output batch parts
> Lists the parts of an output batch. Use the \`export\` stage output batch for compressed results.
```json
{"openapi":"3.0.3","info":{"title":"Roboflow Batch Processing API","version":"1.0"},"tags":[{"name":"Data Export","description":"Download results after processing completes."}],"servers":[{"url":"https://api.roboflow.com"}],"paths":{"/data-staging/v1/external/{workspace}/batches/{batch_id}/parts":{"get":{"operationId":"listBatchParts","tags":["Data Export"],"summary":"List output batch parts","description":"Lists the parts of an output batch. Use the `export` stage output batch for compressed results.\n","parameters":[{"$ref":"#/components/parameters/workspace"},{"$ref":"#/components/parameters/batch_id"},{"$ref":"#/components/parameters/api_key"}],"responses":{"200":{"description":"List of batch parts.","content":{"application/json":{"schema":{"type":"object","properties":{"status":{"type":"string"},"parts":{"type":"array","items":{"type":"object","properties":{"partName":{"type":"string","description":"Name of the batch part."}}},"description":"List of batch part objects."}}}}}}}}}},"components":{"parameters":{"workspace":{"name":"workspace","in":"path","required":true,"schema":{"type":"string"},"description":"Your Roboflow workspace identifier."},"batch_id":{"name":"batch_id","in":"path","required":true,"schema":{"type":"string","maxLength":64,"pattern":"^[a-z0-9_-]+$"},"description":"Batch identifier. Lowercase, max 64 chars: letters, digits, hyphens, underscores."},"api_key":{"name":"api_key","in":"query","required":true,"schema":{"type":"string"},"description":"Your Roboflow API key."}}}}
```
#### List Download URLs
## List download URLs
> Returns paginated download URLs for files in a batch part.
```json
{"openapi":"3.0.3","info":{"title":"Roboflow Batch Processing API","version":"1.0"},"tags":[{"name":"Data Export","description":"Download results after processing completes."}],"servers":[{"url":"https://api.roboflow.com"}],"paths":{"/data-staging/v1/external/{workspace}/batches/{batch_id}/list":{"get":{"operationId":"listDownloadUrls","tags":["Data Export"],"summary":"List download URLs","description":"Returns paginated download URLs for files in a batch part.\n","parameters":[{"$ref":"#/components/parameters/workspace"},{"$ref":"#/components/parameters/batch_id"},{"$ref":"#/components/parameters/api_key"},{"$ref":"#/components/parameters/nextPageToken"},{"name":"partName","in":"query","schema":{"type":"string"},"description":"Filter by part name (from the list parts response)."}],"responses":{"200":{"description":"Paginated list of download URLs.","content":{"application/json":{"schema":{"type":"object","properties":{"status":{"type":"string"},"filesMetadata":{"type":"array","items":{"type":"object","properties":{"downloadURL":{"type":"string","description":"Signed URL to download the file."},"fileName":{"type":"string","description":"Original file name."},"partName":{"type":"string","nullable":true,"description":"Part name this file belongs to."},"shardId":{"type":"string","nullable":true,"description":"Shard ID (for bulk-upload batches)."},"contentType":{"type":"string","description":"Content type (e.g. `image`, `video`)."},"nestedContentType":{"type":"string","nullable":true,"description":"Nested content type, if applicable."}}},"description":"List of file metadata objects with download URLs."},"nextPageToken":{"type":"string","nullable":true,"description":"Token for fetching the next page of results. `null` if no more pages."}}}}}}}}}},"components":{"parameters":{"workspace":{"name":"workspace","in":"path","required":true,"schema":{"type":"string"},"description":"Your Roboflow workspace identifier."},"batch_id":{"name":"batch_id","in":"path","required":true,"schema":{"type":"string","maxLength":64,"pattern":"^[a-z0-9_-]+$"},"description":"Batch identifier. Lowercase, max 64 chars: letters, digits, hyphens, underscores."},"api_key":{"name":"api_key","in":"query","required":true,"schema":{"type":"string"},"description":"Your Roboflow API key."},"nextPageToken":{"name":"nextPageToken","in":"query","required":false,"schema":{"type":"string"},"description":"Pagination token from a previous response."}}}}
```
### Webhook Notifications
Instead of polling for status, you can use webhooks to get notified when ingestion or processing completes. See [CLI Usage](#webhook-automation) for webhook configuration and payload formats.
## CLI
By installing `inference-cli` you gain access to the `inference rf-cloud` command, which allows you to interact with Batch Processing and Data Staging - the core components of Roboflow Batch Processing.
### Setup
```bash
pip install inference-cli
export ROBOFLOW_API_KEY="YOUR-API-KEY-GOES-HERE"
```
For cloud storage support:
```bash
pip install 'inference-cli[cloud-storage]'
```
If you need help finding your API key, see our [authentication guide](https://docs.roboflow.com/reference/authentication/authentication/find-your-roboflow-api-key).
### Ingest Data
#### Images
```bash
inference rf-cloud data-staging create-batch-of-images \
--images-dir \
--batch-id
```
#### Videos
```bash
inference rf-cloud data-staging create-batch-of-videos \
--videos-dir \
--batch-id
```
{% hint style="info" %}
**Batch ID format:** Must be lowercase, at most 64 characters, with only letters, digits, hyphens (`-`), and underscores (`_`).
{% endhint %}
#### Cloud Storage
If your data is already in cloud storage (S3, Google Cloud Storage, or Azure), you can process it directly without downloading files locally.
**For images:**
```bash
inference rf-cloud data-staging create-batch-of-images \
--data-source cloud-storage \
--bucket-path \
--batch-id
```
**For videos:**
```bash
inference rf-cloud data-staging create-batch-of-videos \
--data-source cloud-storage \
--bucket-path \
--batch-id
```
The `--bucket-path` parameter supports the following providers. Glob patterns filter which files are ingested:
| Provider | Path format | Glob example |
| -------------------- | --------------------------- | --------------------------------------------------------------- |
| S3 | `s3://bucket-name/path/` | `s3://my-bucket/training-data/**/*.jpg` - all JPGs recursively |
| Google Cloud Storage | `gs://bucket-name/path/` | `gs://my-bucket/videos/2024-*/*.mp4` - MP4s in `2024-*` folders |
| Azure Blob Storage | `az://container-name/path/` | `az://container/images/*.png` - PNGs in the images folder |
{% hint style="info" %}
Your cloud storage credentials are used **only locally** by the CLI to generate presigned URLs. They are **never uploaded** to Roboflow servers.
{% endhint %}
{% hint style="warning" %}
Generated presigned URLs are valid for 24 hours. Ensure your batch processing job completes within this timeframe.
{% endhint %}
For large datasets, the system automatically splits images into chunks of 20,000 files each. Videos work best in batches under 1,000.
#### Signed URL Ingestion
For advanced automation, you can ingest data via signed URLs instead of local files:
| Flag | Description |
| ------------------------------- | ----------------------------------------------------------------------------------- |
| `--data-source references-file` | Process files referenced via signed URLs. |
| `--references ` | Path to a JSONL file containing file URLs, or a signed URL pointing to such a file. |
**Reference File Format (JSONL):**
```
{"name": "", "url": "https://"}
{"name": "", "url": "https://"}
```
{% hint style="info" %}
Signed URL ingestion is available to Growth Plan and Enterprise customers.
{% endhint %}
### Inspect Staged Data
```bash
inference rf-cloud data-staging show-batch-details --batch-id
```
### Start a Job
#### Process Images
```bash
inference rf-cloud batch-processing process-images-with-workflow \
--workflow-id \
--batch-id \
--machine-type gpu
```
#### Process Videos
```bash
inference rf-cloud batch-processing process-videos-with-workflow \
--workflow-id \
--batch-id \
--machine-type gpu \
--max-video-fps
```
{% hint style="info" %}
**Finding your Workflow ID:** Open the Workflow Editor in the Roboflow App, click "Deploy", and find the identifier in the code snippet.
{% endhint %}
{% hint style="info" %}
By default, processing runs on CPU. Use `--machine-type gpu` for Workflows with multiple or large models.
{% endhint %}
### Monitor Job Progress
The start command outputs a **Job ID**. Use it to check status:
```bash
inference rf-cloud batch-processing show-job-details --job-id
```
### Export Results
The job details will include the **output batch ID**. Use it to export results:
```bash
inference rf-cloud data-staging export-batch \
--target-dir \
--batch-id
```
### Webhook Automation
Instead of polling for status, you can use webhooks to get notified when ingestion or processing completes.
#### Data Ingestion Webhooks
The CLI commands `create-batch-of-images` and `create-batch-of-videos` support:
| Flag | Description |
| --------------------------------------- | ------------------------------------------ |
| `--notifications-url ` | Webhook endpoint for notifications. |
| `--notification-category ingest-status` | Overall ingestion process status. Default. |
| `--notification-category files-status` | Individual file processing status. |
Notifications are delivered via HTTP POST with an `Authorization` header containing your Roboflow Publishable Key.
**Ingest Status Notification**
```json
{
"type": "roboflow-data-staging-notification-v1",
"event_id": "8c20f970-fe10-41e1-9ef2-e057c63c07ff",
"ingest_id": "8cd48813430f2be70b492db67e07cc86",
"batch_id": "test-batch-117",
"shard_id": null,
"notification": {
"type": "ingest-status-notification-v1",
"success": false,
"error_details": {
"type": "unsafe-url-detected",
"reason": "Untrusted domain found: https://example.com/image.png"
}
},
"delivery_attempt": 1
}
```
**File Status Notification**
```json
{
"type": "roboflow-data-staging-notification-v1",
"event_id": "8f42708b-aeb7-4b73-9d83-cf18518b6d81",
"ingest_id": "d5cb69aa-b2d1-4202-a1c1-0231f180bda9",
"batch_id": "prod-batch-1",
"shard_id": "0d40fa12-349e-439f-83f8-42b9b7987b33",
"notification": {
"type": "ingest-files-status-notification-v1",
"success": true,
"ingested_files": [
"000000494869.jpg",
"000000186042.jpg"
],
"failed_files": [
{
"type": "file-size-limit-exceeded",
"file_name": "big_image.png",
"reason": "Max size of single image is 20971520B."
}
],
"content_truncated": false
},
"delivery_attempt": 1
}
```
#### Job Completion Webhooks
Add `--notifications-url` when starting a job:
```bash
inference rf-cloud batch-processing process-images-with-workflow \
--workflow-id \
--batch-id \
--notifications-url
```
**Job Completion Notification**
```json
{
"type": "roboflow-batch-job-notification-v1",
"event_id": "8f42708b-aeb7-4b73-9d83-cf18518b6d81",
"job_id": "",
"job_state": "success | fail",
"delivery_attempt": 1
}
```
### Cloud Storage Authentication
#### AWS S3 and S3-Compatible Storage
Credentials are detected automatically from:
1. **Environment variables:**
```bash
export AWS_ACCESS_KEY_ID=your-access-key-id
export AWS_SECRET_ACCESS_KEY=your-secret-access-key
export AWS_SESSION_TOKEN=your-session-token # Optional
```
2. **AWS credential files** (`~/.aws/credentials`, `~/.aws/config`)
3. **IAM roles** (EC2, ECS, Lambda)
**Named profiles:**
```bash
export AWS_PROFILE=production
```
**S3-compatible services (Cloudflare R2, MinIO, etc.):**
```bash
export AWS_ENDPOINT_URL=https://account-id.r2.cloudflarestorage.com
export AWS_REGION=auto # R2 requires region='auto'
export AWS_ACCESS_KEY_ID=your-r2-access-key
export AWS_SECRET_ACCESS_KEY=your-r2-secret-key
```
#### Google Cloud Storage
Credentials are detected from:
1. **Service account key file** (recommended for automation):
```bash
export GOOGLE_APPLICATION_CREDENTIALS=/path/to/service-account-key.json
```
2. **User credentials** from gcloud CLI (`gcloud auth login`)
3. **GCP metadata service** (when running on Google Cloud Platform)
#### Azure Blob Storage
**SAS Token (recommended):**
```bash
export AZURE_STORAGE_ACCOUNT_NAME=mystorageaccount
export AZURE_STORAGE_SAS_TOKEN="sv=2021-06-08&ss=b&srt=sco&sp=rl&se=2024-12-31"
```
**Account Key:**
```bash
export AZURE_STORAGE_ACCOUNT_NAME=mystorageaccount
export AZURE_STORAGE_ACCOUNT_KEY=your-account-key
```
Generate a SAS token via Azure CLI:
```bash
az storage container generate-sas \
--account-name mystorageaccount \
--name my-container \
--permissions rl \
--expiry 2024-12-31T23:59:59Z
```
#### Custom Scripts
For advanced use cases, reference scripts for generating signed URL files:
* **AWS S3:** [generateS3SignedUrls.sh](https://raw.githubusercontent.com/roboflow/roboflow-python/main/scripts/generateS3SignedUrls.sh)
* **Google Cloud Storage:** [generateGCSSignedUrls.sh](https://github.com/roboflow/roboflow-python/blob/main/scripts/generateGCSSignedUrls.sh)
* **Azure Blob Storage:** [generateAzureSasUrls.sh](https://raw.githubusercontent.com/roboflow/roboflow-python/main/scripts/generateAzureSasUrls.sh)
### Discover All Options
```bash
inference rf-cloud --help
inference rf-cloud data-staging --help
inference rf-cloud batch-processing --help
```
# Troubleshooting
Troubleshoot common Batch Processing issues including timeouts, SAHI performance, and OOM errors.
This page lists known issues, limitations, and workarounds for Batch Processing. If you encounter a problem not listed here, please report it through our [support channels](https://github.com/roboflow/inference/issues).
## Known Limitations
* Certain Workflow blocks requiring access to environment variables and local storage (like File Sink and Environment Secret Store) are blocked and will not execute.
* The service only works with Workflows that define a **single** input image parameter.
## Technical Details
* Data is stored in Data Staging with a **7-day expiry**.
* Each batch processing job contains multiple stages (typically `processing` and `export`). Each stage creates an output batch. We recommend using `export` stage outputs, as they are compressed for efficient transfer.
* A running job in the `processing` stage can be aborted using both the UI and CLI.
* An aborted or failed job can be restarted.
* The service automatically shards data and processes it in parallel:
* The number of machines scales automatically based on data volume (throughput can reach 500k–1M images/hour for certain workloads).
* Each machine runs multiple workers processing chunks of data. This is configurable and should be tuned to balance speed and cost.
* For image jobs, if too many images in a single shard fail, that shard is aborted while the rest of the job continues. You can configure this threshold per job (see [Per-Shard Image Failure Tolerance](#per-shard-image-failure-tolerance) below).
## Job Timed Out
### Issue
Batch jobs terminate prematurely if the **Processing Timeout Hours** is set too low relative to the job's size or complexity.
Processing Timeout setting in the UI
### Details
The timeout setting (UI) or `--max-runtime-seconds` (CLI) defines the **maximum cumulative machine runtime across all parallel workers**.
* **Total compute time:** If the limit is 2 hours and the job spawns 2 machines, each can run for a maximum of 1 hour (2 machines x 1 hour = 2 hours total).
* **Divided per chunk:** Jobs are split into processing chunks to enable parallelism. The timeout is divided across chunks - a short timeout with many chunks may leave too little time per chunk.
* **Machine type matters:** Running complex Workflows on CPU increases processing time significantly. Use GPU where appropriate.
### Recommendations
* Start with a generous timeout (e.g., 4–6 hours) for large datasets or multi-stage Workflows.
* Monitor actual job runtimes to inform future timeout settings.
* Consider reducing chunk count or using video frame sub-sampling for faster processing.
## Workflow with SAHI Runs Too Long
### Issue
Jobs using SAHI - particularly with high-resolution inputs and instance segmentation - may take much longer than expected.
### Causes and Recommendations
**Excessive number of slices:** SAHI splits images into smaller slices for detection. With default settings and high-resolution inputs, this can mean dozens or hundreds of inferences per image.
* Check the Image Slicer block configuration. Reduce slices or downscale inputs using a Resize Image block earlier in the Workflow.
**Consider larger model input size instead of SAHI:** Training a model with larger input dimensions can eliminate the need for SAHI entirely. Test on a small sample first.
**Instance segmentation bottleneck:** When SAHI is used with instance segmentation, the Detections Stitch block (especially with NMS) can become a major bottleneck - stitching a single frame can take tens of seconds.
**Video jobs with SAHI:** Use FPS sub-sampling to skip frames:
* In the UI, use the **Video FPS sub-sampling** dropdown.
* In the CLI, use the `--max-video-fps` flag.
FPS sub-sampling setting in the UI
## Out of Memory (OOM) Errors
### Issue
Jobs fail due to OOM errors when the Workflow consumes more RAM or VRAM than available.
### Common Causes
* **SAHI + Instance Segmentation:** This combination is extremely memory-intensive. SAHI multiplies inference calls, and instance segmentation generates large outputs (masks, scores), often leading to crashes.
* **Too many workers per machine:** Multiple workers optimize cost and speed for lightweight Workflows, but heavy Workflows (multiple large models, complex post-processing) will exceed available memory.
### Recommendations
* Use fewer workers per machine (e.g., 1 or 2) for Workflows with large models, SAHI, or high-resolution inputs.
* Lower the **Workers Per Machine** value under Advanced Options.
* Switch from CPU to GPU if your model needs higher memory throughput.
* Test your Workflow on a small dataset before running large batches.
* Reduce input resolution or simplify the Workflow by removing unneeded blocks.
Workers per machine setting in the UI
## Per-Shard Image Failure Tolerance
### How It Works
Image batch jobs are split into shards that run in parallel. Each shard tracks how many images failed during processing. If the failure rate within a single shard exceeds a threshold, that shard is aborted. The rest of the job continues unaffected.
By default, the platform applies a fixed failure threshold. You can override this per job by setting `maxImageFailureRate` in the job creation request body. The value is a float between `0.0` and `1.0`:
* `0.0` means zero tolerance (abort the shard on the first failure).
* `1.0` means the shard is never aborted, regardless of how many images fail.
* Omit the field or set it to `null` to use the platform default.
This parameter applies only to image jobs. Video jobs do not support it.
### Setting via the API
Include `maxImageFailureRate` in the job creation payload:
```json
{
"type": "simple-image-processing-v1",
"maxImageFailureRate": 0.1,
...
}
```
The value can also be overridden when restarting a failed or aborted job, by including it in the restart parameters override.
# Dedicated Deployments
Run Your Vision Models on Dedicated Servers with Roboflow
## About
Dedicated Deployments are private cloud servers, managed by Roboflow, that run your computer vision models and Workflows on resources allocated specifically to you. They let you serve inference without provisioning or maintaining your own infrastructure, with pay-per-hour billing and secure access through your workspace API key. Use them when you need consistent, dedicated performance for development, testing, or production traffic.
### **What are Dedicated Deployments?**
Dedicated Deployments are private cloud servers managed by Roboflow, specifically designed to run your computer vision models. These models can include:
* Object detection
* Image segmentation
* Classification
* Keypoint detection
* Foundation models like CLIP (if trained on Roboflow)
* Roboflow Workflows (low-code vision applications)
* ...and many others!
### **Benefits of Dedicated Deployments**
* **Focus on your machine vision business problem, leave the infrastructure to us:** Spin up inference serving infrastructure with a few clicks and without having to signup with cloud providers, installing and securing servers, managing TLS certificates or worrying about server management, patching, updates etc.
* **Dedicated Resources:** Get cloud servers allocated specifically for your use, ensuring consistent performance for your models.
* **Secure Access:** Dedicated Deployments are accessible with your workspace's unique API key and utilize HTTPS for secure communication.
* **Easy Integration:** Each deployment receives a subdomain within `roboflow.cloud`, simplifying integration with your applications.
* **Pay-Per-Hour:** You're only charged for the duration of the server's existence (billed in 1 minute intervals).
* **Auto Pause & Resume**: Your Dedicated Deployments will automatically pause after a configurable period of inactivity. For `dev-cpu` or `dev-gpu` deployment types, this period is fixed at 1 hour. They can be quickly resumed by sending a request with your API key. This feature is designed to help you save on costs.
### **Current Limitations**
* All dedicated deployments are currently hosted in US-based data centers; users from other Geographies may see higher latencies. Please contact us for a customized solution if you are outside of US, we can help you to reduce the network latency.
* Dedicated Deployments are available to Core and Enterprise plan workspaces. See [Roboflow plans](https://roboflow.com/pricing).
### Types of Dedicated Deployments
Roboflow offers 4 different types of Dedicated Deployments, i.e., dev-cpu, dev-gpu, prod-cpu, and prod-gpu. While dev-cpu and dev-gpu are designed for development and testing purposes, will be deleted automatically after a few hours, prod-cpu and prod-gpu are persistent, ideally for serving large-scale production traffic.
Type
Features
dev-cpu
Ephemeral: will be automatically deleted after 3 hours
CPU: model inference can be done on the CPU
Ideal for testing integrations and prototyping applications
dev-gpu
Ephemeral: will be automatically deleted after 3 hours
Ideal for testing integrations and prototyping applications
GPU: models need GPU acceleration (like Florence 2)
Ideal for testing integrations and prototyping applications
GPU: models need GPU acceleration (like Florence 2)
Ideal for serving production traffic
### **Bill Information**
The rate for GPU deployments (dev-gpu, prod-gpu) is **1 credit/hour**, while the rate for CPU deployments (dev-cpu, prod-cpu) is **0.25 credit/hour**.
If you prefer to be billed based on number of requests sent to your dedicated deployment server, please [click here to contact our sales](https://roboflow.com/sales).
All dedicated deployment servers will run [Roboflow Inference](/deployment/self-hosted/self-hosted), our open-source inference server. Review the [Roboflow Inference documentation](/deployment/self-hosted/self-hosted) to learn more about all of the features available.
### Useful Links
* [How to create a dedicated deployment (Roboflow App)](/deployment/roboflow-cloud/dedicated-deployments/create-a-dedicated-deployment)
* [How to create a dedicated deployment (Roboflow CLI)](/deployment/roboflow-cloud/dedicated-deployments/create-a-dedicated-deployment#create-a-dedicated-deployment-with-the-cli)
* [How to use a dedicated deployment](/deployment/roboflow-cloud/dedicated-deployments/make-requests-to-a-dedicated-deployment)
* [HTTP APIs](#http-api)
## HTTP API
[Dedicated Deployments](/deployment/roboflow-cloud/dedicated-deployments) are managed GPU machines that run your Roboflow models with predictable latency and high throughput. They are managed by a dedicated service hosted at `https://roboflow.cloud`, separate from the main `https://api.roboflow.com` REST API.
This section documents the management endpoints (create, get, list, pause, resume, delete, logs, usage). For inference against a deployment once it's live, see [Run a Model on an Image](/deployment/roboflow-cloud/serverless-api#http-api).
{% hint style="info" %}
The "edge devices" documentation under [Deployment Manager](/deployment/self-hosted/enterprise/deployment-manager#http-api) is a separate product. Dedicated Deployments are managed GPU machines in Roboflow's cloud; Deployment Manager devices are on-prem hardware running [Roboflow Inference](/deployment/self-hosted/self-hosted).
{% endhint %}
**Base URL:** `https://roboflow.cloud`
`api_key` is passed as a query parameter (or in the request body for `POST` endpoints) on every request. Check the response code: if it's `200`, decode the response body as a JSON object; otherwise, the response body contains an error message as a string.
### List Machine Types
`GET` `/machine_types`
```bash
curl "https://roboflow.cloud/machine_types?api_key=$ROBOFLOW_API_KEY"
```
**Response**
```json
{
"machine_types": [
{ "name": "gpu-small", "description": "1× T4, 4 vCPU, 16 GB RAM" },
{ "name": "gpu-medium", "description": "1× L4, 8 vCPU, 32 GB RAM" }
]
}
```
### Create a Deployment
`POST` `/add`
**Body** (JSON)
Name
Type
Description
Required
api_key
string
Workspace API key.
true
creator_email
string
Email of a workspace member.
true
deployment_name
string
Unique name within the workspace.
true
machine_type
string
From /machine_types.
true
duration
float
Hours before auto-cleanup. Default 3.
false
delete_on_expiration
boolean
true to delete on expiration; false to pause.
false
inference_version
string
Inference server version. Default latest.
false
min_replicas
integer
Minimum replicas. Default 1.
false
max_replicas
integer
Maximum replicas. Default 1.
false
```bash
curl -X POST "https://roboflow.cloud/add" \
-H "Content-Type: application/json" \
-d '{
"api_key": "'$ROBOFLOW_API_KEY'",
"creator_email": "me@company.com",
"deployment_name": "my-deployment",
"machine_type": "gpu-small",
"duration": 8,
"delete_on_expiration": true
}'
```
The deployment provisions asynchronously. Poll `GET /get` until `status == "ready"`.
**Response Example**
```json
{
"deployment_id": "IwzJ5YLQ0iDhwzqoh3Ae",
"deployment_name": "dev-testing",
"machine_type": "dev-gpu",
"creator_email": YOUR_EMAIL_ADDRESS,
"creator_id": YOUR_USER_ID,
"subdomain": "dev-testing",
"domain": "dev-testing.roboflow.cloud",
"duration": 3.0,
"inference_version": "0.45.0",
"max_replicas": 1,
"min_replicas": 1,
"num_replicas": 0,
"status": "pending",
"workspace_id": YOUR_WORKSPACE_ID,
"workspace_url": YOUR_WORKSPACE_URL
}
```
**Response Schema**
| Field | Type | Description |
| ------------------- | ------- | --------------------------------------------------------------------------------------- |
| `deployment_id` | string | Unique identifier for the deployment. |
| `deployment_name` | string | Name you gave the deployment. |
| `machine_type` | string | One of `dev-cpu`, `dev-gpu`, `prod-cpu`, `prod-gpu`. |
| `creator_email` | string | Email of the user who created the deployment. |
| `creator_id` | string | User ID corresponding to `creator_email`. |
| `subdomain` | string | Not always the same as `deployment_name` - a suffix is added if the subdomain is taken. |
| `domain` | string | Full domain of the deployment endpoint. |
| `duration` | float | Hours the deployment has been running. |
| `inference_version` | string | Inference server version running on the deployment. |
| `min_replicas` | integer | Minimum replica count. |
| `max_replicas` | integer | Maximum replica count. |
| `num_replicas` | integer | Currently available replicas. |
| `status` | string | Current deployment status. |
| `workspace_id` | string | ID of the owning workspace. |
| `workspace_url` | string | URL slug of the owning workspace. |
### Get a Deployment
`GET` `/get?api_key=...&deployment_name=...`
**Query Parameters**
| Name | Type | Required | Description |
| ----------------- | ------ | -------- | -------------------------------- |
| `api_key` | string | Yes | Workspace API key. |
| `deployment_name` | string | Yes | Name of the deployment to fetch. |
```bash
curl "https://roboflow.cloud/get?api_key=$ROBOFLOW_API_KEY&deployment_name=my-deployment"
```
**Response** (same schema as the [Create a Deployment](#create-a-deployment) response)
```json
{
"deployment_name": "my-deployment",
"status": "ready",
"machine_type": "gpu-small",
"public_url": "https://my-deployment.roboflow.cloud",
"created_at": "2026-05-01T17:05:33.000Z",
"expires_at": "2026-05-02T01:05:33.000Z"
}
```
### List Deployments
`GET` `/list?api_key=...`
**Query Parameters**
| Name | Type | Required | Description |
| -------------- | ------ | -------- | --------------------------------------------- |
| `api_key` | string | Yes | Workspace API key. |
| `show_expired` | string | No | Include expired deployments. Default `false`. |
| `show_deleted` | string | No | Include deleted deployments. Default `false`. |
```bash
curl "https://roboflow.cloud/list?api_key=$ROBOFLOW_API_KEY"
```
**Response**
A list of dedicated deployment entries, where each entry has the same schema as the [Create a Deployment](#create-a-deployment) response.
```json
[
{
"deployment_id": "IwzJ5YLQ0iDhwzqoh3Ae",
"deployment_name": "dev-testing",
"machine_type": "dev-gpu",
"creator_email": YOUR_EMAIL_ADDRESS,
"creator_id": YOUR_USER_ID,
"subdomain": "dev-testing",
"domain": "dev-testing.roboflow.cloud",
"duration": 3.0,
"inference_version": "0.45.0",
"max_replicas": 1,
"min_replicas": 1,
"num_replicas": 0,
"status": "pending",
"workspace_id": YOUR_WORKSPACE_ID,
"workspace_url": YOUR_WORKSPACE_URL
}
]
```
### Logs
`GET` `/get_log?api_key=...&deployment_name=...&from_timestamp=...&to_timestamp=...&max_entries=...`
**Query Parameters**
| Name | Type | Required | Description |
| ----------------- | ------- | -------- | ---------------------------------------------------------------------------------- |
| `api_key` | string | Yes | Workspace API key. |
| `deployment_name` | string | Yes | Deployment to read logs from. |
| `max_entries` | integer | No | Number of log entries to return. Default `50`. |
| `from_timestamp` | string | No | [ISO 8601](https://en.wikipedia.org/wiki/ISO_8601) start time. Default 1 hour ago. |
| `to_timestamp` | string | No | [ISO 8601](https://en.wikipedia.org/wiki/ISO_8601) end time. Default now. |
```bash
curl "https://roboflow.cloud/get_log?api_key=$ROBOFLOW_API_KEY&deployment_name=my-deployment&max_entries=200"
```
`from_timestamp` and `to_timestamp` are ISO-8601 strings. Omit them to fetch the most recent logs up to `max_entries`.
**Response Example**
```json
[
{
"insert_id": "gpwrgrw55p7b9jdq",
"payload": "INFO: 10.18.0.38:46296 - \"GET /info HTTP/1.1\" 200 OK",
"severity": "INFO",
"timestamp": "2025-01-22T13:23:14.209436+00:00"
},
{
"insert_id": "mbieh16zdjvqp81j",
"payload": "INFO: 10.18.0.38:46294 - \"GET /info HTTP/1.1\" 200 OK",
"severity": "INFO",
"timestamp": "2025-01-22T13:23:14.208738+00:00"
}
]
```
**Response Schema**
A list of log entries, where each entry has the following attributes:
| Field | Type | Description |
| ----------- | ------ | ------------------------------------ |
| `insert_id` | string | Unique identifier for the log entry. |
| `payload` | string | Log content. |
| `severity` | string | Log level. |
| `timestamp` | string | When the entry was written. |
### Usage
Workspace-wide:
`GET` `/usage_workspace?api_key=...&from_timestamp=...&to_timestamp=...`
Per-deployment:
`GET` `/usage_deployment?api_key=...&deployment_name=...&from_timestamp=...&to_timestamp=...`
```bash
curl "https://roboflow.cloud/usage_workspace?api_key=$ROBOFLOW_API_KEY&from_timestamp=2026-04-01T00:00:00Z&to_timestamp=2026-05-01T00:00:00Z"
```
### Pause / Resume / Delete
`POST` `/pause` `POST` `/resume` `POST` `/delete`
**Body** (JSON)
| Name | Type | Required | Description |
| ----------------- | ------ | -------- | --------------------- |
| `api_key` | string | Yes | Workspace API key. |
| `deployment_name` | string | Yes | Deployment to act on. |
```bash
curl -X POST "https://roboflow.cloud/pause" \
-H "Content-Type: application/json" \
-d '{"api_key": "'$ROBOFLOW_API_KEY'", "deployment_name": "my-deployment"}'
```
The same body shape applies to `/resume` and `/delete`.
**Response Example**
```json
{
"message": "OK"
}
```
## Python SDK
[Dedicated Deployments](/deployment/roboflow-cloud/dedicated-deployments) are managed GPU machines that run your Roboflow models with predictable latency and high throughput. The SDK manages them through the `roboflow.adapters.deploymentapi` adapter - the high-level `Workspace` class doesn't currently expose deployment methods.
Each function returns a `(status_code, body)` tuple so you can branch on the HTTP result:
```python
from roboflow.adapters import deploymentapi
status, body = deploymentapi.list_deployment("YOUR_API_KEY")
if status == 200:
for d in body.get("deployments", []):
print(d["deployment_name"], d["status"])
else:
print("Failed:", body)
```
### List available machine types
```python
from roboflow.adapters import deploymentapi
status, body = deploymentapi.list_machine_types("YOUR_API_KEY")
for m in body.get("machine_types", []):
print(m["name"], m.get("description"))
```
### Create a deployment
```python
status, body = deploymentapi.add_deployment(
api_key="YOUR_API_KEY",
creator_email="me@company.com", # must be a workspace member
machine_type="gpu-small",
duration=8, # hours
delete_on_expiration=True,
deployment_name="my-deployment",
inference_version=None, # None → latest
)
```
The deployment provisions asynchronously. Poll `get_deployment` until `status == "ready"`.
### Get deployment details
```python
status, body = deploymentapi.get_deployment("YOUR_API_KEY", "my-deployment")
print(body["status"], body.get("public_url"))
```
### Pause / resume / delete
```python
deploymentapi.pause_deployment("YOUR_API_KEY", "my-deployment")
deploymentapi.resume_deployment("YOUR_API_KEY", "my-deployment")
deploymentapi.delete_deployment("YOUR_API_KEY", "my-deployment")
```
### Logs
```python
import datetime as dt
status, body = deploymentapi.get_deployment_log(
api_key="YOUR_API_KEY",
deployment_name="my-deployment",
from_timestamp=dt.datetime.utcnow() - dt.timedelta(hours=1),
to_timestamp=dt.datetime.utcnow(),
max_entries=200,
)
for entry in body.get("logs", []):
print(entry["timestamp"], entry["message"])
```
### Usage
```python
status, ws_usage = deploymentapi.get_workspace_usage(
api_key="YOUR_API_KEY",
from_timestamp=dt.datetime(2026, 4, 1),
to_timestamp=dt.datetime(2026, 5, 1),
)
status, dep_usage = deploymentapi.get_deployment_usage(
api_key="YOUR_API_KEY",
deployment_name="my-deployment",
from_timestamp=dt.datetime(2026, 4, 1),
to_timestamp=dt.datetime(2026, 5, 1),
)
```
### Running inference against a dedicated deployment
Once a deployment is ready, point inference SDK calls at its `public_url` (returned by `get_deployment`):
```python
from inference_sdk import InferenceHTTPClient, InferenceConfiguration
client = InferenceHTTPClient(
api_url=body["public_url"], api_key="YOUR_API_KEY"
).configure(InferenceConfiguration(api_key_transport="header"))
result = client.infer("photo.jpg", model_id="my-detector/3")
```
## CLI
You can create, monitor, and manage [Dedicated Deployments](/deployment/roboflow-cloud/dedicated-deployments) from the command line.
### List Deployments
```bash
roboflow deployment list
```
### List Machine Types
```bash
roboflow deployment machine-type
```
### Create a Deployment
```bash
roboflow deployment create -m -e
```
#### Options
| Flag | Description |
| --------------------------- | --------------------------------------------------------------------- |
| `-m`, `--machine-type` | Machine type (required). Run `deployment machine-type` to see options |
| `-e`, `--email` | Your email, must be a workspace member (required) |
| `--duration` | Duration in hours (default: 3) |
| `--inference-version` | Inference server version (default: latest) |
| `--no-delete-on-expiration` | Keep deployment when it expires |
| `--wait` | Wait until deployment is ready |
Example:
```bash
roboflow deployment create my-deployment -m gpu-small -e me@company.com --duration 8
```
### Get Deployment Details
```bash
roboflow deployment get
```
Wait for a pending deployment to be ready:
```bash
roboflow deployment get my-deployment --wait
```
### View Logs
```bash
roboflow deployment log
```
Follow logs in real-time:
```bash
roboflow deployment log my-deployment -f
```
#### Options
| Flag | Description |
| ------------------ | -------------------------------------------- |
| `-d`, `--duration` | Log window in seconds (default: 3600) |
| `-n`, `--tail` | Lines to show from end (max 50, default: 10) |
| `-f`, `--follow` | Follow log output |
### Usage Statistics
Get workspace-wide usage:
```bash
roboflow deployment usage
```
Get usage for a specific deployment:
```bash
roboflow deployment usage my-deployment
```
#### Options
| Flag | Description |
| -------- | --------------------- |
| `--from` | Start time (ISO 8601) |
| `--to` | End time (ISO 8601) |
### Pause, Resume, and Delete
```bash
roboflow deployment pause my-deployment
roboflow deployment resume my-deployment
roboflow deployment delete my-deployment
```
### JSON Output
All deployment commands support `--json`:
```bash
roboflow deployment list --json
roboflow deployment get my-deployment --json
```
# Create a Dedicated Deployment
You can create a Dedicated Deployment in the Roboflow web interface, or in the CLI.
{% hint style="warning" %}
Dedicated Deployments are not available on Public (free) tier.
{% endhint %}
### Create a Deployment in the Web Interface
Open your workspace dashboard page, click **Deployments** on the left panel:
Click the **New Deployment** button, it brings up the **Create a Dedicated Deployment** dialog as shown below:
Configure properties for your dedicated deployment.
Each of the properties in the dialog are described in the table below. Fill the dialog and click on the **Create Dedicated Deployment** button. It may take anywhere from a few seconds to a few minutes to provision your deployment.
Property
Description
Name
Choose a unique name (5-15 characters) to identify your Dedicated Deployment. This name will also become the subdomain for your deployment endpoint (e.g., dev-testing.roboflow.cloud).
Easy to Remember: Pick a name that clearly reflects your deployment's purpose (e.g., "prod-inference", "dev-testing").
Unique within Workspace: If your chosen name is already taken, a short random code will be added to create a unique subdomain.
Tips:
Use lowercase letters, numbers, and hyphens (-) for your name.
Avoid special characters or spaces.
Machine Type
Whether a CPU-only or a GPU dedicated deployment is needed.
Deployment Type
Development: ideal for development or experimental purpose, automatically expires in 3 hours.
Production: ideal for serving production requests, permanent until manually deleted.
Autoscaling
This feature is only for prod-cpu and prod-gpu.
### Create a Dedicated Deployment with the CLI
The `roboflow deployment` command provides a set of subcommands to manage your Roboflow Dedicated Deployments. Before you proceed, please ensure you have the `roboflow` CLI installed and configured with your API key, as documented [here.](https://docs.roboflow.com/reference/platform/cli)
#### Subcommands
| Subcommand | Description | Example |
| ------------------ | --------------------------------------------------------------------------- | ---------------------------------------------------------------------- |
| `machine_type` | List available machine types (`dev-cpu`, `dev-gpu`, `prod-cpu`, `prod-gpu`) | `roboflow deployment machine_type` |
| `add` | Create a new deployment | `roboflow deployment add my-deployment -m prod-gpu -e you@example.com` |
| `get` | Get details about one deployment | `roboflow deployment get my-deployment` |
| `list` | List all deployments in your workspace | `roboflow deployment list` |
| `usage_workspace` | Usage statistics for every deployment in the workspace | `roboflow deployment usage_workspace` |
| `usage_deployment` | Usage statistics for one deployment | `roboflow deployment usage_deployment my-deployment` |
| `delete` | Delete a deployment | `roboflow deployment delete my-deployment` |
| `log` | View logs for a deployment | `roboflow deployment log my-deployment -t 60 -n 20` |
Add `--help` to any subcommand for its full set of options.
# Delete a Dedicated Deployment
Delete a Dedicated Deployment from the Deployments page or the Workflows editor.
You can delete a Dedicated Deployment from:
1. The Deployments page in your Roboflow dashboard, and;
2. The Dedicated Deployments tab of the "Choose an Inference Server" setting in the Workflow editor.
### Delete a Dedicated Deployment from the Deployments List
First, click "Deployments" from the left sidebar of your Roboflow dashboard, then click the "Dedicated Deployments" tab.
Then, click the trash icon next to the Dedicated Deployment you want to delete.
You will then be asked to confirm that you want to delete the Dedicated Deployment:
Click "Delete Dedicated Deployment" to delete your deployment. This is permanent and irrevocable.
### Delete a Dedicated Deployment from the Workflows Editor
You can also delete a Dedicated Deployment from the "Choose an Inference Server" page in the Workflows editor. To delete the Deployment, first open a Workflow, then click the "Running on" option:
A window will appear with several deployment options. Click "Dedicated Deployments", then click the trash icon next to the deployment you want to delete:
You will then be asked to confirm that you want to delete the deployment:
Click "Delete Dedicated Deployment" to delete your deployment. This is permanent and irrevocable.
# Make Requests to a Dedicated Deployment
You can make requests to a Dedicated Deployment directly with the Python SDK, using a HTTP API, or using the Workflows web interface.
### Use Python SDK
Please install the latest version of our Python SDK [inference\_sdk](https://pypi.org/project/inference-sdk/) with `pip install --upgrade inference-sdk`.
When your dedicated deployment is ready, copy its URL:
Copy URL of your dedicated deployment when it's ready
and paste it to the parameter `api_url` when initialise `InferenceHTTPClient` , and that's it!
Here is an example for running model inference, you can find more details in [the documentation of inference\_sdk](https://docs.roboflow.com/reference/inference/inference-sdk).
```
from inference_sdk import InferenceHTTPClient, InferenceConfiguration
CLIENT = InferenceHTTPClient(
api_url="https://dev-testing.roboflow.cloud",
api_key="ROBOFLOW_API_KEY"
).configure(InferenceConfiguration(api_key_transport="header"))
image_url = "https://source.roboflow.com/pwYAXv9BTpqLyFfgQoPZ/u48G0UpWfk8giSw7wrU8/original.jpg"
result = CLIENT.infer(image_url, model_id="soccer-players-5fuqs/1")
```
The `api_key_transport="header"` setting sends the key only as an `Authorization: Bearer` header, keeping it out of URLs and logs: recommended for all new code. See [API key transport](https://docs.roboflow.com/reference/inference/inference-sdk/configuration#api-key-transport).
### Use HTTP API
You can also access [the HTTP APIs](https://docs.roboflow.com/reference/platform/rest-api/inference-server-openapi) which are listed under `/docs`, e.g,, `https://dev-testing.roboflow.cloud/docs` .
Send your workspace API key in the `Authorization: Bearer` header when you access these endpoints. Passing `api_key` as a query parameter is the legacy channel: it still works, but is not recommended.
Here is an example for making the same request as above using HTTP API:
```
import requests
import json
api_url = "https://dev-testing.roboflow.cloud"
model_id = "soccer-players-5fuqs/1"
image_url = "https://source.roboflow.com/pwYAXv9BTpqLyFfgQoPZ/u48G0UpWfk8giSw7wrU8/original.jpg"
resp = requests.get(f"{api_url}/{model_id}", headers = {"Authorization": "Bearer ROBOFLOW_API_KEY"}, params = {"image": image_url})
result = json.loads(resp.content)
```
{% hint style="info" %}
Sending the key as an `?api_key=` query parameter or `api_key` body field is the legacy channel. It still works, but the `Authorization: Bearer` header keeps your key out of URLs and logs. See [Authenticate with the REST API](https://docs.roboflow.com/reference/platform/rest-api/authenticate-with-the-rest-api).
{% endhint %}
### Use Workflow UI
A dedicated deployment can also be used as the backend server for running [Roboflow Workflows](https://roboflow.com/workflows/build). Roboflow Workflows is a low-code, web-based application builder for creating computer vision applications.
After creating your workflow, click on the "Running on Cloud API" link in the top left corner:
Changing the backend where the workflow will execute.
Click **Dedicated Deployments** to see the list of your dedicated deployments, select the target deployment, then click **Connect**:
Select a target dedicated deployment as the backend server for workflow execution.
Now you are ready to use your dedicated deployment in the workflow editor.
### Copy a Workflow Code Snippet
You can also get code without opening the editor. In your list of dedicated deployments, click the "View Code Snippet" button on a running deployment, then pick a Workflow. The snippets that appear already point at that deployment's URL.
# Pause and Resume a Dedicated Deployment
Pause a Dedicated Deployment to stop billing when idle, then resume it when you need it again.
You can pause a Dedicated Deployment if you are not currently using the Deployment but want to keep the Deployment for later.
You will not be able to make requests to a paused Dedicated Deployment until you start the Dedicated Deployment again.
You will not be billed while a Dedicated Deployment is paused.
You can pause a Dedicated Deployment from:
1. The Deployments page in your Roboflow dashboard, and;
2. The Dedicated Deployments tab of the "Choose an Inference Server" setting in the Workflow editor.
You can resume a Dedicated Deployment at any time.
### Pause or Resume a Dedicated Deployment from the Deployments List
First, click "Deployments" from the left sidebar of your Roboflow dashboard, then click the "Dedicated Deployments" tab.
To pause a Dedicated Deployment, click the pause icon.
To resume a Dedicated Deployment, click the play icon.
### Pause or Resume a Dedicated Deployment from the Workflows Editor
You can also pause or resume a Dedicated Deployment from the "Choose an Inference Server" page in the Workflows editor. To delete the Deployment, first open a Workflow, then click the "Running on" option:
A window will appear with several deployment options. Click "Dedicated Deployments""
To pause a Dedicated Deployment, click the pause icon next to the deployment you want to pause.
To resume a Dedicated Deployment, click the play icon next to the deployment you want to resume.
# Self-Hosted Deployment
Run Roboflow models and Workflows on your own hardware with Inference, the open source computer vision deployment framework.
[Inference](https://github.com/roboflow/inference) is an open source computer vision deployment hub. It serves models and Workflows, manages video streams, and optimizes inference for CPUs and GPUs. Self-host it when you need local processing, control over latency and resources, or offline deployment. The Apache 2.0 licensed core also powers Roboflow's hosted APIs.
{% hint style="info" %}
Self-hosting means you manage the infrastructure. If you would rather Roboflow run the servers, see [Dedicated Deployments](/deployment/roboflow-cloud/dedicated-deployments) or the [Serverless Cloud API](/deployment/roboflow-cloud/serverless-api), and the full [comparison of options](/deployment/choosing-a-deployment).
{% endhint %}
## Pick a path
There are three ways to run models on your own hardware. Most projects use the Inference Server.
Cover image
Inference Server
A Docker container that serves models and Workflows over HTTP.
Use the server when more than one client or language needs predictions, when you want models isolated from your application dependencies, or when you deploy to edge devices.
Where Inference sits between your application, your models, and the Roboflow platform
## Run model locally
For most projects, run Inference Server in Docker and send requests with `inference-sdk`. The SDK is a Python HTTP client that connects your application to an Inference Server. Use Inference Library when you need to load and run models directly inside your Python process. Both paths accept the same `model_id` values, so you can switch between them later.
### Model IDs
The `model_id` parameter can be:
* A [pre-trained model alias](/models/pretrained-aliases), for example `rfdetr-small` or `rfdetr-large`
* Your own [fine-tuned model from Roboflow](https://app.gitbook.com/s/wdr4k0gUcsVnXVoafYcQ/train/model-ids), for example `my-project/1`
* A [Universe model](https://docs.roboflow.com/datasets/universe/universe/find-a-model-on-universe), for example `soccer-players-xy9vk/2`
Fine-tuned models and Universe models require an [API key](https://docs.roboflow.com/reference/authentication/authentication/find-your-roboflow-api-key).
{% tabs %}
{% tab title="Inference Server" icon="docker" %}
### Install
Start the server with the [Inference CLI](https://docs.roboflow.com/reference/inference/inference-cli). It detects your hardware and pulls the right Docker image with secure defaults:
```bash
pip install inference-cli && inference server start
```
Then install the HTTP client:
```bash
pip install inference-sdk
```
For hardware requirements, per-device guides, and manual `docker run` commands, see [Install Inference Server](/deployment/self-hosted/inference-server/install). The same client also works against the [Serverless Cloud API](/deployment/roboflow-cloud/serverless-api) and [Dedicated Deployments](/deployment/roboflow-cloud/dedicated-deployments): only `api_url` changes.
### Run inference
```python
from inference_sdk import InferenceHTTPClient, InferenceConfiguration
image = "https://media.roboflow.com/inference/people-walking.jpg"
client = InferenceHTTPClient(
api_url="http://localhost:9001", # your self-hosted server
api_key="YOUR_API_KEY",
).configure(InferenceConfiguration(api_key_transport="header"))
results = client.infer(image, model_id="rfdetr-small")
```
The `api_key_transport="header"` setting sends the key only as an `Authorization: Bearer` header, keeping it out of URLs and logs. It requires an inference server on release 1.5.0 or newer; use `api_key_transport="both"` while you still call older servers. See [API key transport](https://docs.roboflow.com/reference/inference/inference-sdk/configuration#api-key-transport).
Swap `api_url` for `https://serverless.roboflow.com` to use the [Serverless Cloud API](/deployment/roboflow-cloud/serverless-api) instead, with no other code changes. See the [Inference SDK reference](https://docs.roboflow.com/reference/inference/inference-sdk) for details.
### Visualize results
Install [Supervision](https://supervision.roboflow.com):
```bash
pip install -U supervision
```
```python
import supervision as sv
from inference_sdk import InferenceHTTPClient, InferenceConfiguration
image = sv.load_image_from_url("https://media.roboflow.com/inference/people-walking.jpg")
client = InferenceHTTPClient(
api_url="http://localhost:9001",
api_key="YOUR_API_KEY",
).configure(InferenceConfiguration(api_key_transport="header"))
results = client.infer(image, model_id="rfdetr-medium")
detections = sv.Detections.from_inference(results)
annotated_image = sv.BoxAnnotator().annotate(scene=image, detections=detections)
annotated_image = sv.LabelAnnotator().annotate(scene=annotated_image, detections=detections)
sv.plot_image(annotated_image)
```
{% endtab %}
{% tab title="Inference Library" icon="python" %}
### Install
Install the `inference` package into your own Python environment:
```bash
pip install inference
```
If you have an NVIDIA GPU, install `inference-gpu` instead, matching the index URL to the CUDA version installed in your OS:
```bash
pip install --extra-index-url https://download.pytorch.org/whl/cu124 inference-gpu
```
See [Inference Library](/deployment/self-hosted/inference-library) for backend extras and GPU setup details.
### Run inference
```python
from inference import get_model
image = "https://media.roboflow.com/inference/people-walking.jpg"
model = get_model(model_id="rfdetr-small")
results = model.infer(image)
```
`get_model()` downloads and caches the model weights on first use, then runs inference locally. See the [Inference Python Package reference](https://docs.roboflow.com/reference/inference/inference-python) for details.
### Visualize results
Install [Supervision](https://supervision.roboflow.com):
```bash
pip install -U supervision
```
```python
import supervision as sv
from inference import get_model
image = sv.load_image_from_url("https://media.roboflow.com/inference/people-walking.jpg")
model = get_model(model_id="rfdetr-medium")
results = model.infer(image)[0]
detections = sv.Detections.from_inference(results)
annotated_image = sv.BoxAnnotator().annotate(scene=image, detections=detections)
annotated_image = sv.LabelAnnotator().annotate(scene=annotated_image, detections=detections)
sv.plot_image(annotated_image)
```
{% endtab %}
{% endtabs %}
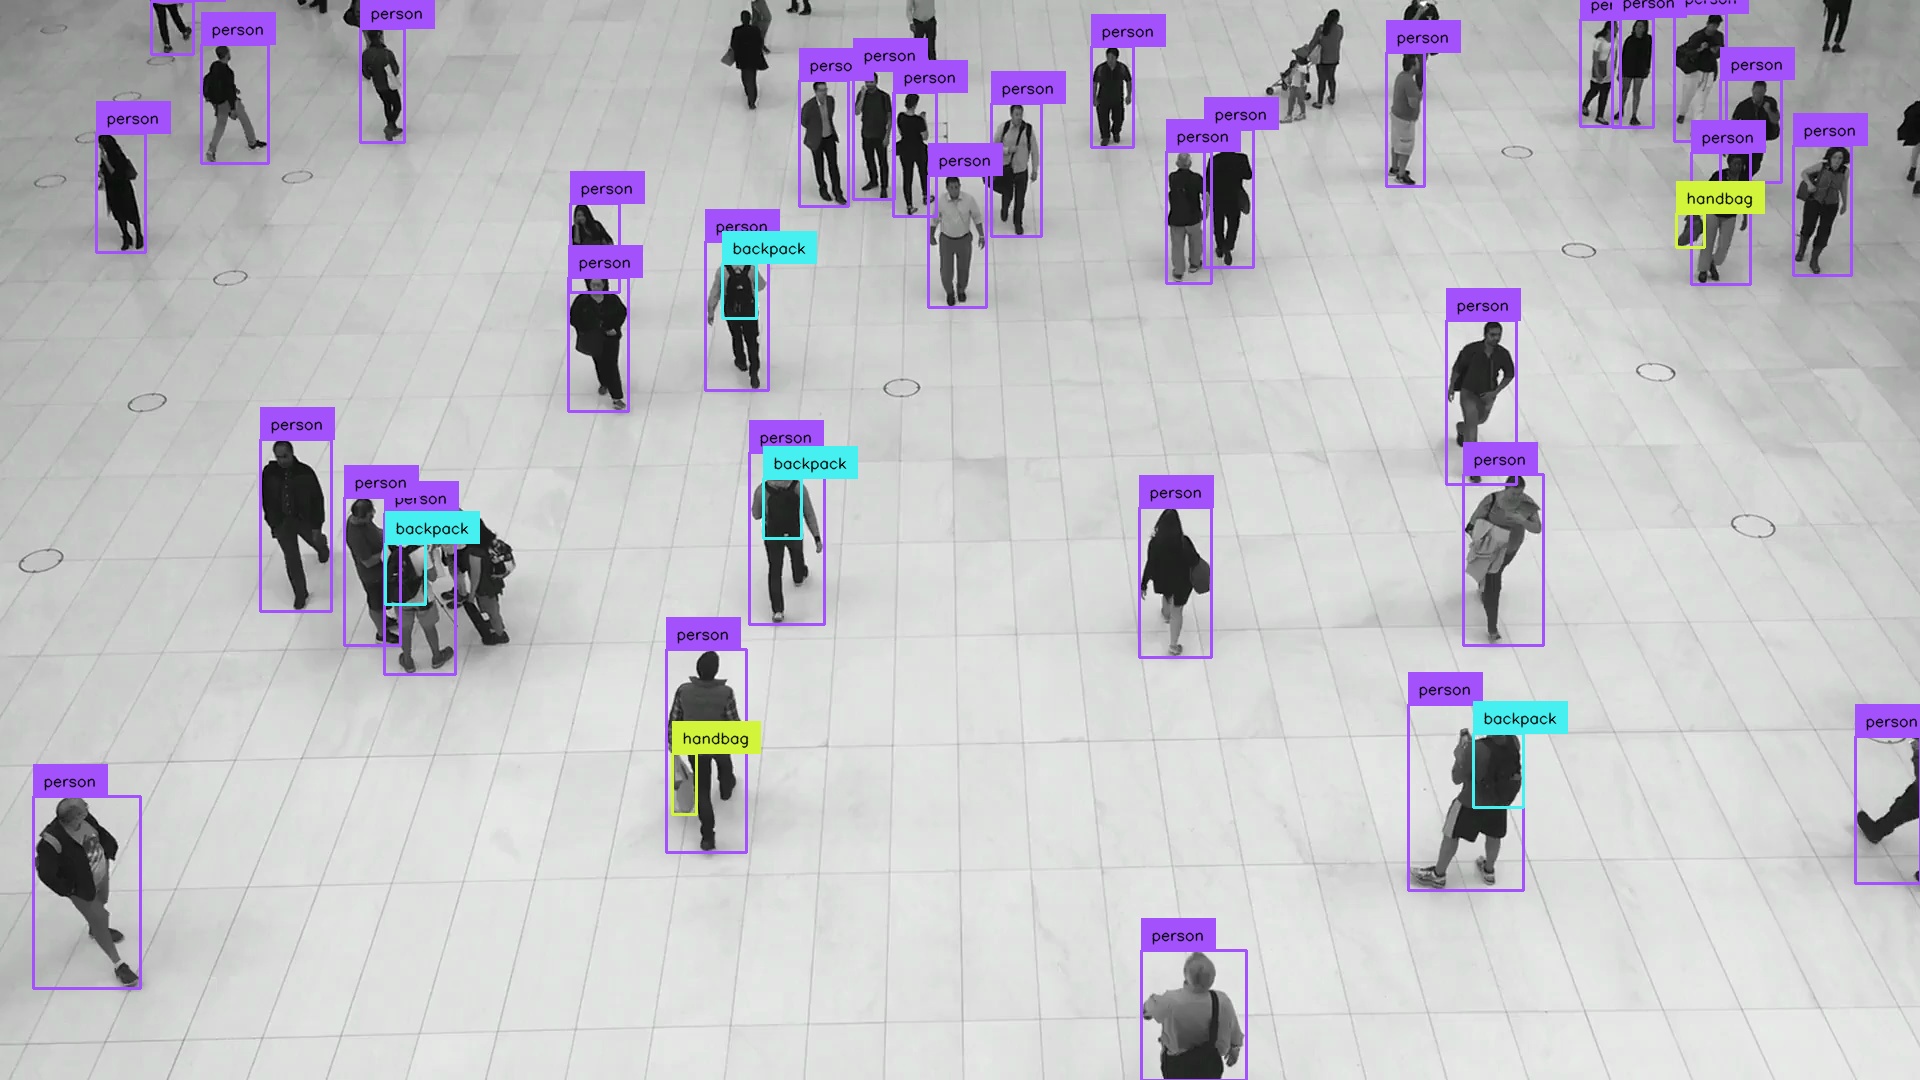
{% hint style="warning" %}
Be careful not to expose your API key to external users. Do not embed it in a public-facing frontend app; proxy the request through your own backend instead.
{% endhint %}
You can run a [Workflow](https://docs.roboflow.com/workflows) the same way, on the server or in your own process: see [Deploy a Workflow](https://docs.roboflow.com/workflows/deploy/deploy-a-workflow).
{% hint style="info" %}
TensorRT-optimized model packages for private models are only available on [Enterprise plans](/deployment/self-hosted/enterprise) when running Inference outside the Roboflow platform. Public models include TensorRT packages on all plans.
{% endhint %}
# Inference Server
What the Inference Server is, how to start it with Docker and the Inference CLI, and how to open its built-in JupyterLab notebook.
The Inference Server is a standalone microservice that wraps the [`inference` Python package](/deployment/self-hosted/inference-library). It exposes HTTP endpoints for images and a WebRTC endpoint for video streams. One server can serve multiple clients and run the same models and [Workflows](https://docs.roboflow.com/workflows) as Roboflow's hosted APIs. It is the recommended way to self-host: see [Pick a path](/deployment/self-hosted/self-hosted#pick-a-path) for how it compares to running the library directly.
## Where it runs
Self-host the server on your own hardware (Raspberry Pi, NVIDIA GPU, NVIDIA Jetson, or a plain server) with [Docker](/deployment/self-hosted/inference-server/install), or in [your own AWS, GCP, or Azure account](/deployment/self-hosted/inference-server/install/cloud). Roboflow also runs the same server for you as the [Serverless Cloud API](/deployment/roboflow-cloud/serverless-api) and [Dedicated Deployments](/deployment/roboflow-cloud/dedicated-deployments): see [Choosing a Deployment Option](/deployment/choosing-a-deployment).
Whichever you pick, you talk to it through the [Inference SDK](https://docs.roboflow.com/reference/inference/inference-sdk), because they share one interface: only the `api_url` changes.
## Running with Docker
Before you begin, make sure [Docker is installed](https://www.docker.com/get-started) on your machine. The easiest way to start the Inference Server is with the [Inference CLI](https://docs.roboflow.com/reference/inference/inference-cli):
```bash
pip install inference-cli && inference server start
```
This pulls the appropriate Docker image for your machine, with dependencies pre-installed, and starts the Inference Server on port 9001. Check the server status with:
```bash
inference server status
```
## Manually setting up a Docker container
`inference server start` runs `docker run` under the hood with recommended security settings, caching, and platform-specific options.
If you want to start the container yourself, see the "Manually starting the container" section of your platform's install guide:
* [Linux](/deployment/self-hosted/inference-server/install/linux#manually-starting-the-container)
* [Windows](/deployment/self-hosted/inference-server/install/windows#manually-starting-the-container)
* [Mac](/deployment/self-hosted/inference-server/install/mac#using-docker)
* [Jetson](/deployment/self-hosted/inference-server/install/jetson#manually-starting-the-container)
* [Raspberry Pi](/deployment/self-hosted/inference-server/install/raspberry-pi#manually-starting-the-container)
Container settings are controlled with environment variables: see [Docker configuration options](/deployment/self-hosted/inference-server/configuration/docker-configuration) and the full [environment variable reference](/deployment/self-hosted/inference-server/configuration/environment-variables).
## Built-in JupyterLab notebook
Inference Servers ship with a built-in JupyterLab environment, which is the fastest way to experiment during development and testing. It is disabled by default, so start the server with the `--dev` flag to enable it:
```bash
pip install inference-cli
inference server start --dev
```
Then open `http://localhost:9001` in your browser to see the Inference landing page, which links to resources, examples, and the built-in JupyterLab environment. Select "Jump Into an Inference Enabled Notebook" to open JupyterLab in a new tab. It comes preloaded with example notebooks and all the dependencies needed to run Inference.
{% hint style="warning" %}
The `--dev` notebook environment is meant for local development. Do not enable it on a server that is reachable from an untrusted network: see [Securing a Self-Hosted Server](/deployment/self-hosted/inference-server/configuration/security).
{% endhint %}
## Stream video
Use the Inference SDK WebRTC client to stream webcams, camera feeds, and video files through a model or Workflow:
```bash
pip install "inference-sdk[webrtc]"
```
Set `api_url="http://localhost:9001"` when you create `InferenceHTTPClient`. See [WebRTC Streaming](https://docs.roboflow.com/reference/inference/inference-sdk/webrtc) for model and Workflow examples, or follow [Video processing with Workflows](https://docs.roboflow.com/workflows/deploy/video-processing) for a task-based guide.
## In this section
Install Inference Server
Requirements, per-device install guides, your own cloud, and updating.
# Install Inference Server
Install the Roboflow Inference Server with Docker or a native desktop app on Linux, Windows, macOS, NVIDIA Jetson, Raspberry Pi, or your own cloud.
Pick the installation method that matches your platform. All paths start the server on port **9001**.
{% tabs %}
{% tab title="Docker (recommended)" %}
Docker is the preferred way to run Inference (see [why Docker](/deployment/self-hosted/inference-server/architecture#why-docker)). It works on Linux, macOS, Windows, Jetson, and other Docker-capable devices.
[Install Docker](https://docs.docker.com/engine/install/) first (plus the [NVIDIA Container Toolkit](https://docs.nvidia.com/datacenter/cloud-native/container-toolkit/latest/install-guide.html) if you have a CUDA-enabled GPU), then install and run the [Inference CLI](https://docs.roboflow.com/reference/inference/inference-cli):
```bash
pip install inference-cli && inference server start
```
This automatically chooses and configures the optimal container for your machine.
{% endtab %}
{% tab title="Windows (native app)" %}
Run an Inference Server on Windows with the native desktop app, with no Docker required.
1. [Download the latest installer](https://github.com/roboflow/inference/releases) and run it.
2. When the install finishes, it offers to launch the Inference Server.
3. To stop the server, close the terminal window it opens.
4. To start it again later, find **Roboflow Inference** in your Start Menu.
See [Install on Windows](/deployment/self-hosted/inference-server/install/windows) for details and the Docker alternative.
{% endtab %}
{% tab title="macOS (native app)" %}
Run an Inference Server on an Apple Silicon Mac with the native desktop app, with no Docker required.
1. [Download the DMG](https://github.com/roboflow/inference/releases) and open it.
2. Drag the Roboflow Inference app to your Applications folder.
3. Double-click the app in Applications to start the server.
See [Install on Mac](/deployment/self-hosted/inference-server/install/mac) for details, the Docker alternative, and MPS acceleration.
{% endtab %}
{% endtabs %}
## Requirements
Inference adapts to your machine and runs faster on more powerful hardware. The floor is a 64-bit processor, 4 GB of RAM, and 20 GB of free disk space. [Docker](https://www.docker.com/get-started) is required for the container paths above.
| Target | Hardware | OS | Docker image |
| ----------------- | ----------------------------------------------------------------------------------------------------------------------------------------------------------------------------------------------------------------- | ----------------------------------------- | ------------------------------------------------------------------------------- |
| **CPU** | 64-bit CPU, 4 GB RAM, 20 GB free disk. Heavy models (e.g. SAM2) may be too slow to be practical. | Linux, macOS, or Windows 10/11 with WSL 2 | `roboflow/roboflow-inference-server-cpu` |
| **GPU** | CUDA-capable NVIDIA GPU with the [NVIDIA Container Toolkit](https://docs.nvidia.com/datacenter/cloud-native/container-toolkit/latest/install-guide.html) installed. Recommended for larger models and live video. | Linux (or Windows 10/11 with WSL 2) | `roboflow/roboflow-inference-server-gpu` |
| **NVIDIA Jetson** | Jetson Orin device (Orin NX 16 GB or above recommended), running JetPack 4.5, 4.6, 5.x, or 6.x. Allow \~10 GB free disk for the image. | JetPack / L4T | `roboflow/roboflow-inference-server-jetson-*` (JetPack-specific, auto-selected) |
See [Minimum Requirements](/deployment/self-hosted/inference-server/install/minimum-requirements) for the full list of supported and suggested devices.
## Device-specific guides
Special installation notes and performance tips by device:
* [Linux](/deployment/self-hosted/inference-server/install/linux)
* [Windows](/deployment/self-hosted/inference-server/install/windows)
* [Mac](/deployment/self-hosted/inference-server/install/mac)
* [NVIDIA Jetson](/deployment/self-hosted/inference-server/install/jetson)
* [Raspberry Pi](/deployment/self-hosted/inference-server/install/raspberry-pi)
* [Other devices](/deployment/self-hosted/inference-server/install/other)
* [Deploy in your own cloud](/deployment/self-hosted/inference-server/install/cloud) - AWS, Azure, or GCP
If you cannot run Docker at all, the [Inference Library](/deployment/self-hosted/inference-library) runs models in your own Python process instead of a server.
## Running the container yourself
You do not usually pick the image by hand: `inference server start` detects your hardware and runs `docker run` for you with recommended security settings, caching, and platform-specific options. If you would rather manage the container yourself, use the CPU image on a CPU-only host, or the GPU image with `--gpus all` on a CUDA host.
{% tabs %}
{% tab title="CPU" %}
```bash
sudo docker run -d \
--name inference-server \
--read-only \
-p 9001:9001 \
--volume ~/.inference/cache:/tmp:rw \
--security-opt="no-new-privileges" \
--cap-drop="ALL" \
--cap-add="NET_BIND_SERVICE" \
roboflow/roboflow-inference-server-cpu:latest
```
{% endtab %}
{% tab title="GPU" %}
Install the [NVIDIA Container Toolkit](https://docs.nvidia.com/datacenter/cloud-native/container-toolkit/latest/install-guide.html) first, then add `--gpus all`:
```bash
sudo docker run -d \
--name inference-server \
--gpus all \
--read-only \
-p 9001:9001 \
--volume ~/.inference/cache:/tmp:rw \
--security-opt="no-new-privileges" \
--cap-drop="ALL" \
--cap-add="NET_BIND_SERVICE" \
roboflow/roboflow-inference-server-gpu:latest
```
{% endtab %}
{% endtabs %}
Your platform's guide has a "Manually starting the container" section with the exact flags for that device.
## Updating
Docker images default to the `:latest` tag. To move to the newest server, pull the latest image, or re-run `inference server start`, which pulls it for you:
```bash
docker pull roboflow/roboflow-inference-server-gpu:latest
```
For reproducible deployments, **pin a specific version tag** instead of `:latest` so an update never changes behavior unexpectedly, for example `roboflow/roboflow-inference-server-gpu:`. Browse available tags on [Docker Hub](https://hub.docker.com/u/roboflow), and update deliberately by bumping the pinned tag.
## Securing your server
A self-hosted server does not enforce authentication, encryption, or network restrictions by default, so securing it is your responsibility. Before exposing it beyond local development traffic, review [Securing a Self-Hosted Server](/deployment/self-hosted/inference-server/configuration/security).
## Using your new server
Once the server is running, call it over [its HTTP API](/deployment/self-hosted/self-hosted#run-a-model) or with the [Inference SDK](https://docs.roboflow.com/reference/inference/inference-sdk). See [Run a model](/deployment/self-hosted/self-hosted#run-a-model) for the first request, and [Docker configuration options](/deployment/self-hosted/inference-server/configuration/docker-configuration) for tuning the container.
## Enterprise considerations
[A Helm chart](https://github.com/roboflow/inference/tree/main/inference/enterprise/helm-chart) is available for enterprise cloud deployments, and enterprise networking solutions that support deployment in OT networks are available on request.
Roboflow also offers customized support and installation packages and [a pre-configured Jetson-based edge device](https://roboflow.com/hardware) suitable for rapid prototyping. [Contact the sales team](https://roboflow.com/sales) if you are part of a large organization and want to learn more. See [Enterprise Deployment](/deployment/self-hosted/enterprise) for the full feature set.
# Minimum Requirements
Minimum hardware and OS requirements for running Roboflow Inference, plus the devices it is tested and supported on.
Inference adapts to your machine's resources and runs faster on more powerful machines, but it cannot run on every device.
To run Inference, we recommend at least:
* A 64-bit processor
* 4 GB of RAM
* 20 GB of free disk space
Additional requirements for Windows
To run on Windows you need Windows 10 or Windows 11 with Windows Subsystem for Linux (WSL 2) activated, unless you use the [native Windows installer](/deployment/self-hosted/inference-server/install/windows#windows-installer-x86).
## GPU recommended
Inference can use hardware acceleration on NVIDIA GPUs. It is not required, but for bigger models and live streaming video we recommend [a CUDA-capable GPU](https://developer.nvidia.com/cuda-gpus).
## Supported devices
You can run an Inference server on:
* ARM CPU (macOS, Raspberry Pi)
* x86 CPU (macOS, Linux, Windows)
* NVIDIA GPU
* NVIDIA Jetson (JetPack 4.5.x, 4.6.x, 5.x, 6.x)
You can also run Inference on a VM in [your own cloud](/deployment/self-hosted/inference-server/install/cloud) on AWS, Azure, or GCP, or let Roboflow host it for you: see [Choosing a Deployment Option](/deployment/choosing-a-deployment) for the comparison. Other hardware may work but is not officially tested; see [Using Other Devices](/deployment/self-hosted/inference-server/install/other).
## Suggested edge devices
NVIDIA Jetson Orin devices with JetPack 5 or JetPack 6 are powerful, well-rounded machines, and the Roboflow test suite runs against them regularly. The [Jetson Orin Nano Super Developer Kit](https://www.seeedstudio.com/NVIDIAr-Jetson-Orintm-Nano-Developer-Kit-p-5617.html) is a good device to start building with.
Roboflow also sells [a pre-configured Jetson-based edge device](https://roboflow.com/hardware) suitable for rapid prototyping.
# Install on Linux
Install and run the Roboflow Inference Server on Linux with the Inference CLI, Docker, or Docker Compose, on CPU, GPU, or TensorRT.
The easiest way to start the correct container for your machine, with good default settings (a cache volume and a secure, non-privileged execution mode), is to let the CLI choose and start it with `inference server start`. [Install Docker](https://docs.docker.com/engine/install/) first:
```bash
pip install inference-cli
inference server start
```
## Manually starting the container
If you want more control over the container settings, start it yourself.
{% tabs %}
{% tab title="CPU" %}
The core CPU Docker image includes support for OpenVINO acceleration on x64 CPUs via onnxruntime. Heavy models like SAM2 may run too slowly (dozens of seconds per image) to be practical; if you need them, use a CUDA-capable GPU.
The primary use cases for CPU inference are processing still images (for example NSFW classification of uploads or document verification) or infrequent sampling of frames from a video (for example occupancy tracking of a parking lot).
To get started with CPU inference, use the `roboflow/roboflow-inference-server-cpu:latest` container.
```bash
sudo docker run -d \
--name inference-server \
--read-only \
-p 9001:9001 \
--volume ~/.inference/cache:/tmp:rw \
--security-opt="no-new-privileges" \
--cap-drop="ALL" \
--cap-add="NET_BIND_SERVICE" \
roboflow/roboflow-inference-server-cpu:latest
```
{% endtab %}
{% tab title="GPU" %}
The GPU container adds hardware acceleration on cards that support CUDA via NVIDIA-Docker. Follow the [NVIDIA Container Toolkit installation guide](https://docs.nvidia.com/datacenter/cloud-native/container-toolkit/latest/install-guide.html), then add `--gpus all` to the `docker run` command:
```bash
sudo docker run -d \
--name inference-server \
--gpus all \
--read-only \
-p 9001:9001 \
--volume ~/.inference/cache:/tmp:rw \
--security-opt="no-new-privileges" \
--cap-drop="ALL" \
--cap-add="NET_BIND_SERVICE" \
roboflow/roboflow-inference-server-gpu:latest
```
{% endtab %}
{% tab title="TensorRT" %}
With the GPU container you can optionally enable [TensorRT](https://developer.nvidia.com/tensorrt), NVIDIA's model optimization runtime. It greatly increases your models' speed at the expense of a heavy compilation and optimization step (sometimes 15+ minutes) the first time you load each model.
Enable TensorRT by adding `TensorrtExecutionProvider` to the `ONNXRUNTIME_EXECUTION_PROVIDERS` environment variable.
```bash
sudo docker run -d \
--name inference-server \
--gpus all \
--read-only \
-p 9001:9001 \
--volume ~/.inference/cache:/tmp:rw \
--security-opt="no-new-privileges" \
--cap-drop="ALL" \
--cap-add="NET_BIND_SERVICE" \
-e ONNXRUNTIME_EXECUTION_PROVIDERS="[TensorrtExecutionProvider,CUDAExecutionProvider,OpenVINOExecutionProvider,CPUExecutionProvider]" \
roboflow/roboflow-inference-server-gpu:latest
```
{% endtab %}
{% endtabs %}
## Docker Compose
If you use Docker Compose for your application, the equivalent YAML is:
{% tabs %}
{% tab title="CPU" %}
```yaml
version: "3.9"
services:
inference-server:
container_name: inference-server
image: roboflow/roboflow-inference-server-cpu:latest
read_only: true
ports:
- "9001:9001"
volumes:
- "${HOME}/.inference/cache:/tmp:rw"
security_opt:
- no-new-privileges
cap_drop:
- ALL
cap_add:
- NET_BIND_SERVICE
```
{% endtab %}
{% tab title="GPU" %}
```yaml
version: "3.9"
services:
inference-server:
container_name: inference-server
image: roboflow/roboflow-inference-server-gpu:latest
read_only: true
ports:
- "9001:9001"
volumes:
- "${HOME}/.inference/cache:/tmp:rw"
deploy:
resources:
reservations:
devices:
- driver: nvidia
count: all
capabilities: [gpu]
security_opt:
- no-new-privileges
cap_drop:
- ALL
cap_add:
- NET_BIND_SERVICE
```
{% endtab %}
{% tab title="TensorRT" %}
```yaml
version: "3.9"
services:
inference-server:
container_name: inference-server
image: roboflow/roboflow-inference-server-gpu:latest
read_only: true
ports:
- "9001:9001"
volumes:
- "${HOME}/.inference/cache:/tmp:rw"
deploy:
resources:
reservations:
devices:
- driver: nvidia
count: all
capabilities: [gpu]
environment:
ONNXRUNTIME_EXECUTION_PROVIDERS: "[TensorrtExecutionProvider,CUDAExecutionProvider,OpenVINOExecutionProvider,CPUExecutionProvider]"
security_opt:
- no-new-privileges
cap_drop:
- ALL
cap_add:
- NET_BIND_SERVICE
```
{% endtab %}
{% endtabs %}
{% hint style="info" %}
Roboflow Enterprise plans add [a Helm chart](https://github.com/roboflow/inference/tree/main/inference/enterprise/helm-chart) for Kubernetes deployments, networking solutions for OT networks, and customized support and installation packages. [Contact the sales team](https://roboflow.com/sales) to learn more.
{% endhint %}
## Next steps
* [Run a model](/deployment/self-hosted/self-hosted#run-a-model) against your new server.
* [Docker configuration options](/deployment/self-hosted/inference-server/configuration/docker-configuration) for ports, caching, and model limits.
* [Securing a self-hosted server](/deployment/self-hosted/inference-server/configuration/security) before you expose it beyond localhost.
# Install on Windows
Install the Roboflow Inference Server on Windows with the native installer or with Docker Desktop, on CPU, GPU, or TensorRT.
## Windows installer (x86)
You can run the Roboflow Inference Server on your Windows machine with the native desktop app. Download the latest Windows installer from the latest GitHub release: [View the latest release and download installers on GitHub](https://github.com/roboflow/inference/releases).
1. [Download the latest installer](https://github.com/roboflow/inference/releases) and run it to install Roboflow Inference.
2. When the install finishes, it offers to launch the Inference Server.
3. To stop the server, close the terminal window it opens.
4. To start it again later, find **Roboflow Inference** in your Start Menu.
{% hint style="info" %}
**`inference-models` backend.** When used with the `inference-models` backend, the Inference Server must run with elevated admin rights because of cache management with symlinks. The alternative is to enable [Developer Mode](https://learn.microsoft.com/en-us/windows/advanced-settings/developer-mode).
The `inference-models` backend is opt-in via an environment flag: `$env:USE_INFERENCE_MODELS = "True"`.
{% endhint %}
## Using Docker
First, [install Docker Desktop](https://docs.docker.com/desktop/setup/install/windows-install/). Then use the CLI to start the container.
{% tabs %}
{% tab title="CPU" %}
```bash
pip install inference-cli
inference server start
```
{% endtab %}
{% tab title="GPU" %}
To access the GPU, make sure you have installed up-to-date NVIDIA drivers and the latest version of WSL 2, and that the WSL 2 backend is configured in Docker. [Follow the setup instructions from Docker](https://docs.docker.com/desktop/features/gpu/).
Then use the CLI to start the container:
```bash
pip install inference-cli
inference server start
```
{% endtab %}
{% endtabs %}
{% hint style="info" %}
If the `pip install` command fails, you may need to [install Python](https://www.python.org/downloads/) first. Once you have Python 3.12, 3.11, or 3.10 on your machine, retry the command.
{% endhint %}
## Manually starting the container
If you want more control over the container settings, start it yourself.
{% tabs %}
{% tab title="CPU" %}
The core CPU Docker image includes support for OpenVINO acceleration on x64 CPUs via onnxruntime. Heavy models like SAM2 may run too slowly (dozens of seconds per image) to be practical; if you need them, use a CUDA-capable GPU.
The primary use cases for CPU inference are processing still images (for example NSFW classification of uploads or document verification) or infrequent sampling of frames from a video (for example occupancy tracking of a parking lot).
To get started with CPU inference, use the `roboflow/roboflow-inference-server-cpu:latest` container.
```bash
docker run -d ^
--name inference-server ^
--read-only ^
-p 9001:9001 ^
--volume "%USERPROFILE%\.inference\cache:/tmp:rw" ^
--security-opt="no-new-privileges" ^
--cap-drop="ALL" ^
--cap-add="NET_BIND_SERVICE" ^
roboflow/roboflow-inference-server-cpu:latest
```
{% endtab %}
{% tab title="GPU" %}
The GPU container adds hardware acceleration on cards that support CUDA via NVIDIA-Docker. Make sure you have [set up Docker to access the GPU](https://docs.docker.com/desktop/features/gpu/), then add `--gpus all` to the `docker run` command:
```bash
docker run -d ^
--name inference-server ^
--gpus all ^
--read-only ^
-p 9001:9001 ^
--volume "%USERPROFILE%\.inference\cache:/tmp:rw" ^
--security-opt="no-new-privileges" ^
--cap-drop="ALL" ^
--cap-add="NET_BIND_SERVICE" ^
roboflow/roboflow-inference-server-gpu:latest
```
{% endtab %}
{% tab title="TensorRT" %}
With the GPU container you can optionally enable [TensorRT](https://developer.nvidia.com/tensorrt), NVIDIA's model optimization runtime. It greatly increases your models' speed at the expense of a heavy compilation and optimization step (sometimes 15+ minutes) the first time you load each model.
Enable TensorRT by adding `TensorrtExecutionProvider` to the `ONNXRUNTIME_EXECUTION_PROVIDERS` environment variable.
```bash
docker run -d ^
--name inference-server ^
--gpus all ^
--read-only ^
-p 9001:9001 ^
--volume "%USERPROFILE%\.inference\cache:/tmp:rw" ^
--security-opt="no-new-privileges" ^
--cap-drop="ALL" ^
--cap-add="NET_BIND_SERVICE" ^
-e ONNXRUNTIME_EXECUTION_PROVIDERS="[TensorrtExecutionProvider,CUDAExecutionProvider,OpenVINOExecutionProvider,CPUExecutionProvider]" ^
roboflow/roboflow-inference-server-gpu:latest
```
{% endtab %}
{% endtabs %}
## Docker Compose
If you use Docker Compose for your application, the equivalent YAML is:
{% tabs %}
{% tab title="CPU" %}
```yaml
version: "3.9"
services:
inference-server:
container_name: inference-server
image: roboflow/roboflow-inference-server-cpu:latest
read_only: true
ports:
- "9001:9001"
volumes:
- "${USERPROFILE}/.inference/cache:/tmp:rw"
security_opt:
- no-new-privileges
cap_drop:
- ALL
cap_add:
- NET_BIND_SERVICE
```
{% endtab %}
{% tab title="GPU" %}
```yaml
version: "3.9"
services:
inference-server:
container_name: inference-server
image: roboflow/roboflow-inference-server-gpu:latest
read_only: true
ports:
- "9001:9001"
volumes:
- "${USERPROFILE}/.inference/cache:/tmp:rw"
deploy:
resources:
reservations:
devices:
- driver: nvidia
count: all
capabilities: [gpu]
security_opt:
- no-new-privileges
cap_drop:
- ALL
cap_add:
- NET_BIND_SERVICE
```
{% endtab %}
{% tab title="TensorRT" %}
```yaml
version: "3.9"
services:
inference-server:
container_name: inference-server
image: roboflow/roboflow-inference-server-gpu:latest
read_only: true
ports:
- "9001:9001"
volumes:
- "${USERPROFILE}/.inference/cache:/tmp:rw"
deploy:
resources:
reservations:
devices:
- driver: nvidia
count: all
capabilities: [gpu]
environment:
ONNXRUNTIME_EXECUTION_PROVIDERS: "[TensorrtExecutionProvider,CUDAExecutionProvider,OpenVINOExecutionProvider,CPUExecutionProvider]"
security_opt:
- no-new-privileges
cap_drop:
- ALL
cap_add:
- NET_BIND_SERVICE
```
{% endtab %}
{% endtabs %}
{% hint style="info" %}
Roboflow Enterprise plans add [a Helm chart](https://github.com/roboflow/inference/tree/main/inference/enterprise/helm-chart) for Kubernetes deployments, networking solutions for OT networks, and customized support and installation packages. [Contact the sales team](https://roboflow.com/sales) to learn more.
{% endhint %}
## Next steps
* [Run a model](/deployment/self-hosted/self-hosted#run-a-model) against your new server.
* [Install `inference-gpu` bare metal on Windows](/deployment/self-hosted/inference-library/bare-metal-gpu-windows) if you cannot use Docker.
* [Securing a self-hosted server](/deployment/self-hosted/inference-server/configuration/security) before you expose it beyond localhost.
# Install on Mac
Install the Roboflow Inference Server on macOS with the native Apple Silicon app, with Docker, or outside Docker with MPS acceleration.
## macOS native app (Apple Silicon)
You can run the Roboflow Inference Server on your Apple Silicon Mac with the native desktop app. Download the latest DMG disk image from the latest GitHub release: [View the latest release and download installers on GitHub](https://github.com/roboflow/inference/releases).
1. [Download the Roboflow Inference DMG](https://github.com/roboflow/inference/releases) disk image.
2. Mount the disk image by double-clicking it.
3. Drag the Roboflow Inference app to your Applications folder.
4. Open your Applications folder and double-click the Roboflow Inference app to start the server.
## Using Docker
{% tabs %}
{% tab title="CPU" %}
First, [install Docker Desktop](https://docs.docker.com/desktop/setup/install/mac-install/). Then use the CLI to start the container:
```bash
pip install inference-cli
inference server start
```
If you want more control over the container settings, start it manually:
```bash
sudo docker run -d \
--name inference-server \
--read-only \
-p 9001:9001 \
--volume ~/.inference/cache:/tmp:rw \
--security-opt="no-new-privileges" \
--cap-drop="ALL" \
--cap-add="NET_BIND_SERVICE" \
roboflow/roboflow-inference-server-cpu:latest
```
{% endtab %}
{% tab title="GPU (MPS)" %}
Apple does not yet support [passing the Metal Performance Shaders (MPS) device to Docker](https://github.com/pytorch/pytorch/issues/81224), so hardware acceleration is not possible inside a container on Mac. To use MPS you must run the server outside Docker.
{% hint style="success" %}
It is easiest to get started with the CPU Docker image and switch to running outside Docker with MPS acceleration later if you need more speed.
{% endhint %}
We recommend [`pyenv`](https://github.com/pyenv/pyenv) and [`pyenv-virtualenv`](https://github.com/pyenv/pyenv-virtualenv) to manage your Python environments on Mac, especially because [homebrew](https://brew.sh) defaults to Python 3.13, which is not yet compatible with several of the machine learning dependencies Inference uses.
Once you have installed and set up `pyenv` and `pyenv-virtualenv` (follow the full instructions for setting up your shell), create and activate an `inference` virtual environment with Python 3.12:
```bash
pyenv install 3.12
pyenv virtualenv 3.12 inference
pyenv activate inference
```
To install and run the server outside Docker, clone the repo, install the dependencies, copy `cpu_http.py` into the top level of the repo, and start the server with `uvicorn`:
```bash
git clone https://github.com/roboflow/inference.git
cd inference
pip install .
cp docker/config/cpu_http.py .
uvicorn cpu_http:app --port 9001 --host 0.0.0.0
```
Your server is now running at `http://localhost:9001` with MPS acceleration.
{% endtab %}
{% endtabs %}
## Next steps
* [Run a model](/deployment/self-hosted/self-hosted#run-a-model) against your new server.
* [Docker configuration options](/deployment/self-hosted/inference-server/configuration/docker-configuration) for ports, caching, and model limits.
* [Securing a self-hosted server](/deployment/self-hosted/inference-server/configuration/security) before you expose it beyond localhost.
# Install on NVIDIA Jetson
Install the Roboflow Inference Server on an NVIDIA Jetson device with JetPack-specific containers, TensorRT acceleration, and Docker Compose.
## Overview
Jetson is NVIDIA's line of compact, power-efficient modules designed to run AI and deep learning workloads at the edge. They combine a GPU, CPU, and neural accelerators on a single board, which makes them a good fit for robotics, drones, smart cameras, and other embedded applications that need real-time computer vision without a cloud connection. For more details, see [NVIDIA's Jetson overview](https://www.nvidia.com/en-us/autonomous-machines/embedded-systems/).
## Prerequisites
* **Disk space:** allocate at least 10 GB free for the Roboflow Jetson image (8.14 GB).
* **JetPack version:** a supported JetPack (5.x or 6.x).
* **Recommended hardware:** an NVIDIA Orin NX 16 GB or above for best performance.
* **Docker and the NVIDIA Container Toolkit:** containers need the Docker engine plus the NVIDIA runtime to access the GPU. Follow the [Docker install guide](https://docs.docker.com/engine/install/ubuntu/) and the [NVIDIA Container Toolkit guide](https://docs.nvidia.com/datacenter/cloud-native/container-toolkit/install-guide.html).
Roboflow publishes specialized containers built with hardware acceleration support for JetPack L4T. To detect your JetPack version automatically and start the right container with good defaults, run:
```bash
pip install inference-cli
inference server start
```
## Manually starting the container
If you want more control over the container settings, start it yourself. Jetson devices with NVIDIA JetPack are pre-configured with the NVIDIA container runtime and are hardware accelerated out of the box.
{% tabs %}
{% tab title="JetPack 6.2" %}
```bash
sudo docker run -d \
--name inference-server \
--runtime nvidia \
--read-only \
-p 9001:9001 \
--volume ~/.inference/cache:/tmp:rw \
--security-opt="no-new-privileges" \
--cap-drop="ALL" \
--cap-add="NET_BIND_SERVICE" \
roboflow/roboflow-inference-server-jetson-6.2.0:latest
```
{% endtab %}
{% tab title="JetPack 6.0" %}
```bash
sudo docker run -d \
--name inference-server \
--runtime nvidia \
--read-only \
-p 9001:9001 \
--volume ~/.inference/cache:/tmp:rw \
--security-opt="no-new-privileges" \
--cap-drop="ALL" \
--cap-add="NET_BIND_SERVICE" \
roboflow/roboflow-inference-server-jetson-6.0.0:latest
```
{% endtab %}
{% tab title="JetPack 5" %}
```bash
sudo docker run -d \
--name inference-server \
--runtime nvidia \
--read-only \
-p 9001:9001 \
--volume ~/.inference/cache:/tmp:rw \
--security-opt="no-new-privileges" \
--cap-drop="ALL" \
--cap-add="NET_BIND_SERVICE" \
roboflow/roboflow-inference-server-jetson-5.1.1:latest
```
{% endtab %}
{% tab title="JetPack 4 (deprecated)" %}
{% hint style="warning" %}
JetPack 4 is deprecated and will not receive future updates. Please migrate to JetPack 6.
{% endhint %}
Use the same command as JetPack 5 with the JetPack 4 image tag: `roboflow/roboflow-inference-server-jetson-4.6.1:latest` for JetPack 4.6, or `roboflow/roboflow-inference-server-jetson-4.5.0:latest` for JetPack 4.5.
{% endtab %}
{% endtabs %}
## TensorRT
You can optionally enable [TensorRT](https://developer.nvidia.com/tensorrt), NVIDIA's model optimization runtime. It greatly increases your models' speed at the expense of a heavy compilation and optimization step (sometimes 15+ minutes) the first time you load each model.
Enable TensorRT by adding `TensorrtExecutionProvider` to the `ONNXRUNTIME_EXECUTION_PROVIDERS` environment variable on any of the commands above:
```bash
-e ONNXRUNTIME_EXECUTION_PROVIDERS="[TensorrtExecutionProvider,CUDAExecutionProvider,CPUExecutionProvider]" \
```
Mounting a persistent cache volume (as in the commands above) keeps the compiled TensorRT engines between restarts, so you only pay the compilation cost once per model.
## Docker Compose
If you use Docker Compose for your application, the equivalent YAML is below. Swap the image tag for your JetPack version: `jetson-6.2.0`, `jetson-6.0.0`, `jetson-5.1.1`, `jetson-4.6.1`, or `jetson-4.5.0`.
```yaml
version: "3.9"
services:
inference-server:
container_name: inference-server
image: roboflow/roboflow-inference-server-jetson-6.2.0:latest
read_only: true
ports:
- "9001:9001"
volumes:
- "${HOME}/.inference/cache:/tmp:rw"
runtime: nvidia
# Optionally: uncomment the following lines to enable TensorRT:
# environment:
# ONNXRUNTIME_EXECUTION_PROVIDERS: "[TensorrtExecutionProvider,CUDAExecutionProvider,CPUExecutionProvider]"
security_opt:
- no-new-privileges
cap_drop:
- ALL
cap_add:
- NET_BIND_SERVICE
```
{% hint style="info" %}
Roboflow Enterprise plans add [a Helm chart](https://github.com/roboflow/inference/tree/main/inference/enterprise/helm-chart) for Kubernetes deployments, networking solutions for OT networks, customized support and installation packages, and [a pre-configured Jetson-based edge device](https://roboflow.com/hardware). [Contact the sales team](https://roboflow.com/sales) to learn more.
{% endhint %}
## Next steps
* [Run a model](/deployment/self-hosted/self-hosted#run-a-model) against your new server.
* [Deployment Manager](/deployment/self-hosted/enterprise/deployment-manager) (Enterprise) to manage a fleet of Jetson devices remotely.
* [Securing a self-hosted server](/deployment/self-hosted/inference-server/configuration/security) before you expose it beyond localhost.
# Install on Raspberry Pi
Install the Roboflow Inference Server on a 64-bit Raspberry Pi 4 or 5 with Docker, and what performance to expect.
Inference works on the Raspberry Pi 4 Model B and Raspberry Pi 5, as long as you use [the 64-bit version of the operating system](https://www.raspberrypi.com/software/operating-systems/). If your SD card is big enough, we recommend the 64-bit "Raspberry Pi OS with desktop and recommended software" version.
Once you have installed the 64-bit OS, [install Docker](https://docs.docker.com/engine/install/debian/), then use the Inference CLI to select, configure, and start the correct Inference Docker container automatically:
```bash
pip install inference-cli
inference server start
```
## Hardware acceleration
Inference does not yet support hardware acceleration on the Raspberry Pi. Expect about 1 FPS on a Pi 4 and 4 FPS on a Pi 5 for a "Roboflow 3.0 Fast" object detection model (equivalent to a "nano" sized YOLO model).
Larger models like Segment Anything and VLMs like Florence-2 will struggle on the Pi's compute. If you need higher framerates or bigger models, consider [an NVIDIA Jetson](/deployment/self-hosted/inference-server/install/jetson).
## Manually starting the container
If you want more control over the container settings, start it yourself:
```bash
sudo docker run -d \
--name inference-server \
--read-only \
-p 9001:9001 \
--volume ~/.inference/cache:/tmp:rw \
--security-opt="no-new-privileges" \
--cap-drop="ALL" \
--cap-add="NET_BIND_SERVICE" \
roboflow/roboflow-inference-server-cpu:latest
```
## Docker Compose
If you use Docker Compose for your application, the equivalent YAML is:
```yaml
version: "3.9"
services:
inference-server:
container_name: inference-server
image: roboflow/roboflow-inference-server-cpu:latest
read_only: true
ports:
- "9001:9001"
volumes:
- "${HOME}/.inference/cache:/tmp:rw"
security_opt:
- no-new-privileges
cap_drop:
- ALL
cap_add:
- NET_BIND_SERVICE
```
{% hint style="info" %}
Roboflow Enterprise plans add [a Helm chart](https://github.com/roboflow/inference/tree/main/inference/enterprise/helm-chart) for Kubernetes deployments, networking solutions for OT networks, and customized support and installation packages. [Contact the sales team](https://roboflow.com/sales) to learn more.
{% endhint %}
## Next steps
* [Run a model](/deployment/self-hosted/self-hosted#run-a-model) against your new server.
* [Docker configuration options](/deployment/self-hosted/inference-server/configuration/docker-configuration) for ports, caching, and model limits.
* [Securing a self-hosted server](/deployment/self-hosted/inference-server/configuration/security) before you expose it beyond localhost.
# Deploy in Your Own Cloud
Run Roboflow Inference on your own AWS, Azure, or GCP infrastructure using the SkyPilot integration in the Inference CLI.
You can run Roboflow Inference on major cloud platforms like AWS, Azure, or GCP.
Deploying in your own cloud is a good fit when you want the scalability and flexibility of the cloud but have technical or organizational constraints on where your data can be sent. Billing works the same as self-hosting on an edge device: the software is free and open source and you pay your cloud provider for the machine.
Inference integrates with [SkyPilot](https://github.com/skypilot-org/skypilot), which makes deploying a cloud instance to run Inference a single command once you have authenticated with your cloud provider.
Read the provider guides for details:
* [Set up Inference on AWS](/deployment/self-hosted/inference-server/install/cloud/aws)
* [Set up Inference on Azure](/deployment/self-hosted/inference-server/install/cloud/azure)
* [Set up Inference on GCP](/deployment/self-hosted/inference-server/install/cloud/gcp)
## Manual setup
You can also follow the [Linux install guide](/deployment/self-hosted/inference-server/install/linux) to configure a Docker container manually on your cloud VM.
[A Helm chart](https://github.com/roboflow/inference/tree/main/inference/enterprise/helm-chart) is available for enterprise cloud deployments via Kubernetes. See [Kubernetes deployment](/deployment/self-hosted/enterprise/kubernetes) for more advice.
{% hint style="info" %}
If you want cloud inference without managing infrastructure at all, compare the Roboflow-hosted options in [Choosing a Deployment Option](/deployment/choosing-a-deployment).
{% endhint %}
# Deploy on AWS
Deploy a Roboflow Inference server on an AWS EC2 instance with the Inference CLI and SkyPilot.
You can run Roboflow Inference on machines hosted on Amazon Web Services. This is a good fit when you want the features of Inference while managing your own cloud infrastructure.
## Set up an AWS EC2 instance
To get started you need an EC2 instance running on AWS. For provisioning instances we recommend SkyPilot, a tool designed to help you set up cloud instances for AI projects.
Run the following command on your own machine:
```bash
pip install inference "skypilot[aws]"
```
Follow the [SkyPilot cloud account setup documentation](https://docs.skypilot.co/en/latest/getting-started/installation.html#cloud-account-setup) to authenticate with AWS, then run:
```bash
inference cloud deploy --provider aws --compute-type gpu
```
This provisions a GPU-capable instance in AWS with the latest version of Roboflow Inference installed automatically.
When the command finishes you should see a message like:
```
Deployed Roboflow Inference to aws on gpu, deployment name is ...
To get a list of your deployments: inference cloud status
To delete your deployment: inference cloud undeploy ...
To ssh into the deployed server: ssh ...
The Roboflow Inference Server is running at http://34.66.116.66:9001
```
You can then use that endpoint to run models: object detection, segmentation, classification, and keypoint models from your Roboflow workspace, plus foundation models like CLIP, PaliGemma, and SAM2.
## Next steps
Point your client at the new server by setting `api_url` to the IP address of your VM and the port the server is running on (`9001` by default). See [Run a model](/deployment/self-hosted/self-hosted#run-a-model) for the first request, and the [Inference CLI cloud commands](https://docs.roboflow.com/reference/inference/inference-cli/cloud) for managing deployments.
Before you expose the server beyond a private network, review [Securing a Self-Hosted Server](/deployment/self-hosted/inference-server/configuration/security).
# Deploy on Azure
Deploy a Roboflow Inference server on an Azure virtual machine with the Inference CLI and SkyPilot.
You can run Roboflow Inference on machines hosted on Azure. This is a good fit when you want the features of Inference while managing your own cloud infrastructure.
## Set up an Azure compute VM
To get started you need a compute instance running on Azure. For provisioning instances we recommend SkyPilot, a tool designed to help you set up cloud instances for AI projects.
Run the following command on your own machine:
```bash
pip install inference "skypilot[azure]"
```
Follow the [SkyPilot cloud account setup documentation](https://docs.skypilot.co/en/latest/getting-started/installation.html#cloud-account-setup) to authenticate with Azure, then run:
```bash
inference cloud deploy --provider azure --compute-type gpu
```
This provisions a GPU-capable instance in Azure with the latest version of Roboflow Inference installed automatically.
When the command finishes you should see a message like:
```
Deployed Roboflow Inference to azure on gpu, deployment name is ...
To get a list of your deployments: inference cloud status
To delete your deployment: inference cloud undeploy ...
To ssh into the deployed server: ssh ...
The Roboflow Inference Server is running at http://34.66.116.66:9001
```
You can then use that endpoint to run models: object detection, segmentation, classification, and keypoint models from your Roboflow workspace, plus foundation models like CLIP, PaliGemma, and SAM2.
## Next steps
Point your client at the new server by setting `api_url` to the IP address of your VM and the port the server is running on (`9001` by default). See [Run a model](/deployment/self-hosted/self-hosted#run-a-model) for the first request, and the [Inference CLI cloud commands](https://docs.roboflow.com/reference/inference/inference-cli/cloud) for managing deployments.
Before you expose the server beyond a private network, review [Securing a Self-Hosted Server](/deployment/self-hosted/inference-server/configuration/security).
# Deploy on Google Cloud Platform
Deploy a Roboflow Inference server on a Google Cloud Platform compute VM with the Inference CLI and SkyPilot.
You can run Roboflow Inference on machines hosted on Google Cloud Platform (GCP). This is a good fit when you want the features of Inference while managing your own cloud infrastructure.
## Set up a Google Cloud compute VM
To get started you need a compute instance running on GCP. For provisioning instances we recommend SkyPilot, a tool designed to help you set up cloud instances for AI projects.
Run the following command on your own machine:
```bash
pip install inference "skypilot[gcp]"
```
Follow the [SkyPilot cloud account setup documentation](https://docs.skypilot.co/en/latest/getting-started/installation.html#cloud-account-setup) to authenticate with GCP, then run:
```bash
inference cloud deploy --provider gcp --compute-type gpu
```
This provisions a GPU-capable instance in GCP with the latest version of Roboflow Inference installed automatically.
When the command finishes you should see a message like:
```
Deployed Roboflow Inference to gcp on gpu, deployment name is ...
To get a list of your deployments: inference cloud status
To delete your deployment: inference cloud undeploy ...
To ssh into the deployed server: ssh ...
The Roboflow Inference Server is running at http://34.66.116.66:9001
```
You can then use that endpoint to run models: object detection, segmentation, classification, and keypoint models from your Roboflow workspace, plus foundation models like CLIP, PaliGemma, and SAM2.
## Next steps
Point your client at the new server by setting `api_url` to the IP address of your VM and the port the server is running on (`9001` by default). See [Run a model](/deployment/self-hosted/self-hosted#run-a-model) for the first request, and the [Inference CLI cloud commands](https://docs.roboflow.com/reference/inference/inference-cli/cloud) for managing deployments.
Before you expose the server beyond a private network, review [Securing a Self-Hosted Server](/deployment/self-hosted/inference-server/configuration/security).
# Using Other Devices
Run Roboflow Inference on unsupported hardware, including non-NVIDIA GPUs through alternative ONNX Runtime execution providers, and other edge SDKs.
Inference is tested and supported on x64 and ARM processors, optionally with an NVIDIA/CUDA GPU. Running on other devices may be possible but is not officially tested or supported.
## Other GPUs
Hardware acceleration on non-NVIDIA, non-Apple GPUs is not currently supported, but ONNX Runtime has [additional execution providers](https://onnxruntime.ai/docs/execution-providers/) for AMD/ROCm, Arm NN, Rockchip, and others.
If you install one of these runtimes, you can enable it with the `ONNXRUNTIME_EXECUTION_PROVIDERS` environment variable. For example:
```bash
export ONNXRUNTIME_EXECUTION_PROVIDERS="[ROCMExecutionProvider,OpenVINOExecutionProvider,CPUExecutionProvider]"
```
This is untested and performance improvements are not guaranteed. Acceleration of non-CUDA GPUs is unlikely to work inside Docker. See the [Mac install guide](/deployment/self-hosted/inference-server/install/mac) for an example of how to run the server outside of a container.
## Other edge devices
Roboflow has SDKs for running object detection natively on other deployment targets, including [TensorFlow.js in a web browser](/deployment/self-hosted/sdks/web-browser), [native Swift on iOS](/deployment/self-hosted/sdks/ios-sdk) via CoreML, and [Snap Lens Studio](/deployment/self-hosted/sdks/lens-studio). See the [SDKs overview](/deployment/self-hosted/sdks) for the full list.
For additional functionality, such as running Workflows and other types of models on another device, connect to an Inference Server over HTTP [with the Inference SDK](https://docs.roboflow.com/reference/inference/inference-sdk).
# Configuration
Configure, secure, and monitor a self-hosted Roboflow Inference server - container options, environment variables, HTTPS, input formats, and metrics.
A default Inference server started with `inference server start` is tuned for local development: it listens on port 9001 over plain HTTP, accepts every input format, and enforces no authentication. The pages in this section cover what you change once the server moves past your laptop.
You do not need any of this to run your first model. Come back here when you want to expose the server to other machines, run it in production, pin its resource usage, or watch how it behaves under load.
## Tune the container
* [Docker Configuration Options](/deployment/self-hosted/inference-server/configuration/docker-configuration) - ports, CORS, worker counts, NMS defaults, model cache, and the Secure Gateway.
* [Inference Server Environment Variables](/deployment/self-hosted/inference-server/configuration/environment-variables) - the full reference for every variable the server reads, grouped by area.
## Harden the server
* [Securing a Self-Hosted Server](/deployment/self-hosted/inference-server/configuration/security) - network isolation, authentication, TLS, custom Python restrictions, and SSRF controls. Start here before exposing the server beyond localhost.
* [Serving Inference over HTTPS](/deployment/self-hosted/inference-server/configuration/https) - terminate TLS with your own certificate, use encrypted keys, and require mutual TLS.
* [Accepted Input Formats](/deployment/self-hosted/inference-server/configuration/input-formats) - which payload types the server accepts, and how to disable the riskier ones such as pickled numpy arrays and URL image fetching.
## Watch it run
* [Inference Server Telemetry](/deployment/self-hosted/inference-server/configuration/telemetry) - Prometheus metrics and Docker container statistics for a running server.
{% hint style="info" %}
Configuring the [Inference CLI and SDK](https://docs.roboflow.com/reference/environment-variables) is separate from configuring the server. The variables on these pages are read by the server process inside the container.
{% endhint %}
# Docker Configuration Options
Configure a self-hosted Roboflow Inference container - networking, CORS, NMS defaults, model cache, workers, HTTPS, and the Secure Gateway.
Inference servers have a number of configurable parameters that you set with environment variables. To set an environment variable with `docker run`, use the `-e` flag:
```bash
docker run -it --rm -e ENV_VAR_NAME=env_var_value -p 9001:9001 --gpus all roboflow/roboflow-inference-server-gpu:latest
```
This page covers the options you are most likely to change. For the complete list, see [Environment Variables](/deployment/self-hosted/inference-server/configuration/environment-variables).
## Networking
**`HOST`**: string (default `0.0.0.0`). Sets the host address used by HTTP interfaces.
**`PORT`**: integer (default `9001`). Sets the port used by HTTP interfaces.
**`ALLOW_ORIGINS`**: string (default `*`). Sets the `allow_origins` property on the CORS middleware used with FastAPI for HTTP interfaces. Multiple values can be provided separated by a comma, for example `ALLOW_ORIGINS=orig1.com,orig2.com`.
## Inference behavior
**`CLASS_AGNOSTIC_NMS`**: boolean (default `False`). Sets the default non-maximum suppression (NMS) behavior for detection models (object detection, instance segmentation, and similar). When `True`, NMS is class agnostic, so overlapping detections from different classes may be removed based on the IoU threshold. When `False`, only overlapping detections from the same class are considered for removal.
**`MAX_CANDIDATES`**: integer (default `3000`). The maximum number of candidates for detection.
**`MAX_DETECTIONS`**: integer (default `300`). The maximum number of detections returned by a model.
**`FIX_BATCH_SIZE`**: boolean (default `False`). When `True`, the batch size is fixed to the maximum batch size configured for this server.
**`MAX_ACTIVE_MODELS`**: integer (default `8`). The maximum number of models the internal model manager keeps in memory at one time. By default the model queue removes the least recently accessed model when making space for a new one.
**`NUM_WORKERS`**: integer (default `1`). The number of workers used by HTTP interfaces.
## CLIP model options
**`CLIP_VERSION_ID`**: string (default `ViT-B-16`). Sets the OpenAI CLIP version used by all `/clip` routes. Available versions are `RN101`, `RN50`, `RN50x16`, `RN50x4`, `RN50x64`, `ViT-B-16`, `ViT-B-32`, `ViT-L-14-336px`, and `ViT-L-14`.
**`CLIP_MAX_BATCH_SIZE`**: integer (default `8`). Sets the max batch size accepted by the CLIP model inference functions.
## Model cache
**`MODEL_CACHE_DIR`**: string (default `/tmp/cache`). Sets the container path for the root model cache directory.
**`TENSORRT_CACHE_PATH`**: string (default: the value of `MODEL_CACHE_DIR`). Sets the container path to the TensorRT cache directory. Setting this path together with a mounted host volume reduces the cold start time of TensorRT-based servers.
### Persistent model cache
By default model weights are stored inside the container at `/tmp/cache` and are **lost on container restart or system reboot**. For production deployments, mount a persistent host volume to preserve downloaded weights:
```bash
# Create a persistent cache directory on the host
mkdir -p /var/lib/roboflow/cache
# Run the container with a persistent cache
docker run -d \
-p 9001:9001 \
-v /var/lib/roboflow/cache:/tmp/cache \
-e MODEL_CACHE_DIR=/tmp/cache \
roboflow/roboflow-inference-server-cpu:latest
```
Things to keep in mind:
* The host path should be on persistent storage, not in `/tmp`.
* The mounted directory needs appropriate permissions for the container user (typically UID 1000 or root, depending on the image).
* A persistent cache lets you pre-populate weights before deployment and keeps them across container updates.
See [Offline weights download](https://docs.roboflow.com/reference/inference/inference-python/offline-weights) for more on pre-downloading and caching weights.
## HTTPS / TLS
**`ENABLE_HTTPS`**: boolean (default `False`). When set, the Inference Server serves traffic over HTTPS instead of HTTP, reading the certificate and private key from `SSL_CERTFILE` and `SSL_KEYFILE`.
**`SSL_CERTFILE`**: string (default `/etc/inference/certs/server.crt`) and **`SSL_KEYFILE`**: string (default `/etc/inference/certs/server.key`). Paths to the PEM-encoded certificate and private key inside the container. The defaults are convenient mount points, so usually you only need to bind your cert and key into `/etc/inference/certs/` and set `ENABLE_HTTPS=true`.
**`SSL_KEYFILE_PASSWORD`**: string (optional). Set this if your private key is encrypted.
**`SSL_CA_CERTS`**: string (optional). Set this to a CA bundle when you need client certificate verification (mTLS).
Full walkthrough with self-signed certificates: [Serving Inference over HTTPS](/deployment/self-hosted/inference-server/configuration/https).
## Secure Gateway
**`SECURE_GATEWAY`**: string (default unset). Sets the address of a [Roboflow Secure Gateway](/deployment/self-hosted/enterprise/secure-gateway) for air-gapped deployments. Roboflow API and model download traffic is routed through this proxy. Traffic that cannot be proxied is disabled or rerouted as follows:
* The Inference version check (which calls `api.github.com`) is force-disabled: `DISABLE_VERSION_CHECK` is set to `True` even if explicitly configured otherwise.
* If `WORKFLOWS_STEP_EXECUTION_MODE=remote` is combined with `WORKFLOWS_REMOTE_API_TARGET=hosted`, step execution falls back to `local` with a warning, because the hosted Roboflow inference endpoints cannot be reached through the gateway proxy. To keep remote execution, use `WORKFLOWS_REMOTE_API_TARGET=self-hosted` **and** point `LOCAL_INFERENCE_API_URL` (default `http://127.0.0.1:9001`) at an Inference server reachable inside the gateway perimeter.
* Third-party integrations (Google Vision and Gemini direct-key paths, Stability AI, Twilio media upload, webhooks to external hosts) are not proxied and will fail unless the gateway network permits them.
The legacy `LICENSE_SERVER` environment variable is still accepted but deprecated.
# Inference Server Environment Variables
Environment variables that control a self-hosted Roboflow Inference server - execution providers, caching, Workflows, Roboflow API retries, telemetry, HTTPS, and security.
Inference server behavior is controlled by a set of environment variables. Every variable is defined in [`inference/core/env.py`](https://github.com/roboflow/inference/blob/main/inference/core/env.py); the ones below are the variables that need more explanation.
Pass them to the container with `-e` (see [Docker configuration options](/deployment/self-hosted/inference-server/configuration/docker-configuration) for the most commonly changed settings):
```bash
docker run -it --rm -e ENV_VAR_NAME=env_var_value -p 9001:9001 roboflow/roboflow-inference-server-cpu:latest
```
{% hint style="info" %}
These variables configure the **Inference server**. The Roboflow CLI and Python SDK read a different, smaller set of variables (`ROBOFLOW_API_KEY`, `ROBOFLOW_CONFIG_DIR`, and others): see [Environment Variables](https://docs.roboflow.com/reference/environment-variables) in the Reference section.
{% endhint %}
## Execution and models
| Variable | Description | Default |
| --------------------------------- | ----------------------------------------------------------------------------------------------------------------------------------- | ------------------------------------------------------------------------------------- |
| `ONNXRUNTIME_EXECUTION_PROVIDERS` | List of execution providers in priority order. A warning is displayed if a provider is not supported on your platform. | See [`env.py`](https://github.com/roboflow/inference/blob/main/inference/core/env.py) |
| `RUNS_ON_JETSON` | Whether Inference runs on a Jetson device. Set to `True` in all Docker builds for the Jetson architecture. | `False` |
| `MODEL_VALIDATION_DISABLED` | Makes model loading faster by skipping the trial inference. | `False` |
| `SAM2_MAX_EMBEDDING_CACHE_SIZE` | Number of SAM2 embeddings held in GPU memory. Each embedding takes 16777216 bytes. | `100` |
| `SAM2_MAX_LOGITS_CACHE_SIZE` | Number of SAM2 logits held in CPU memory. Each logit takes 262144 bytes. | `1000` |
| `DISABLE_SAM2_LOGITS_CACHE` | Disables caching of SAM2 logits. Useful for debugging or to minimize memory usage, at the cost of slower repeated similar requests. | `False` |
## `inference-models` backend
| Variable | Description | Default |
| --------------------------------------------------- | ---------------------------------------------------------------------------------------------------------------------------------------------------------------------------------------------------------------------------------------------------------------------------------------------------------------------------------------------------------------------------------------------------------------------------------------------------------------------------------------------------------------------------------------------------------------------------------------------------------- | ------- |
| `USE_INFERENCE_MODELS` | Selects the `inference-models` backend. | `False` |
| `MAX_INFERENCE_MODELS_CACHE_SIZE_MB` | Enables the `inference-models` cache watchdog. When set above `0`, the watchdog prunes model artifacts (oldest and biggest first) to prevent the system running out of disk space over time. Only applies when `USE_INFERENCE_MODELS=True`. | `-1` |
| `INFERENCE_MODELS_CACHE_WATCHDOG_INTERVAL_MINUTES` | Frequency of `inference-models` cache watchdog cycles. The minimum is 15 minutes. | `60` |
| `ENABLE_CUDA_MEMORY_RECLAMATION_WATCHDOG` | Enables a background daemon that periodically returns cached-but-unused CUDA memory to the driver via `torch.cuda.empty_cache()`. PyTorch's caching allocator retains freed device blocks in its own pool and never releases them on its own, so on a long-running server the high-water mark of concurrent or batched inference is sticky and reserved VRAM only grows. This watchdog reclaims that slack on a fixed interval; live allocations are untouched. It does not prevent an OOM caused by a genuinely oversubscribed concurrent peak. Only meaningful with `USE_INFERENCE_MODELS=True` on CUDA. | `False` |
| `CUDA_MEMORY_RECLAMATION_WATCHDOG_INTERVAL_SECONDS` | Interval between reclamation cycles of the CUDA memory watchdog. The minimum is `5` seconds (lower values are clamped up). Only applies when `ENABLE_CUDA_MEMORY_RECLAMATION_WATCHDOG=True`. | `300` |
## Workflows and video
| Variable | Description | Default |
| ----------------------------------- | ----------------------------------------------------------------------------------------------------------------------------------------------------------------------------------------------------- | -------------------------------------- |
| `ENABLE_WORKFLOWS_PROFILING` | Allows the server to return Workflows profiler traces to the client. | `False` |
| `WORKFLOWS_PROFILER_BUFFER_SIZE` | Size of the profiler buffer: the number of consecutive Workflows Execution Engine `run(...)` invocations traced in the buffer. | `64` |
| `WORKFLOWS_DEFINITION_CACHE_EXPIRY` | Number of seconds to cache Workflow definitions returned by `get_workflow_specification(...)`. | `900` (15 minutes) |
| `ENABLE_STREAM_API` | Enables the video management API. The standard CPU, GPU, and TensorRT images set this to `True`, as do the JetPack 5.1.1 and 6.2.0 images; slim images and the JetPack 6.0.0 and 7.1.0 images do not. | `False` outside the images that set it |
| `STREAM_API_PRELOADED_PROCESSES` | How many idle video workers are warmed up. This reduces worker start time on GPU. | `0` |
## GPU tensor pipeline
On a capable NVIDIA GPU, Workflows can keep image data on the GPU from video decode through model inference to output, instead of moving it through the CPU. This lowers latency for GPU-heavy video Workflows. It needs `USE_INFERENCE_MODELS=True`, a GPU with compute capability 7.5 or higher (ex: T4, RTX 20-series and newer; not V100), and the `onnx.gpu` or Jetson Docker image. Without a matching GPU and image, Inference falls back to normal CPU-based execution.
| Variable | Description | Default |
| ----------------------------------------- | ------------------------------------------------------------------------------------------------------------------- | ------------------------------------------------------- |
| `ENABLE_TENSOR_DATA_REPRESENTATION` | Turns on the GPU tensor pipeline: GPU-resident Workflows execution and hardware-accelerated (NVDEC) video decoding. | `False` |
| `WORKFLOWS_IMAGE_TENSOR_DEVICE` | Torch device Workflow tensors are placed on when the tensor pipeline is enabled. | `cuda` if available, else `cpu` |
| `VIDEO_SOURCE_BUFFER_SIZE` | Number of decoded frames buffered per video source. | `8` when the tensor pipeline is enabled, `64` otherwise |
| `VIDEO_SOURCE_ADAPTIVE_BACKPRESSURE` | Drops buffered frames based on buffer state instead of estimated frame rate. | Matches `ENABLE_TENSOR_DATA_REPRESENTATION` |
| `WORKFLOWS_ENFORCE_DENSE_INSTANCE_MASKS` | Returns dense instance segmentation masks instead of RLE-encoded ones from tensor pipeline models. | `False` |
| `WORKFLOWS_SAM_VIDEO_MASK_REPRESENTATION` | Mask format (`rle` or `dense`) used by SAM video tracking blocks in the tensor pipeline. | `rle` |
| `DISABLE_GSTREAMER_VIDEO_SOURCES` | Disables GStreamer-based video sources, forcing standard CPU decoding. | `False` |
## Roboflow API connectivity
| Variable | Description | Default |
| ---------------------------------------------- | --------------------------------------------------------------------------------------------------------------------------------------------------------------------------------------------------------------------------------------------------------------------------------------------------------------------------------------------------------------------------------------------------------------------------------------------------------------------------------------------- | ----------------------- |
| `TRANSIENT_ROBOFLOW_API_ERRORS` | Comma-separated list of HTTP codes from the Roboflow API that should be retried (GET endpoints only). | Not set |
| `TRANSIENT_ROBOFLOW_API_ERRORS_RETRIES` | Number of times transient errors (connection errors and transient HTTP codes) are retried (GET endpoints only). | `3` |
| `TRANSIENT_ROBOFLOW_API_ERRORS_RETRY_INTERVAL` | Delay between retries of transient Roboflow API errors (GET endpoints only). | `3` |
| `RETRY_CONNECTION_ERRORS_TO_ROBOFLOW_API` | Whether connection errors to the Roboflow API should be retried (GET endpoints only). | `False` |
| `ROBOFLOW_API_REQUEST_TIMEOUT` | Timeout in seconds (integer) for requests to the Roboflow API. | Not set |
| `API_PROXY_BASE_URL` | Base URL used for Roboflow API proxy requests to `apiproxy/*` endpoints. Set this to a direct heavy-API Cloud Run service root to bypass Firebase Hosting timeouts for long-running third-party proxy calls. | Value of `API_BASE_URL` |
| `DISABLE_VERSION_CHECK` | Disables the Inference version check that runs in a background thread. Force-set to `True` (overriding an explicit `False`) when `SECURE_GATEWAY` is configured, because `api.github.com` is unreachable behind the gateway. | `False` |
| `SECURE_GATEWAY` | Address of a [Roboflow Secure Gateway](/deployment/self-hosted/enterprise/secure-gateway) for air-gapped deployments (legacy alias: `LICENSE_SERVER`). Routes Roboflow API and model download traffic through the gateway proxy, force-disables the version check, and falls back to local Workflow step execution when `remote` plus `hosted` is configured. See [Docker configuration options](/deployment/self-hosted/inference-server/configuration/docker-configuration#secure-gateway). | Not set |
## Monitoring and telemetry
| Variable | Description | Default |
| -------------------------------- | ------------------------------------------------------------------------------------------------------------------------------------------------------------------------------------------------------------------------------------------------------- | -------------------------------- |
| `ENABLE_PROMETHEUS` | Enables the Prometheus `/metrics` endpoint. See [Telemetry](/deployment/self-hosted/inference-server/configuration/telemetry). | `True` for the Docker Hub images |
| `DOCKER_SOCKET_PATH` | Path to the Docker daemon socket mounted into the container. When provided, enables polling Docker container stats from the daemon socket. See [Telemetry](/deployment/self-hosted/inference-server/configuration/telemetry#docker-container-metrics). | Not set |
| `METRICS_ENABLED` | Controls Roboflow [Model Monitoring](/deployment/monitoring-and-analytics/model-monitoring). | `True` |
| `MODEL_MONITORING_CACHE_BACKEND` | Cache backend for model-monitoring pingback data. Use `default` to follow the normal cache selection (Redis when `REDIS_HOST` is configured, otherwise memory), or `memory` to force process-local buffering and keep Redis off the inference hot path. | `default` |
## HTTPS
| Variable | Description | Default |
| ---------------------- | ------------------------------------------------------------------------------------------------------------------------------------------------------------------------------------------------------------------------------------- | --------------------------------- |
| `ENABLE_HTTPS` | Toggles HTTPS for the Inference server. When `True`, the server reads `SSL_CERTFILE` and `SSL_KEYFILE` and serves traffic over TLS. See [Serving Inference over HTTPS](/deployment/self-hosted/inference-server/configuration/https). | `False` |
| `SSL_CERTFILE` | Path to a PEM-encoded TLS certificate served when `ENABLE_HTTPS=True`. | `/etc/inference/certs/server.crt` |
| `SSL_KEYFILE` | Path to the PEM-encoded TLS private key paired with `SSL_CERTFILE`. | `/etc/inference/certs/server.key` |
| `SSL_KEYFILE_PASSWORD` | Passphrase used to decrypt `SSL_KEYFILE` when the private key is encrypted. | Not set |
| `SSL_CA_CERTS` | Path to a CA bundle used when client certificate verification (mTLS) is required. | Not set |
## Authentication and input security
| Variable | Description | Default |
| --------------------------------------------- | ----------------------------------------------------------------------------------------------------------------------------------------------------------------------------------------------------------------------------------------------------- | ------- |
| `WORKSPACES_WHITELISTED_FOR_LOCAL_DEPLOYMENT` | Comma-separated list of Roboflow workspace URL slugs allowed to execute requests against this server. When set, every request (apart from the docs, landing page, and health, liveness, and metrics endpoints) is authorized with a Roboflow API key. | Not set |
Variables that control custom Python execution and URL image fetching (`ALLOW_CUSTOM_PYTHON_EXECUTION_IN_WORKFLOWS`, `ALLOW_URL_INPUT`, `ALLOW_URL_TO_NON_GLOBAL_ADDRESSES`, `VALIDATE_IMAGE_URL_REDIRECTS`, and others) are documented in [Securing a Self-Hosted Server](/deployment/self-hosted/inference-server/configuration/security) and [Accepted Input Formats](/deployment/self-hosted/inference-server/configuration/input-formats).
# Securing a Self-Hosted Server
Secure a self-hosted Roboflow Inference server with network isolation, authentication, TLS, custom Python restrictions, and SSRF controls on URL image input.
When you run Inference on your own hardware, **you own its security posture**. A locally deployed server does not enforce authentication, encryption, or network restrictions by default: it is built to be easy to start, not to be safe to expose. Out of the box it answers any request that reaches it, including requests to run models and execute Workflows.
This page covers the five controls every self-hosted deployment should review before it handles anything beyond local development traffic. They are complementary, so apply as many as your environment allows.
{% hint style="warning" %}
**This is your responsibility.** Roboflow secures the managed [Serverless Cloud API](/deployment/roboflow-cloud/serverless-api) and [Dedicated Deployment](/deployment/roboflow-cloud/dedicated-deployments) offerings. For a server you run yourself, securing the host, the network around it, and the credentials it accepts is your responsibility. If your server is reachable from an untrusted network without the controls below, treat it as open to the world.
{% endhint %}
## 1. Restrict network access
The single most effective control is to not expose the server in the first place. Inference listens on port `9001` by default and has no concept of a "trusted" network: anything that can reach the port can use it.
* **Bind to localhost** when only processes on the same host need it, for example publish the container port as `127.0.0.1:9001:9001` instead of `9001:9001`.
* **Keep it on a private network or VPC** and reach it through a VPN, SSH tunnel, or service mesh rather than a public IP.
* **Use host and cloud firewalls or security groups** to allow port `9001` only from the specific clients that need it.
* **Put a reverse proxy in front of it** (nginx, Traefik, Caddy, or a cloud load balancer) if you need to expose it more broadly. That gives you a single place to add TLS, rate limiting, and access logging.
Never publish the inference port directly to the public internet without authentication and TLS in place.
## 2. Enforce authentication
By default a self-hosted server does **not** require an API key to make requests. Beyond the authentication that happens at the Roboflow API level when fetching data from the platform, there is no additional security on the server itself. To turn on authentication, set `WORKSPACES_WHITELISTED_FOR_LOCAL_DEPLOYMENT` to a comma-separated list of the Roboflow workspace slugs allowed to use the server:
```bash
docker run --rm -p 9001:9001 \
-e WORKSPACES_WHITELISTED_FOR_LOCAL_DEPLOYMENT=your-workspace-url-slug,another-workspace-url-slug \
roboflow/roboflow-inference-server-cpu:latest
```
With this set, the server installs an authorization middleware. Every inference and Workflow request must carry an `api_key` (as a query parameter or in the JSON body) that resolves, via Roboflow, to one of the whitelisted workspaces. Requests with a missing, invalid, or non-whitelisted key are rejected with `401 Unauthorized`.
{% hint style="info" %}
**What is not covered by the API-key check.** A small set of unauthenticated endpoints stay open so the server remains usable and observable: `/`, `/docs`, `/redoc`, `/info`, `/healthz`, `/readiness`, `/metrics`, `/openapi.json`, and static assets (`/static/...`, `/_next/...`). Treat `/info` and `/metrics` as information that anyone who can reach the server can read, and rely on network restrictions (control 1) to limit who that is.
{% endhint %}
**Bring your own auth.** The built-in check ties authorization to Roboflow workspaces. If you have your own identity model, place a reverse proxy or authentication middleware in front of the server, enforcing OAuth/OIDC, mTLS, signed headers, an API gateway, or whatever your organization already uses, and let only authenticated traffic through to port `9001`. The two approaches can be combined.
## 3. Enable TLS when the network requires it
The built-in API-key check sends credentials in the request. If those requests travel over any network you do not fully control, the connection must be encrypted, otherwise keys and payloads are exposed in plaintext.
You have two options:
* **Terminate TLS at a reverse proxy or load balancer** in front of the server. This is the usual choice when you already run one.
* **Serve HTTPS directly from the server** by mounting a certificate and key and setting `ENABLE_HTTPS=true`. See [Serving Inference over HTTPS](/deployment/self-hosted/inference-server/configuration/https) for the full guide, including mutual TLS (client certificates) via `SSL_CA_CERTS`.
For purely local, loopback-only traffic (control 1, bound to `127.0.0.1`) TLS is optional. Any time requests leave the host over an untrusted network, TLS is required.
## 4. Disable custom Python execution in Workflows
Workflows can contain **Custom Python blocks**: arbitrary Python that runs inside the server process. This is a powerful feature, but it means anyone who can submit a Workflow to the server can run arbitrary code on your host. On a server reachable by untrusted clients, that is remote code execution.
This is controlled by `ALLOW_CUSTOM_PYTHON_EXECUTION_IN_WORKFLOWS`.
| Setting | Effect |
| ------------------------ | -------------------------------------------------------------------------- |
| `True` (current default) | Workflows may define and run custom Python blocks. |
| `False` | Custom Python blocks are rejected; all other Workflow features still work. |
If your Workflows do not rely on custom Python, set it to `False`:
```bash
docker run --rm -p 9001:9001 \
-e ALLOW_CUSTOM_PYTHON_EXECUTION_IN_WORKFLOWS=false \
roboflow/roboflow-inference-server-cpu:latest
```
{% hint style="warning" %}
**The default is changing on 2026-06-19.** Today this flag defaults to `True` for backward compatibility. On 2026-06-19 the default changes to `False`. If your Workflows depend on custom Python blocks, set `ALLOW_CUSTOM_PYTHON_EXECUTION_IN_WORKFLOWS=true` explicitly so they keep working after that date. Otherwise leave it disabled, and prefer enabling it only on deployments where the network and authentication controls above are already in place.
{% endhint %}
## 5. Restrict image fetching from URLs (SSRF)
Inference can load images straight from a URL supplied in the request (`{"image": {"type": "url", "value": "https://..."}}`). Any time a server fetches a URL that a caller controls, the caller can try to steer it into making requests on their behalf, a class of attack called **server-side request forgery (SSRF)**. Someone who cannot reach your internal network directly can ask your server to fetch, for example:
* `http://169.254.169.254/latest/meta-data/`, the cloud metadata service (AWS, GCP, Azure), which can hand back instance credentials.
* `http://127.0.0.1:9001/...` and other localhost services: admin panels, databases, or the Inference server's own unauthenticated endpoints.
* `http://10.0.0.5/`, `http://192.168.1.1/`, and other private (RFC1918), link-local, CGNAT, or IPv6 ULA hosts that sit behind your perimeter.
A public-looking hostname is not proof of a public target: it may resolve to a private IP, redirect to one, or use **DNS rebinding** (resolve to a public IP for the validation check, then a private IP for the actual connection). Inference ships controls for all of these.
### Turn URL input off if you don't need it
The strongest control is to not accept URL images at all. If your clients always send images as base64 or file uploads, disable URL fetching outright:
```bash
docker run --rm -p 9001:9001 \
-e ALLOW_URL_INPUT=false \
roboflow/roboflow-inference-server-cpu:latest
```
### Harden URL input when you do need it
When URL images are required, these flags narrow what the server is allowed to fetch. Together they reject internal targets, **pin the connection to the validated IP** (defeating DNS rebinding), and re-check every redirect hop.
| Variable | Default | Effect |
| ---------------------------------------- | ------- | ------------------------------------------------------------------------------------------------------------------------------------------------------------------------------------------------------------------------------------------------- |
| `ALLOW_URL_INPUT` | `True` | Master switch for URL image input. `False` rejects all URL images. |
| `ALLOW_URL_TO_NON_GLOBAL_ADDRESSES` | `True` | When `False`, a URL whose host resolves to a non-global address (loopback, private, link-local/metadata, CGNAT, IPv6 ULA, and so on) is rejected, and the connection is pinned to the validated IP so a second DNS answer cannot swap the target. |
| `VALIDATE_IMAGE_URL_REDIRECTS` | `False` | When `True`, redirects are followed one hop at a time and each hop URL is re-validated, instead of being followed blindly. |
| `MAX_IMAGE_URL_REDIRECTS` | `30` | Hard cap on redirect hops, enforced regardless of the flag above. |
| `ALLOW_NON_HTTPS_URL_INPUT` | `False` | When `False`, only `https://` URLs are accepted. |
| `ALLOW_URL_INPUT_WITHOUT_FQDN` | `False` | When `False`, URLs whose host is a bare IP or has no public suffix are rejected, so callers must use a real domain name. |
| `WHITELISTED_DESTINATIONS_FOR_URL_INPUT` | unset | Comma-separated allow-list of destinations (`subdomain.domain.suffix`). When set, only these are permitted. |
| `BLACKLISTED_DESTINATIONS_FOR_URL_INPUT` | unset | Comma-separated block-list of destinations that are always rejected. |
A hardened configuration that still allows public HTTPS image URLs:
```bash
docker run --rm -p 9001:9001 \
-e ALLOW_URL_TO_NON_GLOBAL_ADDRESSES=false \
-e VALIDATE_IMAGE_URL_REDIRECTS=true \
roboflow/roboflow-inference-server-cpu:latest
```
For the tightest control, add an allow-list so the server can only reach the exact hosts you serve images from:
```bash
docker run --rm -p 9001:9001 \
-e ALLOW_URL_TO_NON_GLOBAL_ADDRESSES=false \
-e VALIDATE_IMAGE_URL_REDIRECTS=true \
-e WHITELISTED_DESTINATIONS_FOR_URL_INPUT=images.example.com,cdn.example.com \
roboflow/roboflow-inference-server-cpu:latest
```
{% hint style="warning" %}
**Two defaults are changing in Q4 2026.** `ALLOW_URL_TO_NON_GLOBAL_ADDRESSES` (to `False`) and `VALIDATE_IMAGE_URL_REDIRECTS` (to `True`) currently default to the legacy, permissive behavior for backward compatibility. Both defaults are scheduled to flip to the secure values in Q4 2026. Set them explicitly now, to the secure values to opt in early or to the legacy values if a Workflow genuinely depends on fetching internal URLs, so the change does not surprise you.
{% endhint %}
{% hint style="info" %}
**Proxies bypass this protection.** If an HTTP(S) proxy is configured for the server, the proxy (not Inference) resolves the destination, so non-global blocking and connection pinning cannot be enforced. The server emits a warning when it detects this. Restrict what the proxy itself can reach if you rely on these controls.
{% endhint %}
{% hint style="info" %}
**Same controls in the Python SDK.** The `inference-sdk` client applies the same URL policy and SSRF protections, and reads the same environment variables, when it loads images from URLs, so a client that hydrates URL images before sending them is covered too.
{% endhint %}
## Recommended baseline
For any self-hosted server that is reachable beyond `localhost`:
* Network access restricted to known clients (firewall, private network, or proxy).
* `WORKSPACES_WHITELISTED_FOR_LOCAL_DEPLOYMENT` set, or your own auth in front.
* TLS terminated at the server or an upstream proxy.
* `ALLOW_CUSTOM_PYTHON_EXECUTION_IN_WORKFLOWS=false` unless you genuinely need it.
* URL image input disabled (`ALLOW_URL_INPUT=false`), or hardened with `ALLOW_URL_TO_NON_GLOBAL_ADDRESSES=false` and `VALIDATE_IMAGE_URL_REDIRECTS=true`, plus an allow-list where you can.
See also [Accepted Input Formats](/deployment/self-hosted/inference-server/configuration/input-formats) for the pickled-numpy input control, and the [Production Readiness Checklist](/deployment/production-checklist) for error handling and rate limits.
# Serving Inference over HTTPS
Serve a self-hosted Roboflow Inference server over HTTPS with your own TLS certificate, custom cert paths, encrypted keys, and mutual TLS.
The Inference server can serve HTTPS directly when you provide your own TLS certificate and private key. This is useful for self-hosted deployments where you cannot place a TLS-terminating reverse proxy in front of the container.
HTTPS is configured entirely through environment variables.
## Environment variables
| Variable | Description | Default |
| ---------------------- | ------------------------------------------------------------ | --------------------------------- |
| `ENABLE_HTTPS` | Master switch. Set to `True`, `1`, or `yes` to enable HTTPS. | `False` |
| `SSL_CERTFILE` | Path inside the container to the PEM-encoded certificate. | `/etc/inference/certs/server.crt` |
| `SSL_KEYFILE` | Path inside the container to the PEM-encoded private key. | `/etc/inference/certs/server.key` |
| `SSL_KEYFILE_PASSWORD` | Passphrase for an encrypted private key. | unset |
| `SSL_CA_CERTS` | CA bundle used to verify client certificates (mTLS). | unset |
The cert and key paths default to `/etc/inference/certs/...`, so the simplest deployment only needs to mount your cert and key at those paths and set `ENABLE_HTTPS=true`.
If `ENABLE_HTTPS` is set but the cert or key is missing, the server refuses to start with an error listing the paths it tried to read.
## Quickstart with self-signed certs
The example below runs the CPU image on `https://localhost:9001` using a self-signed certificate. Replace the cert generation step with your own CA-issued certificate in production.
```bash
# 1. Generate a self-signed cert/key pair valid for localhost
mkdir -p /tmp/inference-certs
openssl req -x509 -newkey rsa:2048 -nodes \
-keyout /tmp/inference-certs/server.key \
-out /tmp/inference-certs/server.crt \
-days 365 \
-subj "/CN=localhost" \
-addext "subjectAltName=DNS:localhost,IP:127.0.0.1"
# 2. Run the inference server with HTTPS enabled
docker run --rm -p 9001:9001 \
-e ENABLE_HTTPS=true \
-v /tmp/inference-certs:/etc/inference/certs:ro \
roboflow/roboflow-inference-server-cpu:latest
# 3. Validate from another shell
curl -sk https://localhost:9001/info
```
`-k` (or `--insecure`) is only required because the cert is self-signed; clients that trust your CA do not need it.
## Custom cert paths
If your certs live somewhere other than the defaults, set the paths explicitly:
```bash
docker run --rm -p 9001:9001 \
-e ENABLE_HTTPS=true \
-e SSL_CERTFILE=/run/secrets/tls/fullchain.pem \
-e SSL_KEYFILE=/run/secrets/tls/privkey.pem \
-v /etc/letsencrypt/live/inference.example.com:/run/secrets/tls:ro \
roboflow/roboflow-inference-server-cpu:latest
```
## Encrypted private keys
When the key file is encrypted, supply the passphrase via `SSL_KEYFILE_PASSWORD`. Prefer Docker secrets or another secret store over baking the value into the image.
## Mutual TLS (client certs)
Set `SSL_CA_CERTS` to a CA bundle that should be used to verify client certificates. Only clients presenting a certificate signed by one of the listed CAs are allowed.
TLS is one of five controls covered in [Securing a Self-Hosted Server](/deployment/self-hosted/inference-server/configuration/security); review the rest before exposing the server beyond localhost.
# Accepted Input Formats
Input formats accepted by a self-hosted Roboflow Inference server, and how to disable the less secure ones such as pickled numpy payloads and URL image fetching.
## Why this matters
The Inference server is designed to be straightforward to integrate, which is why some convenient but potentially less secure data loading methods are available. For production deployments, configuration options let you disable those behaviors.
This page explains how to configure the server to either harden it or enable more flexible behavior, depending on your needs.
## Deserialization of pickled numpy objects
One way to send requests to the Inference server is with serialized numpy objects:
```python
import cv2
import pickle
import requests
image = cv2.imread("...")
img_str = pickle.dumps(image)
infer_payload = {
"model_id": "{project_id}/{model_version}",
"image": {
"type": "numpy",
"value": img_str,
},
}
res = requests.post(
"http://localhost:9001/infer/{task}",
headers={"Authorization": "Bearer YOUR_API_KEY"},
json=infer_payload,
)
```
Starting with version `v0.14.0`, deserialization of this payload type is disabled by default. You can enable it by setting `ALLOW_NUMPY_INPUT=True`. See the [Inference CLI](https://docs.roboflow.com/reference/inference/inference-cli/server) docs for how to run the server with that flag. This option is **not available in Roboflow's hosted APIs**.
{% hint style="warning" %}
Do not enable this option in production if the server is open to requests from the open internet, or is not locked down to accept only authenticated requests from your workspace's API key.
{% endhint %}
## Sending URLs to inference images
Fetching images from URLs is convenient, but it can expose the server to [server-side request forgery (SSRF) attacks](https://en.wikipedia.org/wiki/Server-side_request_forgery):
```python
import requests
infer_payload = {
"model_id": "{project_id}/{model_version}",
"image": {
"type": "url",
"value": "https://some.com/image.jpg",
},
}
res = requests.post(
"http://localhost:9001/infer/{task}",
headers={"Authorization": "Bearer YOUR_API_KEY"},
json=infer_payload,
)
```
This option is **enabled by default**. We recommend configuring the server with one or more of these environment variables:
* `ALLOW_URL_INPUT` - set to `False` to reject image URLs of any kind. Default: `True`.
* `ALLOW_NON_HTTPS_URL_INPUT` - set to `False` to only allow the HTTPS protocol in URLs. Default: `False`.
* `ALLOW_URL_INPUT_WITHOUT_FQDN` - set to `False` to enforce fully qualified domain names only and reject URLs based on IPs. Default: `False`.
* `WHITELISTED_DESTINATIONS_FOR_URL_INPUT` - comma-separated list of allowed destinations for URL requests, for example `WHITELISTED_DESTINATIONS_FOR_URL_INPUT=192.168.0.15,some.site.com`. URLs pointing elsewhere are rejected.
* `BLACKLISTED_DESTINATIONS_FOR_URL_INPUT` - comma-separated list of forbidden destinations for URL requests.
* `ALLOW_LOADING_IMAGES_FROM_LOCAL_FILESYSTEM` - set to `False` to disable local filesystem access to images. Default: `True`.
* `ALLOW_URL_TO_NON_GLOBAL_ADDRESSES` - set to `False` to reject URLs whose host resolves to a non-global address (loopback, private/RFC1918, link-local and cloud metadata `169.254.169.254`, CGNAT, IPv6 ULA) and pin the connection to the validated IP so DNS rebinding cannot swap the target. Default: `True` (scheduled to change to `False` in Q4 2026).
* `VALIDATE_IMAGE_URL_REDIRECTS` - set to `True` to follow redirects one hop at a time and re-validate every hop URL (scheme, FQDN, allow-list, block-list, non-global address) instead of letting the client follow redirects blindly. Default: `False` (scheduled to change to `True` in Q4 2026).
* `MAX_IMAGE_URL_REDIRECTS` - hard cap on the number of redirect hops allowed when fetching a URL image, enforced regardless of `VALIDATE_IMAGE_URL_REDIRECTS`. Default: `30`.
See [Securing a Self-Hosted Server](/deployment/self-hosted/inference-server/configuration/security) for a fuller explanation of the SSRF controls and recommended configurations, and the [Inference CLI](https://docs.roboflow.com/reference/inference/inference-cli/server) docs for running the server with specific flags.
# Inference Server Telemetry
Monitor a self-hosted Roboflow Inference server with Prometheus metrics and Docker container statistics.
Service telemetry provides real-time data on system health, performance, and usage. It enables:
* **Monitoring and diagnostics:** early detection of issues for quick resolution.
* **Performance optimization:** identifying bottlenecks to improve efficiency.
* **Usage insights:** understanding user behavior to guide improvements.
* **Security:** detecting suspicious activity and ensuring compliance.
* **Scalability:** predicting and managing resource demands.
The Inference server exposes two sources of telemetry:
* [Prometheus](https://prometheus.io/) metrics
* Docker container metrics provided by the Docker daemon
## Prometheus metrics
To enable metrics, set the environment variable `ENABLE_PROMETHEUS=True` on your container:
```bash
docker run -p 9001:9001 -e ENABLE_PROMETHEUS=True roboflow/roboflow-inference-server-cpu
```
Then use the `GET /metrics` endpoint to fetch the metrics in Python:
```python
import requests
result = requests.get("http://127.0.0.1:9001/metrics")
result.raise_for_status()
print(result.text)
```
or with curl:
```bash
curl http://127.0.0.1:9001/metrics
```
{% hint style="info" %}
`/metrics` is one of the endpoints that stays unauthenticated even when [API-key authentication](/deployment/self-hosted/inference-server/configuration/security#2-enforce-authentication) is enabled, so restrict network access to the server if the metrics are sensitive.
{% endhint %}
## Docker container metrics
{% hint style="warning" %}
**Potential security issue.** This feature relies on exposing the Docker daemon socket inside the container. That exposes container resource utilization metrics without needing a supervisor service, but it may be considered a security violation. It is disabled by default. Acknowledge the [potential security risks](https://www.lvh.io/posts/dont-expose-the-docker-socket-not-even-to-a-container/) before enabling it.
{% endhint %}
To expose container metrics, run the Inference server container with the Docker socket mounted:
```bash
docker run -p 9001:9001 \
-v /var/run/docker.sock:/var/run/docker.sock \
-e DOCKER_SOCKET_PATH=/var/run/docker.sock \
roboflow/roboflow-inference-server-cpu
```
* The `-v` line **mounts** the Docker daemon socket from your host (typically `/var/run/docker.sock`, but verify your setup) into the container, here also at `/var/run/docker.sock`.
* The `-e` line sets `DOCKER_SOCKET_PATH` to the location of the Docker daemon socket **inside the container**, matching the mount above.
You can then reach the `GET /device/stats` endpoint with curl:
```bash
curl http://127.0.0.1:9001/device/stats
```
or with Python:
```python
import requests
result = requests.get("http://127.0.0.1:9001/device/stats")
result.raise_for_status()
print(result.json())
```
## Model-level monitoring
For prediction-level monitoring across deployments (rather than host telemetry), see [Model Monitoring](/deployment/monitoring-and-analytics/model-monitoring). It is controlled on a self-hosted server with the `METRICS_ENABLED` and `MODEL_MONITORING_CACHE_BACKEND` [environment variables](/deployment/self-hosted/inference-server/configuration/environment-variables#monitoring-and-telemetry).
# Inference Architecture
How Roboflow Inference is architected - request routing, parallelization, microservice and appliance patterns, capabilities, and why Docker is recommended.
Inference is best run in server mode. It also supports a [native Python interface](/deployment/self-hosted/inference-library), though see [why we recommend Docker](#why-docker). You interact with it over a REST API, most often through [the Inference SDK](https://docs.roboflow.com/reference/inference/inference-sdk), or from a web browser (the [Roboflow app](https://app.roboflow.com) can optionally act as a frontend for a locally hosted Inference server).
Inference orchestrates getting predictions through a model, or a series of models, and processing the results. It multithreads automatically to parallelize workloads and efficiently use the available GPU and CPU cores, and it dynamically adapts to variable processing rates when consuming video streams so the host machine is not overloaded.
Inference talks to Roboflow services to retrieve model weights and Workflow definitions and to keep track of model results for later evaluation, but all of the computation is done locally, which means it can run offline.
One Inference server can handle multiple clients and streams.
Where Inference sits between your application, models, and the Roboflow platform
## Inference as a microservice
The most common way to use Inference is as a small part of a larger system, producing a response that is consumed by downstream code. That response sometimes represents the prediction from a model (for example a set of detections containing objects' categorization, location, and size in an image) but it can also represent the result of post-processing logic (like the pass/fail state of an inspection), an aggregation (like the count of unique objects seen over the past hour), or a visualization.
For image workloads, the input is passed in as a parameter and the response is returned synchronously.
Inference as a microservice
For video streams, the server starts a persistent video worker that runs until the session ends. Client applications receive processed frames and prediction data through WebRTC.
Inference Server video streaming
Example microservice use cases:
* Tagging user-uploaded images on a website
* Determining if a machine is set up correctly before allowing it to turn on
* Blurring faces in a video
* Detecting mismatched wiring in a finished circuit board
* Inspecting a manufactured good to ensure it matches the spec
* Validating that an object is defect and blemish free
* Counting the number of pills in an image
## Inference as an appliance
Inference can also be treated as an autonomous agent that continuously consumes and processes a video stream and performs downstream actions, such as updating a database, sending notifications, firing webhooks, or signaling hardware. In this pattern the full logic of the system is defined in a [Workflow](https://docs.roboflow.com/workflows) and the output is pushed to external systems.
Inference as an appliance
Example appliance use cases:
* Stopping a conveyor belt if a jam has occurred
* Collecting highway traffic analytics
* Flagging suspicious activity in a security camera feed
* Updating an inventory system as vehicles enter or leave a yard
* Sounding an alarm when a scrap heap overflows
* Cataloguing retail customers' wait time over the course of a day
## What the server handles for you
| Capability | What it does |
| ----------------------------- | -------------------------------------------------------------------------------------------------------------------------------------------------------------------------------------------------------------------------------------------------------------------------------- |
| **Model serving** | Runs object detection, image classification, instance segmentation, keypoint detection, image embedding, OCR, visual question answering, and more. See [supported models](https://docs.roboflow.com/models/supported-models/supported-models). |
| **Image processing** | Applies the same pre- and post-processing methods models use during training, efficiently, so accuracy is preserved without unnecessary latency. |
| **Video stream management** | Spawns separate threads to process video streams so the model always gets the most recent frame possible. |
| **Workflows** | Runs a declared computation graph that pipes and parallelizes data through models, logic, integrations, and custom code. |
| **HTTP server, SDK, and CLI** | An HTTP API for use as a microservice, plus a [Python SDK](https://docs.roboflow.com/reference/inference/inference-sdk) and [CLI](https://docs.roboflow.com/reference/inference/inference-cli) for driving it. |
| **Speed** | Automatic parallelization via multiprocessing, hardware acceleration, and dynamic batching, plus optional TensorRT quantization and device-specific layer fusion on supported GPUs. |
| **Offline cache** | Pulls down models and Workflow definitions and stores them locally so the server can operate in [offline mode](/deployment/self-hosted/enterprise/offline-mode). |
| **Insights** | Connects to the Roboflow platform to upload outlier data, expose stats and telemetry, and feed downstream data sinks. See [Model Monitoring](/deployment/monitoring-and-analytics/model-monitoring) and [Active Learning](/deployment/monitoring-and-analytics/active-learning). |
| **Portability** | Runs on macOS development machines, cloud servers, and tiny edge devices. Swap the Docker tag and the same code runs on another platform. |
| **Extensibility** | Open source under Apache 2.0. Add custom models, Workflow blocks, and backends, or use dynamic Python blocks to bridge gaps between blocks. |
## Why Docker
We highly recommend using the Docker container to run Inference. Machine learning dependencies are sensitive to minor changes in their environment; if they are not isolated into a deterministic environment, your system is likely to break when you update your operating system or drivers, update the dependencies of your application code, apply security patches, or set up a new machine. The images ensure that library versions are compatible with each other, packages are compiled to take advantage of the GPU, and security patches are applied.
Docker also gives you portability. You can decide later to serve multiple clients from a single large server, or to upgrade from a CPU to a GPU, without refactoring your application code.
The exception is hardware where a container cannot reach the accelerator, such as [MPS on macOS](/deployment/self-hosted/inference-server/install/mac), where running outside Docker is the only way to get acceleration.
# Inference Library
Run models directly in your own Python process with the inference package, with no server and no HTTP hop.
The `inference` Python package loads models and runs them inside your own process. There is no container to start and no HTTP request between your code and the model, which makes it the lowest-latency way to self-host and the simplest to embed in an existing Python application.
Use it when your application is Python and runs on the same machine as the model. If several clients, languages, or video streams need predictions, or you want models isolated from your application's dependencies, run the [Inference Server](/deployment/self-hosted/inference-server) instead. Both accept the same `model_id` values, so switching later is a small change.
## Install
```bash
pip install inference
```
If you have an NVIDIA GPU, install `inference-gpu` instead:
```bash
pip install --extra-index-url https://download.pytorch.org/whl/cu124 inference-gpu
```
Match `--extra-index-url` to the CUDA version installed in your OS: `https://download.pytorch.org/whl/cu`, for instance `https://download.pytorch.org/whl/cu130` for CUDA 13.0. GPU installation requires CUDA in the OS. See the [Linux](https://docs.nvidia.com/cuda/cuda-installation-guide-linux/) or [Windows](https://docs.nvidia.com/cuda/cuda-installation-guide-microsoft-windows/) CUDA installation guide if your environment lacks the dependencies.
Starting with `inference` 1.2.0, the new inference engine (`inference-models`) is the default. It supports several model backends, including TensorRT, and picks the fastest one available for your hardware. `inference` installs what `torch` and `onnx` models need; other backends come from package extras:
```bash
pip install inference-models[trt10]
```
On Windows, CUDA setup has extra steps: see [Install Bare Metal Inference GPU on Windows](/deployment/self-hosted/inference-library/bare-metal-gpu-windows).
## Run a model
```python
from inference import get_model
image = "https://media.roboflow.com/inference/people-walking.jpg"
model = get_model(model_id="rfdetr-small")
results = model.infer(image)
```
`get_model()` downloads and caches the model weights on first use, then runs inference locally. The `model_id` can be a pre-trained alias, your own fine-tuned model, or a Universe model: see [model IDs](/deployment/self-hosted/self-hosted#model-ids). Fine-tuned and Universe models require an [API key](https://docs.roboflow.com/reference/authentication/authentication/find-your-roboflow-api-key).
## Visualize results
Install [Supervision](https://supervision.roboflow.com) to annotate predictions:
```bash
pip install -U supervision
```
```python
import supervision as sv
from inference import get_model
image = sv.load_image_from_url("https://media.roboflow.com/inference/people-walking.jpg")
model = get_model(model_id="rfdetr-medium")
results = model.infer(image)[0]
detections = sv.Detections.from_inference(results)
annotated_image = sv.BoxAnnotator().annotate(scene=image, detections=detections)
annotated_image = sv.LabelAnnotator().annotate(scene=annotated_image, detections=detections)
sv.plot_image(annotated_image)
```
## Video and Workflows
For most video applications, run an [Inference Server](/deployment/self-hosted/inference-server) and stream a model or Workflow to it with the [Inference SDK WebRTC client](https://docs.roboflow.com/reference/inference/inference-sdk/webrtc).
If you intentionally run the Inference Library inside your Python process, `InferencePipeline` can process a webcam, RTSP camera, or video file without a server. This direct-library API gives your process access to frames, custom inference logic, and sinks. See [Inference Pipeline](https://docs.roboflow.com/reference/inference/inference-python/inference-pipeline).
## Going further
* [Inference Python Package reference](https://docs.roboflow.com/reference/inference/inference-python) - the full API surface.
* [Native Python API](https://docs.roboflow.com/reference/inference/inference-python/native-python-api) - load models and run Workflows without the server.
* [Model Weights Download](https://docs.roboflow.com/reference/inference/inference-python/offline-weights) - cache weights for offline and air-gapped hosts.
* [Inference Benchmarks](https://docs.roboflow.com/reference/inference/inference-python/benchmarks) - measured throughput by model and hardware.
# Install Bare Metal Inference GPU on Windows
Install the inference-gpu Python package with NVIDIA CUDA and cuDNN on Windows, without Docker.
{% hint style="warning" %}
We strongly recommend [installing Inference with Docker on Windows](/deployment/self-hosted/inference-server/install/windows#using-docker) instead. Use the guide below only if you cannot use Docker on your system.
{% endhint %}
You can use Inference with the `inference-gpu` package and NVIDIA CUDA on Windows. This guide walks through configuring your Windows GPU setup.
## Prerequisites
You need a machine running Windows 10 or Windows 11 with an NVIDIA GPU.
## Step 1: Install Python
Download the latest Python 3.11.x from the [Python Windows version list](https://www.python.org/downloads/windows/). Do not install the Python version from the Microsoft Store, because it is not compatible with onnxruntime.
Click the "Windows Installer (64-bit)" link and follow the instructions to install Python on the machine. When the installation finishes, run `py --version` to confirm it succeeded. You should see a message showing your Python version.
## Step 2: Install Inference GPU
In a PowerShell terminal, run:
```bash
py -m pip install --extra-index-url https://download.pytorch.org/whl/cu128 inference-gpu
```
Adjust `--extra-index-url` to the CUDA version installed in your OS: `https://download.pytorch.org/whl/cu`, for instance `https://download.pytorch.org/whl/cu130` for CUDA 13.0.
## Step 3: Install CUDA Toolkit 11.8
Next, install CUDA Toolkit 11.8 so Inference can use CUDA. [Download CUDA Toolkit](https://developer.nvidia.com/cuda-11-8-0-download-archive?target_os=Windows\&target_arch=x86_64).
From the download page, choose the correct parameters for your system, then choose "exe (Network)" and follow the link to download the toolkit.
Open the installation file and accept all defaults to install the toolkit.
## Step 4: Install cuDNN
Navigate to the [cuDNN archive on the NVIDIA website](https://developer.nvidia.com/rdp/cudnn-archive) and select "cuDNN v8.7.0 (November 28th, 2022), for CUDA 11.x". Choose the link for 11.x; the others are not compatible with your CUDA version and will fail.
Choose "Local Installer for Windows (Zip)" and download the ZIP file. You need an NVIDIA account to download the software.
Open the file in your Downloads folder, right-click, and choose "Extract All" to extract all files to the download folder.
Press Ctrl+N to open a new Explorer window and navigate to `C:\Program Files\NVIDIA GPU Computing Toolkit\CUDA\v11.8`.
Copy all `.dll` files from the `bin/` folder of the cuDNN download into the `bin/` folder of the CUDA toolkit:
Copy all `.h` files from the `include/` folder of the cuDNN download into the `include/` folder of the CUDA toolkit:
Copy the `x64` folder from the `lib/` directory of the cuDNN download into the `lib/` directory of the CUDA installation:
Right-click the Start menu and choose System, then Advanced system settings, then Environment Variables. Create a new environment variable called `CUDNN` with the value:
```
C:\Program Files\NVIDIA GPU Computing Toolkit\CUDA\v11.8;C:\Program Files\NVIDIA GPU Computing Toolkit\CUDA\v11.8\bin;C:\Program Files\NVIDIA GPU Computing Toolkit\CUDA\v11.8\include;C:\Program Files\NVIDIA GPU Computing Toolkit\CUDA\v11.8\lib;
```
## Step 5: Install zlib
Find the file `C:\Program Files\NVIDIA Corporation\Nsight Systems 2022.4.2\host-windows-x64\zlib.dll`, right-click, and choose "Copy".
Navigate to `C:\Program Files\NVIDIA GPU Computing Toolkit\CUDA\v11.8\bin`, paste the `zlib.dll` file into this folder, and rename it to `zlibwapi.dll`.
## Step 6: Install the Visual Studio 2019 C++ runtime
Install the Visual Studio 2019 C++ runtime ([download link](https://aka.ms/vs/17/release/vc_redist.x64.exe)).
## Verify the installation
Create a new file with the following contents and add your [Roboflow API key](https://docs.roboflow.com/reference/authentication/authentication/find-your-roboflow-api-key):
```python
from inference import InferencePipeline
from inference.core.interfaces.stream.sinks import render_boxes
pipeline = InferencePipeline.init(
api_key="YOUR_API_KEY",
model_id="rock-paper-scissors-sxsw/11",
video_reference="https://media.roboflow.com/rock-paper-scissors.mp4",
on_prediction=render_boxes,
)
pipeline.start()
pipeline.join()
```
Open a PowerShell terminal in the location of the file and run `py infer.py`. If the installation succeeded, you should see a few frames of annotated images displayed, with no errors or warnings in the console.
# Other SDKs
Roboflow SDKs for deploying models to web browsers, mobile, Lens Studio, Luxonis OAK, and OpenMV.
Roboflow offers several SDKs that you can use to deploy models to specific environments.
Cover image
Web Browser
Run models in the browser with inferencejs or the web inference-sdk.
# iOS SDK
Deploy your trained Roboflow model in your iOS app
The Roboflow Mobile iOS SDK is a great option if you are developing an iOS application where having a model running on the edge (iPad or iPhone) is needed for faster inference or to unlock a new suite of features, capabilities, and use cases (like augmented reality).
Native mobile applications with custom computer vision models embedded in them allows developers to give their apps the sense of sight.
## Task Support
The following task types are supported by the iOS SDK Deployment:
| Task Type | Supported by iOS SDK Deployment |
| --------------------- | ------------------------------- |
| Object Detection | ✅ |
| Classification | |
| Instance Segmentation | ✅ (iOS 18 or higher) |
| Semantic Segmentation | |
### CoreML Export Compatibility
The following model architectures support CoreML (`.mlpackage`) export for on-device deployment:
| Model | CoreML Export |
| --------------------- | ------------- |
| RF-DETR | ✅ |
| YoloLite | ✅ |
| Classification models | ✅ |
## Deploy a Model to an iOS Device
### Supported Hardware and Software
All iOS devices support on-device inference, but those older than the iPhone 8 (A11 Bionic Processor) will fall back to the less energy efficient gpu engine.
Roboflow requires a minimum iOS version of 15.4 (18.0 for instance segmentation models).
## Prototyping
You can develop against the [Roboflow Serverless Cloud API](/deployment/legacy/legacy-serverless). It uses the same trained models as on-device inference.
## Installation
* Install [CocoaPods](https://guides.cocoapods.org/using/getting-started.html) | [Troubleshooting Guide](https://guides.cocoapods.org/using/troubleshooting#installing-cocoapods)
"CocoaPods is built with Ruby and it will be installable with the default Ruby available on macOS. You can use a Ruby Version manager, however, we recommend that you use the standard Ruby available on macOS unless you know what you're doing. Using the default Ruby install will require you to use `sudo` when installing gems. (This is only an issue for the duration of the gem installation, though.)" - [CocoaPods](https://guides.cocoapods.org/using/getting-started.html)
The "Sudo-less" installation is an option, if you do not want to grant RubyGems admin privileges for this process. However, note that the `sudo` installation is more typical.
Check that CocoaPods is successfully installed by entering `pod --version` in your Terminal.
### Installing the Roboflow CocoaPod
First, run `pod init` in your project directory.
Make sure the `Podfile` specifies the `platform :ios, '15.4'`
Next, add `pod 'Roboflow'` to your `Podfile`.
If you do not have the XCode Command Line Tools installed, run `xcode-select --install` in your Terminal.
This will return: `xcode-select: error: command line tools are alreadyinstalled, use "Software Update" to install updates` if the Command Line Tools are already present on your system.
Lastly, run `pod install` and open the generated `.xcworkspace` file in [XCode](https://developer.apple.com/xcode/).


* If it returns this error: "You may have encountered a bug in the Ruby interpreter or extension libraries," then first run `brew install cocoapods`, and then run `pod install` and open the generated `.xcworkspace` file in XCode.
* Check that CocoaPods is successfully installed by entering `pod --version` in your Terminal.
### Using Roboflow in Swift
Navigate to the `.xcworkspace` file in XCode.

Next, import Roboflow by adding `import Roboflow`. to the `.xcworkspace` file.
Then, create an instance of the Roboflow API with `let rf = Roboflow(apiKey: "API_KEY")`. For `modelVersion`, replace `YOUR-MODEL-VERSION-#` with the integer value of your model's version number.
#### Locating Your Project Information
**Completion Handler Usage:**
```swift
import Roboflow
...
//initalize with your API Key
let rf = RoboflowMobile(apiKey: "API_KEY")
var model: RFModel?
...
//model is your model's project name
rf.load(model: "YOUR-MODEL-ID", modelVersion: YOUR-MODEL-VERSION-#) { [self] model, error, modelName, modelType in
if error != nil {
print(error?.localizedDescription as Any)
} else {
model?.configure(threshold: threshold, overlap: overlap, maxObjects: maxObjects
processingMode: .performance or .balanced or .quality, // instance seg
maxNumberPoints: max number of mask processing points) // instance seg
self.model = model
}
}
...
//model?.detect takes a UIImage and runs inference on it
let img = UIImage(named: "example.jpeg") // or CVPixelBuffer
model?.detect(image: img!) { predictions, error in
if error != nil {
print(error)
} else {
print(predictions)
}
}
```
**Asynchronous Usage:**
To use asynchronously, you must invoke your Roboflow model within an asynchronous block.
```swift
import Roboflow
...
//initalize with your API Key
let rf = RoboflowMobile(apiKey: "API_KEY")
...
//model is your model's project name
let (model, loadingError, modelName, modelType) = await rf.load(model: "YOUR-MODEL-ID", modelVersion: YOUR-MODEL-VERSION-#)
model!.configure(threshold: threshold, overlap: overlap, maxObjects: maxObjects)
...
//model?.detect takes a UIImage and runs inference on it
let img = UIImage(named: "example.jpeg")
let (predictions, predictionError) = await model!.detect(image: img!)
print(predictions)
```
**Predictions Format:**
```
x:Float //center of object x
y:Float //center of object y
width:Float
height:Float
className:String
confidence:Float
color:UIColor
box:CGRect
points:[CGPoint] // instance segmentation models only
```
[CGRect](https://developer.apple.com/documentation/corefoundation/cgrect)
### Native Swift Example
The [roboflow-ios-starter](https://github.com/roboflow/roboflow-ios-starter) app is a great starting point for creating a realtime iOS app with roboflow models. It includes camera setup, model loading and process, and output drawing code for both object-detection and instance segmentation models.
### React Native Expo App Example
We also provide an example of integrating this SDK into an expo app with React Native here. You may find this useful when considering the construction of your own downstream application.
Be sure that you have both [Expo](https://docs.expo.dev/) and [CocoaPods](https://guides.cocoapods.org/using/getting-started.html) installed.
* `expo-cli` supports the following Node.js versions: `>=12.13.0 <15.0.0` (Maintenance LTS) and `>=16.0.0 <17.0.0` (Active LTS)
* The yarn package must be installed for Node.js (`npm install -g yarn`)
{% embed url="" %}
### Example iOS application - CashCounter
Download [CashCounter](https://apps.apple.com/app/roboflow-cash-counter/id1633812788), our example iOS app that counts US coins and bills, as an example of how you could deploy a computer vision model to an iPhone. You'll see examples of visualizing bounding boxes, FPS, object counting, image upload, and more.
# Luxonis OAK
Deploy your Roboflow Train model to your OpenCV AI Kit with Myriad X VPU acceleration.
The [Luxonis OAK (OpenCV AI Kit)](https://shop.luxonis.com/) is an edge device that is popularly used for the deployment of embedded computer vision systems.
OAK devices are paired with a host machine that drives the operation of the downstream application. For some exciting inspiration, see [Luxonis's use cases](https://docs.luxonis.com/en/latest/#example-use-cases) and [Roboflow's case studies](https://blog.roboflow.com/tag/case-studies/).
**By the way:** if you don't have your OAK device yet, you can [buy one via the Roboflow Store](https://store.roboflow.com/) to get a 10% discount.
### Task Support
The following task types are supported by the hosted API:
| Task Type | Supported by Luxonis OAK Deployment |
| ------------------------------------------------------------------------------------------------------------------------------------------------------------------------ | ----------------------------------- |
|
Object Detection:
YOLOv8 models, trained on Roboflow (all sizes: Nano, Small, Medium, Large, X Large)
YOLOv11 models trained on Roboflow
| ✅ |
| Classification | |
| Instance Segmentation | |
| Semantic Segmentation | |
### Deploy a Model to the Luxonis OAK
#### Supported Luxonis Devices and Host Requirements
The Roboflow Inference Server supports the following devices:
* OAK-D
* OAK-D-Lite
* OAK-D-POE
* OAK-1 (no depth)
#### Installation
Install the `roboflowoak`, `depthai`, and `opencv-python` packages:
```bash
pip install roboflowoak
pip install depthai
pip install opencv-python
```
Now you can use the `roboflowoak` package to run your custom trained Roboflow model.
#### Running Inference: Deployment
If you are deploying to an OAK device without Depth capabilities, set `depth=False` when instantiating (creating) the `rf` object. OAK's with Depth have a "D" attached to the model name, i.e OAK-D and OAK-D-Lite.
Also, comment out `max_depth = np.amax(depth)` and `cv2.imshow("depth", depth/max_depth)`
```python
from roboflowoak import RoboflowOak
import cv2
import time
import numpy as np
if __name__ == '__main__':
# instantiating an object (rf) with the RoboflowOak module
rf = RoboflowOak(model="YOUR-MODEL-ID", confidence=0.05, overlap=0.5,
version="YOUR-MODEL-VERSION-#", api_key="YOUR-PRIVATE_API_KEY", rgb=True,
depth=True, device=None, blocking=True)
# Running our model and displaying the video output with detections
while True:
t0 = time.time()
# The rf.detect() function runs the model inference
result, frame, raw_frame, depth = rf.detect()
predictions = result["predictions"]
#{
# predictions:
# [ {
# x: (middle),
# y:(middle),
# width:
# height:
# depth: ###->
# confidence:
# class:
# mask: {
# ]
#}
#frame - frame after preprocs, with predictions
#raw_frame - original frame from your OAK
#depth - depth map for raw_frame, center-rectified to the center camera
# timing: for benchmarking purposes
t = time.time()-t0
print("FPS ", 1/t)
print("PREDICTIONS ", [p.json() for p in predictions])
# setting parameters for depth calculation
# comment out the following 2 lines out if you're using an OAK without Depth
max_depth = np.amax(depth)
cv2.imshow("depth", depth/max_depth)
# displaying the video feed as successive frames
cv2.imshow("frame", frame)
# how to close the OAK inference window / stop inference: CTRL+q or CTRL+c
if cv2.waitKey(1) == ord('q'):
break
```
Enter the code below (after replacing the placeholder text with the path to your Python script)
```bash
# To close the window (interrupt or end inference), enter CTRL+c on your keyboard
python3 /path/to/[YOUR-PYTHON-FILE].py
```
The inference speed (in milliseconds) with the Apple Macbook Air (M1) as the host device averaged around 15 ms, or 66 FPS. ***Note**: The host device used with OAK will drastically impact FPS. Take this into consideration when creating your system.*
#### Troubleshooting
If you are experiencing issues setting up your OAK device, visit Luxonis' installation instructions and be sure that you can run the RGB example successfully on the [Luxonis installation](https://docs.luxonis.com/en/latest/#demo-script). You can also post for help on the [Roboflow Forum](https://discuss.roboflow.com/).
### See Also
* [Step-by-step Luxonis OAK setup guide](https://blog.roboflow.com/opencv-ai-kit-deployment/)
* [Installation issue when using M1 Chip · Issue #299 · luxonis/depthai · GitHub](https://github.com/luxonis/depthai/issues/299) (depthai SDK)
# OpenMV
Deploy computer vision models to extremely low power edge cameras.
The OpenMV camera is an extremely low-power camera-compute unit that uses an image processing SOC to run micropython programs directly on the same board as the camera. It uses less than 0.5W of power and can run models at up to \~13 fps (with quantization and low resolutions).
#### Train a compatible model
Train a Roboflow 3.0 model to allow for OpenMV deployments. Models are quantized and scaled by our model post-processing (so that it fits on the low-power SOC) so the the real-world performance might be lower than the metrics in platform might reveal. Please also use a resolution of 224 or 256 for best results (thats what we scale to in post-processing).
#### Download Quantized Artifact
Use the deployments page to download the OpenMV artifact which should consist of a `.tflite` file which is compatible with OpenMV devices.
#### Deploy model to OpenMV device
You can then use the [OpenMV IDE](https://openmv.io/pages/download) to deploy the model to the edge device. You will need the model weights we just downloaded along with the class list which you can find in the roboflow dashboard as mentioned in this [video by OpenMV](https://www.youtube.com/watch?v=aRnn2LeAS4c). The video demonstrates this [example script](https://github.com/openmv/openmv/blob/4d7247e11e9f4605802f4e285ac65701a2079b4d/scripts/examples/03-Machine-Learning/00-TensorFlow/yolo_v8_detector.py) for running YOLOv8 (Roboflow 3.0) models on OpenMV devices and should be used as a starting point for developing with Roboflow models on OpenMV.
# Lens Studio
Deploy a model to Lens Studio for use in building a Snap Lens.
{% hint style="warning" %}
**Lens Studio deployment is no longer supported as of February 2026.** This page is retained for reference only. We recommend deploying your model with one of Roboflow's [supported deployment options](/deployment).
{% endhint %}
With a trained model ready in Roboflow, you can deploy your model to SnapML.
{% hint style="warning" %}
Snap AR export weights are no longer generated for newly trained models. Only model versions trained before February 25, 2026 include the weights needed for Lens Studio. On a project's "Deploy" page, the export option appears only for versions that support it, and a notice lists the compatible versions when your selected version does not.
{% endhint %}
## Task Support
The following task types are supported by the hosted API:
| Task Type | Supported by Lens Studio |
| --------------------- | ------------------------ |
| Object Detection | ✅ |
| Classification | |
| Instance Segmentation | |
| Semantic Segmentation | |
*Note: Only models trained using Roboflow Train 3.0 are supported. You can check if a model is trained on Roboflow Train 3.0 by checking the Versions page associated with your model.*
## Deploy a Model to Lens Studio
Click on “Deploy” in the Roboflow sidebar, then scroll down until you see the “Use with Snap Lens Studio” box. Click “Export to Lens Studio”.
When you click this button, a pop up will appear showing information about the classes in your model.
These classes are ordered and will be used in the next step for configuring your model in Lens Studio. Take note of the class list for future use.
In addition, two files will be downloaded:
1. The Roboflow Lens Studio template, with which you can use your weights in an application with minimal configuration, and;
2. Your model weights.
The Roboflow Lens Studio template is 100 MB, so downloading the template may take a few moments depending on your internet connection.
With the template ready, we can start setting up our model in Lens Studio.
### Configure Model in Lens Studio
If you haven’t already installed Lens Studio, go to the [Snap AR website](https://ar.snap.com/lens-studio) and download the latest version of Lens Studio. With Lens Studio installed, we are ready to start configuring our model.
For this section, we will use the Roboflow Lens Studio template. But, you can use your model weights in any application with the [MLController component](https://docs.snap.com/lens-studio/references/templates/ml/object-detection).
Unzip the Roboflow Lens Studio template you downloaded earlier, then open up the `Roboflow-Lens-Template.Isproj` file in the unzipped folder.
When you open the application, you will see something like this:
By default, the template uses a coin counting model. For this example, we will use the playing cards model we built earlier. This application draws boxes around each prediction, but you can add your own filters and logic using Lens Studio.
Click the “ML Controller” box at the top of the left sidebar in Lens Studio:
This will open up a box in which you can configure your model for use in the application next to the preview window:
Our demo application is configured for the coin counter example. To use your own model, first click the “ML Model” box:
Then, drag the weights downloaded from Roboflow into the pop up box:
{% embed url="" %}
When you drag in the weights, you will be prompted with some configuration options. In the “Inputs” section of the pop up, set each “Scale” value to 0.0039. Leave the bias values as they are by default.
Then, click “Import” to import your model.
### Configure Classes in Lens Studio
We now have our model loaded into Lens Studio. There is one more step: tell our model what classes we are using.
In the “Class Settings” tab below the ML Model button that we used earlier, you will see a list of classes. These are configured for a coin counter example in our demo project, but if you are working with your own Lens Studio project these values will be blank.
Here, we need to set our class names and labels. The labels must be in the order presented in the Roboflow dashboard. Here is an example of setting one of our values for the playing card application:
We need to do this configuration for each class in our model. You must specify all classes in your model so Snap can interpret the information in the model weights.
Now our application is ready to use! You can use the “Preview” box to use your application on your computer, or demo your application on your own device using the [Pairing with Snapchat feature](https://docs.snap.com/lens-studio/references/guides/general/pairing-to-snapchat).
# Changelog - Lens Studio
A list of public facing changes for the Lens Studio integration
### February 25, 2026
* Snap AR export weights are no longer generated for newly trained models. Versions trained before this date keep their existing Lens Studio export. The "Deploy" page now shows the export option only for compatible versions and lists which versions support it.
### August 16, 2023
* **Please note: Roboflow models are now only compatible with Lens Studio 4.42 and up**
* Addresses feedback on low FPS in Lens Studio by implementing NMS optimization for Roboflow models
### June 22, 2023 - Public Release
Tap Into 50,000+ ML Models
We're excited to announce a flagship partnership between Roboflow and Lens Studio. With Roboflow, a service whose primary focus is reducing barriers to entry for developers interested in leveraging machine learning and computer vision, developers can easily bring ML models into Lens Studio for use in their AR Lenses. This collaboration enables Lens Studio developers to utilize Roboflow's free machine learning tools to easily train and bring models directly into SnapML.
Now developers can explore Roboflow's platform and upload, organize, automatically annotate, train, and deploy models to target devices, including hosted API endpoints, iOS devices, and now Lens Studio. Snap AR worked with Roboflow to make it possible for these models to be exported into a SnapML compatible format, so developers can download models in one tap and bring them into Lens Studio.
{% embed url="" %}
Snap AR Release Blog
{% endembed %}
{% embed url="" %}
Roboflow + Lens Studio Guide
{% endembed %}
{% embed url="" %}
Snap Lens Studio Guides
{% endembed %}
# Web Browser
Compare the inference-sdk and inferencejs JavaScript packages for running models in web browsers.
Roboflow provides JavaScript packages for deploying computer vision models in web browsers.
### inference-sdk
Uses WebRTC to run inference on your video streams with the Roboflow Cloud and return live results with minimal latency.
* For live video streams
* When running Roboflow Workflows, or a model not supported on `inferencejs`
* On latency-sensitive use cases with **compute-heavy models**
Learn more about inference-sdk
### inferencejs
Uses Tensorflow\.js to run inference on your images and video streams on-device.
* For images and live video streams
* On latency-sensitive use cases with **light,** [**supported models**](/deployment/self-hosted/sdks/web-browser/inferencejs#supported-models)
* When internet access isn't continuously available (still required for initial load)
Learn more about inferencejs
## Comparison
# inferencejs Reference
Reference for \`inferencejs\`, an edge library for deploying computer vision applications built with Roboflow to web/JavaScript environments
{% hint style="info" %}
Learn more about `inferencejs` , our web SDK, [here](/deployment/self-hosted/sdks/web-browser)
{% endhint %}
### Installation
This library is designed to be used within the browser, using a bundler such as vite, webpack, parcel, etc. Assuming your bundler is set up, you can install by executing:
`npm install inferencejs`
### Getting Started
Begin by initializing the `InferenceEngine`. This will start a background worker which is able to download and\
execute models without blocking the user interface.
```typescript
import { InferenceEngine } from "inferencejs";
const PUBLISHABLE_KEY = "rf_a6cd..."; // replace with your own publishable key from Roboflow
const inferEngine = new InferenceEngine();
// Load a model by its model id, copied from the model's page on Roboflow.
const workerId = await inferEngine.startWorkerByModelId("[MODEL ID]", PUBLISHABLE_KEY);
//make inferences against the model
const result = await inferEngine.infer(workerId, img);
```
The model id is shown on the model's page and has the form `workspace/model-slug` (ex: `my-workspace/hard-hat-abc-1-yolov8n-t1`). Legacy project-versioned models can be loaded with `startWorker` using a project slug and version number. For a version with several trained models, the legacy `{project}/{version}` id resolves through the version's alias when one exists; without an alias it works only if the version has a single model, otherwise the id is ambiguous and you should load the model by its own model id. See [how legacy IDs resolve](https://docs.roboflow.com/models/model-ids).
## API
### InferenceEngine
**`new InferenceEngine()`**
Creates a new InferenceEngine instance.
**`startWorkerByModelId(modelId: string, publishableKey: string): Promise`**
Starts a new worker for the given model id and returns the `workerId`. This is the recommended way to load a model. `modelId` is the full `workspace/model-slug` id shown on the model's page, and works for versionless and multi-model versions. `publishableKey` is required and can be obtained from Roboflow in your project settings folder.
**`startWorker(modelName: string, modelVersion: number, publishableKey: string): Promise`**
Loads a legacy model addressed by project url slug and integer version, and returns the `workerId`. Use `startWorkerByModelId` for new integrations. `publishableKey` is required and can be obtained from Roboflow in your project settings folder.
**`infer(workerId: number, img: CVImage | ImageBitmap): Promise`**
Infer on n image using the worker with the given `workerId`. `img` can be created using `new CVImage(HTMLImageElement | HTMLVideoElement | ImageBitmap | TFJS.Tensor)` or [`createImageBitmap`](https://developer.mozilla.org/en-US/docs/Web/API/createImageBitmap)
**`stopWorker(workerId: number): Promise`**
Stops the worker with the given `workerId`.
### `YOLO Lite` `YOLOv8` `YOLOv5`
The result of making an inference using the `InferenceEngine` on a YOLO Lite, YOLOv8, or YOLOv5 object detection model is an array of the following type:
```typescript
type RFObjectDetectionPrediction = {
class?: string;
confidence?: number;
bbox?: {
x: number;
y: number;
width: number;
height: number;
};
color?: string;
};
```
### `GazeDetections`
The result of making an inference using the `InferenceEngine` on a Gaze model. An array with the following type:
```typescript
type GazeDetections = {
leftEye: { x: number; y: number };
rightEye: { x: number; y: number };
yaw: number;
pitch: number;
}[];
```
**`leftEye.x`**
The x position of the left eye as a floating point number between 0 and 1, measured in percentage of the input image width.
**`leftEye.y`**
The y position of the left eye as a floating point number between 0 and 1, measured in percentage of the input image height.
**`rightEye.x`**
The x position of the right eye as a floating point number between 0 and 1, measured in percentage of the input image width.
**`rightEye.y`**
The y position of the right eye as a floating point number between 0 and 1, measured in percentage of the input image height.
**`yaw`**
The yaw of the visual gaze, measured in radians.
**`pitch`**
The pitch of the visual gaze, measured in radians.
### `CVImage`
A class representing an image that can be used for computer vision tasks. It provides various methods to manipulate and convert the image.
#### **Constructor**
The `CVImage(image)` class constructor initializes a new instance of the class. It accepts one image of one of the following types:
* `ImageBitmap`: An optional `ImageBitmap` representation of the image.
* `HTMLImageElement`: An optional `HTMLImageElement` representation of the image.
* `tf.Tensor`: An optional `tf.Tensor` representation of the image.
* `tf.Tensor4D`: An optional 4D `tf.Tensor` representation of the image.
#### **Methods**
**`bitmap()`**
Returns a promise that resolves to an `ImageBitmap` representation of the image. If the image is already a bitmap, it returns the cached bitmap.
**`tensor()`**
Returns a `tf.Tensor` representation of the image. If the image is already a tensor, it returns the cached tensor.
**`tensor4D()`**
Returns a promise that resolves to a 4D `tf.Tensor` representation of the image. If the image is already a 4D tensor, it returns the cached 4D tensor.
**`array()`**
Returns a promise that resolves to a JavaScript array representation of the image. If the image is already a tensor, it converts the tensor to an array.
**`dims()`**
Returns an array containing the dimensions of the image. If the image is a bitmap, it returns `[width, height]`. If the image is a tensor, it returns the shape of the tensor. If the image is an HTML image element, it returns `[width, height]`.
**`dispose()`**
Disposes of the tensor representations of the image to free up memory.
**`static fromArray(array: tf.TensorLike)`**
Creates a new `CVImage` instance from a given tensor-like array.
# inferencejs Requirements
Requirements for running \`inferencejs\`
{% hint style="info" %}
Learn more about `inferencejs` [here](/deployment/self-hosted/sdks/web-browser) and see the [`inferencejs` reference](/deployment/self-hosted/sdks/web-browser/inferencejs-reference)
{% endhint %}
**Minimum Browser Versions**
* **Chrome**: 61+
* **Firefox**: 60+
* **Safari**: 15.4+
* **Edge (Chromium-based)**: 79+
* **Opera**: 48+
{% hint style="info" %}
These are minimum browser versions based on available MDN feature-support information of browser features `inferencejs` uses and is meant for basic guidance.\
\
Not all of these browsers have been tested on, and there may be instances where a higher version than what is listed is required for use. These minimums are subject to change
{% endhint %}
**Required Browser Features**
* Web Workers (`Worker` API)
* `navigator.hardwareConcurrency`
* `navigator.mediaDevices.getUserMedia`
* `createImageBitmap`
* ES6+
* ESM
* Promises & Fetch API
# Web inference.js
Run realtime predictions at the edge, on the browser, with inference.js
`inferencejs` is a JavaScript package that enables real-time inference via the browser using models trained on Roboflow.
{% hint style="info" %}
See the `inferencejs` reference [here](/deployment/self-hosted/sdks/web-browser/inferencejs-reference)
{% endhint %}
For most business applications, the [Serverless Cloud API](/deployment/roboflow-cloud/serverless-api) is suitable. But for many consumer applications and some enterprise use cases, having a server-hosted model is not workable (for example, if your users are bandwidth constrained or need lower latency than you can achieve using a remote API).
### Learning Resources
* **Try Your Model With a Webcam**: You can try out a webcam demo of a [hand-detector model here](https://demo.roboflow.com/egohands-public/9?publishable_key=rf_5w20VzQObTXjJhTjq6kad9ubrm33) (it is trained on the public [EgoHands dataset](https://universe.roboflow.com/brad-dwyer/egohands-public/)).
* **Interactive Replit Environment**: We have published a "[Getting Started](https://replit.com/@roboflow/Roboflow-Web-Quickstart)" project on Repl.it with an accompanying tutorial showing [how to deploy YOLOv8 models using our Repl.it template](https://blog.roboflow.com/deploy-yolov8-models-to-replit/).
* **GitHub Template**: [The Roboflow homepage](https://github.com/roboflow/homepage-demo) uses `inferencejs` to power the COCO inference widget. The README contains instructions on how to use the repository template to deploy a model to the web using GitHub Pages.
* **Documentation**: If you would like more details regarding specific functions in `inferencejs`, check out our [documentation page](/deployment/self-hosted/sdks/web-browser/inferencejs-reference) or click on any mention of a `inferencejs` method in our guide below to be taken to the respective documentation.
### Supported Models
`inferencejs` currently supports these model architectures:
* [RF-DETR](https://roboflow.com/model/rf-detr)
* Roboflow 3.0 (YOLOv8-compatible)
* YOLOv5
* YOLOLite
* [Gaze Detection](/deployment/self-hosted/sdks/web-browser/inferencejs-reference#gazedetections)
### Installation
To add `inference` to your project, simply install using npm or add the script tag reference to your page's `` tag.
```bash
npm install inferencejs
```
```html
```
## Initalizing `inferencejs`
### Authenticating
You can obtain your `publishable_key` from the Roboflow workspace settings.
{% hint style="warning" %}
**Note:** your `publishable_key` is used with `inferencejs`, **not** your **private** API key (which should remain secret).
{% endhint %}
Start by importing `InferenceEngine` and creating a new inference engine object
{% hint style="info" %}
`inferencejs` uses webworkers so that multiple models can be used without blocking the main UI thread. Each model is loaded through the `InferenceEngine` our webworker manager that abstracts the necessary thread management for you.
{% endhint %}
```typescript
import { InferenceEngine } from "inferencejs";
const inferEngine = new InferenceEngine();
```
Now we can load models from Roboflow using your `publishable_key` and the model id, along with configuration parameters like confidence threshold and overlap threshold.
```typescript
const workerId = await inferEngine.startWorkerByModelId("[model id]", "[publishable key]");
```
The model id is shown on the model's page and has the form `workspace/model-slug` (ex: `my-workspace/hard-hat-abc-1-yolov8n-t1`). To load a legacy project-versioned model, use `startWorker` with a project slug and version number instead. For a version with several trained models, the legacy `{project}/{version}` id resolves through the version's alias when one exists; without an alias it works only if the version has a single model, otherwise the id is ambiguous and you should load the model by its own model id. See [how legacy IDs resolve](https://docs.roboflow.com/models/model-ids).
`inferencejs` will now start a worker that runs the chosen model. The returned worker id corresponds with the worker id in `InferenceEngine` that we will use for inference. To infer on the model we can invoke the `infer` method on the `InferenceEngine`.
Let's load an image and infer on our worker.
```typescript
const image = document.getElementById("image"); // get image element with id `image`
const predictions = await inferEngine.infer(workerId, image); // infer on image
```
{% hint style="info" %}
This can take in a variety of image formats (`HTMLImageElement`, `HTMLVideoElement`, `ImageBitmap`, or `TFJS Tensor`).
{% endhint %}
This returns an array of predictions (as a class, in this case `RFObjectDetectionPrediction` )
### Configuration
If you would like to customize and configure the way `inferencejs` filters its predictions, you can pass parameters to the worker on creation.
```typescript
const configuration = [{ scoreThreshold: 0.5, iouThreshold: 0.5, maxNumBoxes: 20 }];
const workerId = await inferEngine.startWorkerByModelId("[model id]", "[publishable key]", configuration);
```
Or you can pass configuration options on inference
```javascript
const configuration = [{
scoreThreshold: 0.5,
iouThreshold: 0.5,
maxNumBoxes: 20
}];
const predictions = await inferEngine.infer(workerId, image, configuration);
```
# Web inference-sdk
Run realtime video inference from your browser, running on the Roboflow cloud, with inference-sdk
### What is WebRTC Streaming?
`@roboflow/inference-sdk` enables real-time video streaming from your browser to Roboflow's inference servers using WebRTC. This allows you to:
* **Execute Workflows** - Run complex multi-step computer vision pipelines
* **Access All Models** - Use any Roboflow model type
* **Server-Side Processing** - Leverage powerful GPUs
* **Low Latency** - WebRTC provides near-real-time results
* **Bidirectional Communication** - Send and receive data during streaming
### Installation
```bash
npm install @roboflow/inference-sdk
```
### Quick Start
Take a look at the video/sample code below to get started:
{% embed url="" %}
```typescript
import { connectors, webrtc, streams } from '@roboflow/inference-sdk';
// ⚠️ Use withApiKey for development only
// ⚠️ Do not use this in production, because it will expose your API key
// For production, use a backend proxy (see next section)
const connector = connectors.withApiKey("your-api-key");
// Get camera stream
const stream = await streams.useCamera({
video: {
facingMode: { ideal: "environment" },
width: { ideal: 640 },
height: { ideal: 480 }
}
});
// Start WebRTC connection
const connection = await webrtc.useStream({
source: stream,
connector,
wrtcParams: {
workspaceName: "your-workspace",
workflowId: "your-workflow",
imageInputName: "image",
streamOutputNames: ["output"],
dataOutputNames: ["predictions"]
},
onData: (data) => {
console.log("Inference results:", data);
}
});
// Display processed video
const videoElement = document.getElementById('video');
videoElement.srcObject = await connection.remoteStream();
// Clean up when done
await connection.cleanup();
```
### 🔐 Security Best Practices
**NEVER expose your API key in frontend code for production applications.**
The `connectors.withApiKey()` method is convenient for demos but exposes your API key in the browser. **For production, always use a backend proxy:**
#### Secure Production Pattern
**Frontend:**
```typescript
import { connectors, webrtc, streams } from '@roboflow/inference-sdk';
// Use proxy endpoint instead of direct API key
const connector = connectors.withProxyUrl('/api/init-webrtc');
const stream = await streams.useCamera({ video: true });
const connection = await webrtc.useStream({
source: stream,
connector,
wrtcParams: { /* ... */ }
});
```
**Backend (Express):**
```typescript
import { InferenceHTTPClient } from '@roboflow/inference-sdk/api';
app.post('/api/init-webrtc', async (req, res) => {
const { offer, wrtcparams } = req.body;
// API key stays secure on the server
const client = InferenceHTTPClient.init({
apiKey: process.env.ROBOFLOW_API_KEY
});
const answer = await client.initializeWebrtcWorker({
offer,
workspaceName: wrtcparams.workspaceName,
workflowId: wrtcparams.workflowId,
config: {
imageInputName: wrtcparams.imageInputName,
streamOutputNames: wrtcparams.streamOutputNames,
dataOutputNames: wrtcparams.dataOutputNames
}
});
res.json(answer);
});
```
### Key Features
#### Dynamic Output Reconfiguration
Change stream and data outputs at runtime without restarting:
```typescript
// Switch to different visualization
connection.reconfigureOutputs({
streamOutput: ["blur_visualization"]
});
// Enable all data outputs
connection.reconfigureOutputs({
dataOutput: ["*"]
});
// Change both at once
connection.reconfigureOutputs({
streamOutput: ["annotated_image"],
dataOutput: ["predictions", "counts"]
});
```
### Complete Working Example
For a full working example with both frontend and backend code, see the [sample application repository](https://github.com/roboflow/inferenceSampleApp). The sample app demonstrates:
* Proper backend proxy setup for API key security
* Camera streaming integration
* Error handling and connection management
* Production-ready patterns
### Resources
* [Example Application](https://github.com/roboflow/inferenceSampleApp)
* [Package on NPM](https://www.npmjs.com/package/@roboflow/inference-sdk)
# Enterprise Deployment
Advanced Roboflow Enterprise deployment features like Secure Gateway, offline mode, and Kubernetes.
Roboflow Enterprise customers have access to several advanced features.
As an enterprise customer, you can leverage our:
* [Deployment Manager](/deployment/self-hosted/enterprise/deployment-manager) - centrally host and control model versions across your edge devices, with remote fleet management and live camera views
* [Secure Gateway](/deployment/self-hosted/enterprise/secure-gateway)
* [License server](/deployment/self-hosted/enterprise/license-server) (deprecated, replaced by Secure Gateway)
* [Offline mode in Inference containers](/deployment/self-hosted/enterprise/offline-mode)
* [Kubernetes deployment advice](/deployment/self-hosted/enterprise/kubernetes)
* [Docker Compose deployment](/deployment/self-hosted/enterprise/docker-compose)
* [Parallel HTTP API](/deployment/self-hosted/enterprise/parallel-http-api) - asynchronous request processing for higher throughput
* [Stream Management API](/deployment/self-hosted/enterprise/stream-management-api) - remotely manage video pipelines across devices
Enterprise customers also have access to the following advanced features in local Inference deployments:
1. **Active learning**: Actively collect data from your production line for use in training new, more accurate models over time.
2. **Parallel processing server**: Run requests in parallel to achieve increased throughput and lower latency when running inference on models. See the [Parallel HTTP API](/deployment/self-hosted/enterprise/parallel-http-api).
3. **TensorRT model packages for private models**: When running self-hosted Inference outside the Roboflow platform, TensorRT-optimized model packages for private models are only available on Enterprise plans. Public models include TensorRT packages on all plans.
4. A license to run Inference on more than one device.
To learn more about Roboflow's enterprise offerings, [contact the sales team](https://roboflow.com/sales).
{% hint style="info" %}
Refer to the [Roboflow Licensing guidance](https://roboflow.com/licensing) to learn more about how Roboflow tools are licensed.
{% endhint %}
# Docker Compose
Run the Roboflow inference server alongside other docker containers to build your multi-container application via Docker Compose.
If you want to run other docker containers alongside the Roboflow inference container you can do so using [Docker Compose](https://docs.docker.com/compose/). We illustrate this via an example docker-compose.yaml file:
```yaml
# Run the roboflow Inference Service as a Docker compose service"
services:
roboflow-inference-service:
image: roboflow/inference-server:cpu
ports:
- "9001:9001"
# Optionally, add any other containers or services you need here,
# illustrated via this example below;
# so you can "compose" multiple services with the roboflow inference
# service as needed by your application
another-container-service:
image: curlimages/curl:8.00.1
entrypoint:
- /bin/ash
- -c
- |
while true; do
curl -s -X GET http://roboflow-inference-service:9001
sleep 5;
done
depends_on:
- roboflow-inference-service
```
After saving the file, type `docker-compose up` in your terminal. Two docker containers will spin up - the roboflow inference server and another container that `curls` the inference server every 5 seconds.
You can extend this example to add more containers to compose your stack as needed by your application.
# Kubernetes
Getting started with Roboflow Inference on Kubernetes
***Update: if you are a Roboflow Enterprise Customer you can deploy Roboflow Inference Service in your Kubernetes environments using*** [***this Helm chart***](https://github.com/roboflow/inference/tree/main/inference/enterprise/helm-chart)***.***
Alternatively, here are simple Kubernetes manifests to deploy a pod and service to a Kubernetes cluster.
The Kubernetes manifest below shows a simple example of creating a single CPU-based roboflow infer pod and attaching a cluster-IP service to it.
```yaml
# Pod
---
apiVersion: v1
kind: Pod
metadata:
name: roboflow
labels:
app.kubernetes.io/name: roboflow
spec:
containers:
- name: roboflow
image: roboflow/roboflow-inference-server-cpu
ports:
- containerPort: 9001
name: rf-pod-port
# Service
---
apiVersion: v1
kind: Service
metadata:
name: rf-service
spec:
type: ClusterIP
selector:
app.kubernetes.io/name: roboflow
ports:
- name: rf-svc-port
protocol: TCP
port: 9001
targetPort: rf-pod-port
```
(the above example assumes your Kubernetes cluster can download images from Docker hub)
Save the blurb of yaml above as `roboflow.yaml` and use the `kubectl` cli to deploy the pod and service into the default namespace of your Kubernetes cluster.
```
kubectl apply -f roboflow.yaml
```
\
A service (of type ClusterIP) will be created; you can access Roboflow inference from within the Kubernetes cluster at this URI: `http://rf-service.default.svc:9001`
### Beyond this example
Kubernetes gives you the power to incorporate several advanced features and extensions into your Roboflow inference service. For example, you could extend the above example for more advanced use-cases such as
* Using nodeSelectors to host the pod(s) on GPU machines node pools within your Kubernetes environments and using the `roboflow/inference-server:gpu` image
* Creating Kubernetes deployments to horizontally autoscale the Roboflow inference service and setting up auto-scaling triggers based on specific metrics like CPU usage.
* Using different service types like nodePort and LoadBalancer to serve the Roboflow inference service externally
* Use ingress controllers to expose Roboflow inference over TLS (HTTPs) etc.
* Add monitoring and alerting to your Roboflow inference service
* Integrating the license server and offline modes
# License Server
You can use the Roboflow License server to proxy the necessary routes for Roboflow Deployment servers into your company's DMZ
{% hint style="warning" %}
The License Server is deprecated. New deployments should use [Secure Gateway](/deployment/self-hosted/enterprise/secure-gateway), its successor, which adds local caching of model weights and container images.
{% endhint %}
Use the license server as a proxy for the Roboflow API.
## Prerequisites
* Linux server running Ubuntu 20.04+ or Debian 11+
* Internet access to api.roboflow\.com and repo.roboflow\.com
* Static IP address or hostname
* Port 80 available (or custom port)
* Docker Engine 20.10+
* 200GB+ storage
* 4GB+ memory
## Using the License Server
If you wish to firewall the Roboflow Inference Server from the Internet, you will need to use the Roboflow License Server which acts as a proxy for the Roboflow API and your models' weights.
On a machine with access to `https://api.roboflow.com` and `https://repo.roboflow.com` (and port `80` open to the Inference Server running in your private network), pull the License Server Docker container:
```
docker pull repo.roboflow.com/roboflow/license-server
```
And run it:
```
docker run -d --name license-server -p 80:80 --restart unless-stopped \
repo.roboflow.com/roboflow/license-server:latest
```
Configure your Inference Server to use this License Server by passing its IP in the `LICENSE_SERVER` environment variable:
```
sudo docker run --net=host --env LICENSE_SERVER=10.0.1.1 roboflow/inference-server:cpu
```
## Configuring via Deployment Manager
If you manage your devices through [Deployment Manager](/deployment/self-hosted/enterprise/deployment-manager), you can set the License Server address directly in the Configuration tab for each device's inference service.
When you enter a License Server address, `API_BASE_URL` is automatically set to `https://api.roboflow.com`. This gives the License Server an upstream to proxy requests to, and prevents a misconfiguration where both `LICENSE_SERVER` and `API_BASE_URL` point to the same on-prem address (which would cause a recursive proxy loop).
Clearing the License Server field does not remove `API_BASE_URL`, so existing configurations are not disrupted.
# Offline Mode
Roboflow Enterprise customers can deploy models offline.
{% hint style="info" %}
Offline Mode for Roboflow Enterprise customers requires that you use our Docker container.
{% endhint %}
Roboflow Enterprise customers can configure Roboflow Inference, our on-device inference server, to cache weights for up to 30 days.
This allows your model to run completely air-gapped or in locations where an Internet connection is not readily available.
To run your model offline, you need to:
1. Create and attach a Docker volume to `/tmp/cache` on the your Inference Server.
2. Start a Roboflow Inference server with Docker.
3. Make a request to your model through the server, which will initiate the model weight download and cache process. You will need an internet connection for this step.
Once your weights have been cached, you can use them locally.
Below, we provide instructions for how to run your model offline on various device types, from CPU to GPU.
## CPU
Image: [roboflow / roboflow-inference-server-cpu](https://hub.docker.com/r/roboflow/roboflow-inference-server-cpu)
```bash
sudo docker volume create roboflow
sudo docker run --net=host --env LICENSE_SERVER=10.0.1.1 --mount source=roboflow,target=/tmp/cache roboflow/roboflow-inference-server-cpu
```
## GPU
To use the GPU container, you must first install [nvidia-container-runtime](https://github.com/NVIDIA/nvidia-container-runtime).
Image:[ roboflow / roboflow-inference-server-gpu](https://hub.docker.com/r/roboflow/roboflow-inference-server-gpu)
```bash
sudo docker volume create roboflow
docker run -it --rm -p 9001:9001 --gpus all --mount source=roboflow,target=/tmp/cache roboflow/roboflow-inference-server-gpu
```
## Jetson 4.5
Your Jetson Jetpack 4.5 will already have installed.
Image:[ roboflow/roboflow-inference-server-jetson-4.5.0](https://hub.docker.com/r/roboflow/roboflow-inference-server-jetson-4.5.0)
## Jetson 4.6
Your Jetson Jetpack 4.6 will already have installed.
Image:[ roboflow/roboflow-inference-server-jetson-4.6.1](https://hub.docker.com/r/roboflow/roboflow-inference-server-jetson-4.6.1/tags)
## Jetson 5.1
Your Jetson Jetpack 5.1 will already have installed.
Image: [roboflow/roboflow-inference-server-jetson-5.1.1](https://hub.docker.com/r/roboflow/roboflow-inference-server-jetson-5.1.1)
```bash
sudo docker volume create roboflow
docker run -it --rm -p 9001:9001 --runtime=nvidia --mount source=roboflow,target=/tmp/cache roboflow/roboflow-inference-server-jetson-5.1.1
```
## Running Inference
With your Inference server set up with local caching, you can run your model on images and video frames without an internet connection.
See [Run a model](/deployment/self-hosted/self-hosted#run-a-model) for guidance on how to run your model.
## Inference Results
The weights will be loaded from the your Roboflow account over the Internet (via the License Server if you have configured it) with SSL encryption and stored safely in the Docker volume for up to 30 days.
Your inference results will contain a new `expiration` key you can use to determine how long the Inference Server can continue to provide predictions before renewing its lease on the weights via an Internet or License Server connection. Once the weight expiration date drops below 7 days, the Inference Server will begin trying to renew the weights' lease once per hour until a connection to the Roboflow API is successfully made.
Once the lease has been renewed, the counter will reset to 30 days.
```json
{
"predictions": [
{
"x": 340.9,
"y": 263.6,
"width": 284,
"height": 360,
"class": "example",
"confidence": 0.867
}
],
"expiration": {
"value": 29.91251408564815,
"unit": "days"
}
}
```
{% hint style="info" %}
If you have questions about deploying your model offline, contact your Roboflow representative for guidance.
{% endhint %}
---
[Next Page](/llms-full.txt/1)