> For the complete documentation index, see [llms.txt](https://docs.roboflow.com/llms.txt). Markdown versions of documentation pages are available by appending `.md` to page URLs; this page is available as [Markdown](https://docs.roboflow.com/models/supported-models/rf-detr.md).
# RF-DETR
Use Roboflow's RF-DETR model as a self-hosted model or through our Serverless Cloud API
## RF-DETR Object Detection
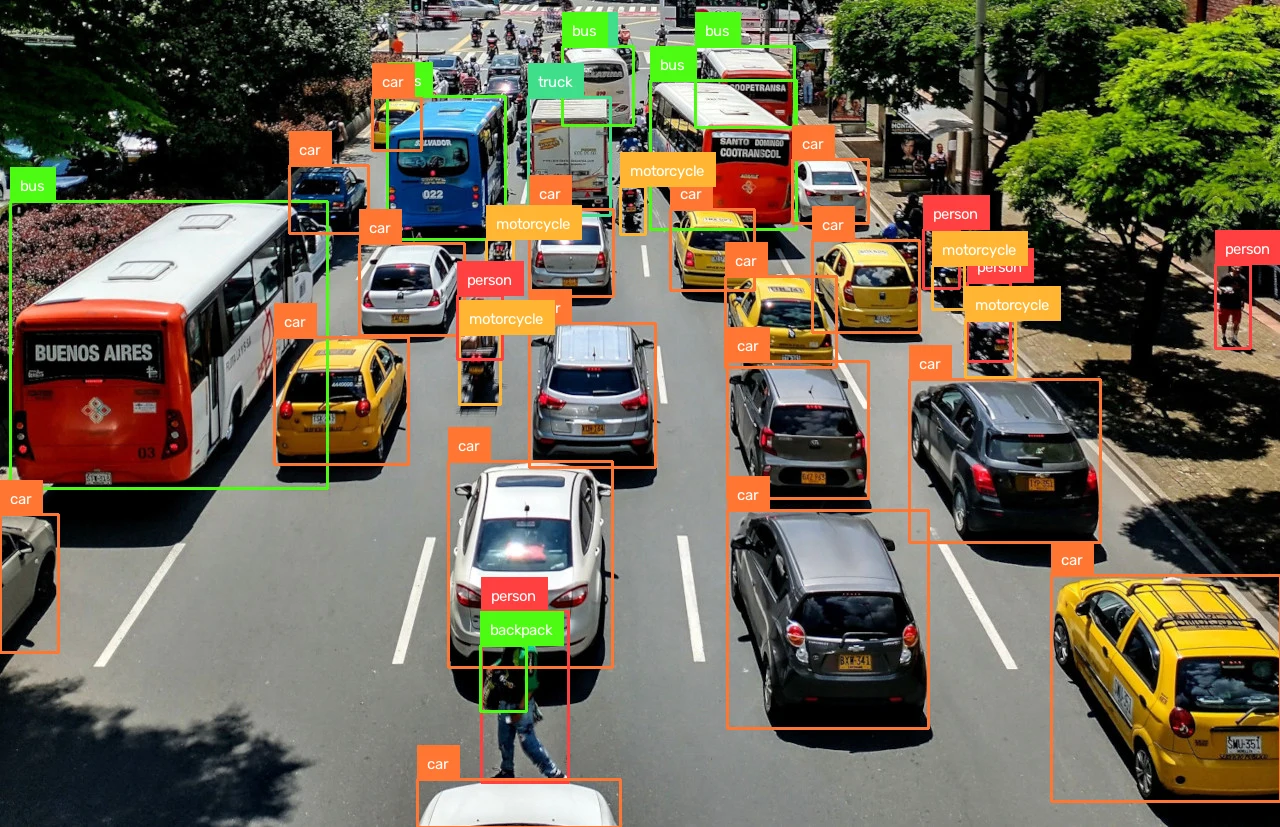
RF-DETR is Roboflow's transformer-based real-time detection model. Run inference against COCO-pretrained object detection checkpoints through the [Serverless Cloud API](https://docs.roboflow.com/deployment/roboflow-cloud/serverless-api), or self-host using [Roboflow Inference](https://docs.roboflow.com/deployment/self-hosted/self-hosted).
### RF-DETR Object Detection API
The steps below run RF-DETR through the [Serverless Cloud API](https://docs.roboflow.com/deployment/roboflow-cloud/serverless-api) and visualize results with [supervision](https://supervision.roboflow.com/).
{% stepper %}
{% step %}
**Get your API Key**
Create a Roboflow account, find your key on the [Roboflow API settings page](https://app.roboflow.com/settings/api) and make it available to your shell:
```bash
export ROBOFLOW_API_KEY="your-key-here"
```
{% endstep %}
{% step %}
**Install the dependencies**
These two packages call the model and draw its results:
```bash
pip install -U inference-sdk supervision
```
{% endstep %}
{% step %}
**Run the model**
Run `rfdetr-small` on a sample image and annotate boxes and labels:
```python
import os
import cv2
import supervision as sv
from inference_sdk import InferenceHTTPClient, InferenceConfiguration
image_url = "https://media.roboflow.com/quickstart/traffic.jpg"
image = sv.load_image_from_url(image_url)
client = InferenceHTTPClient(
api_url="https://serverless.roboflow.com",
api_key=os.environ["ROBOFLOW_API_KEY"],
).configure(InferenceConfiguration(api_key_transport="header"))
result = client.infer(image, model_id="rfdetr-small")
detections = sv.Detections.from_inference(result)
annotated = sv.BoxAnnotator().annotate(image.copy(), detections)
annotated = sv.LabelAnnotator().annotate(annotated, detections)
cv2.imwrite("traffic-annotated.png", annotated)
```
{% endstep %}
{% endstepper %}
{% hint style="info" %}
Set `api_url` to match your deployment target:
* `https://serverless.roboflow.com` for the Serverless Cloud API.
* `http://localhost:9001` for a local [Inference](https://docs.roboflow.com/deployment/self-hosted/self-hosted) server.
* Your [Dedicated Deployment](https://docs.roboflow.com/deployment/roboflow-cloud/dedicated-deployments) URL for a private endpoint.
{% endhint %}
### RF-DETR Object Detection models and benchmarks
Pass any of these aliases as the `model_id` when running inference. The SDK resolves each alias to the underlying Roboflow project version.
Alias
Input Size
mAP50-95
ONNX latency (ms)*
TensorRT FP16 (ms)*
rfdetr-nano
384x384
48.4
9.7
6.2
rfdetr-small
512x512
53.0
12.9
8.3
rfdetr-medium
576x576
54.7
16.3
9.5
rfdetr-large
704x704
56.5
25.6
11.6
rfdetr-xlarge
700x700
58.6
41.6
14.9
rfdetr-2xlarge
880x880
60.1
53.4
21.7
## RF-DETR Instance Segmentation
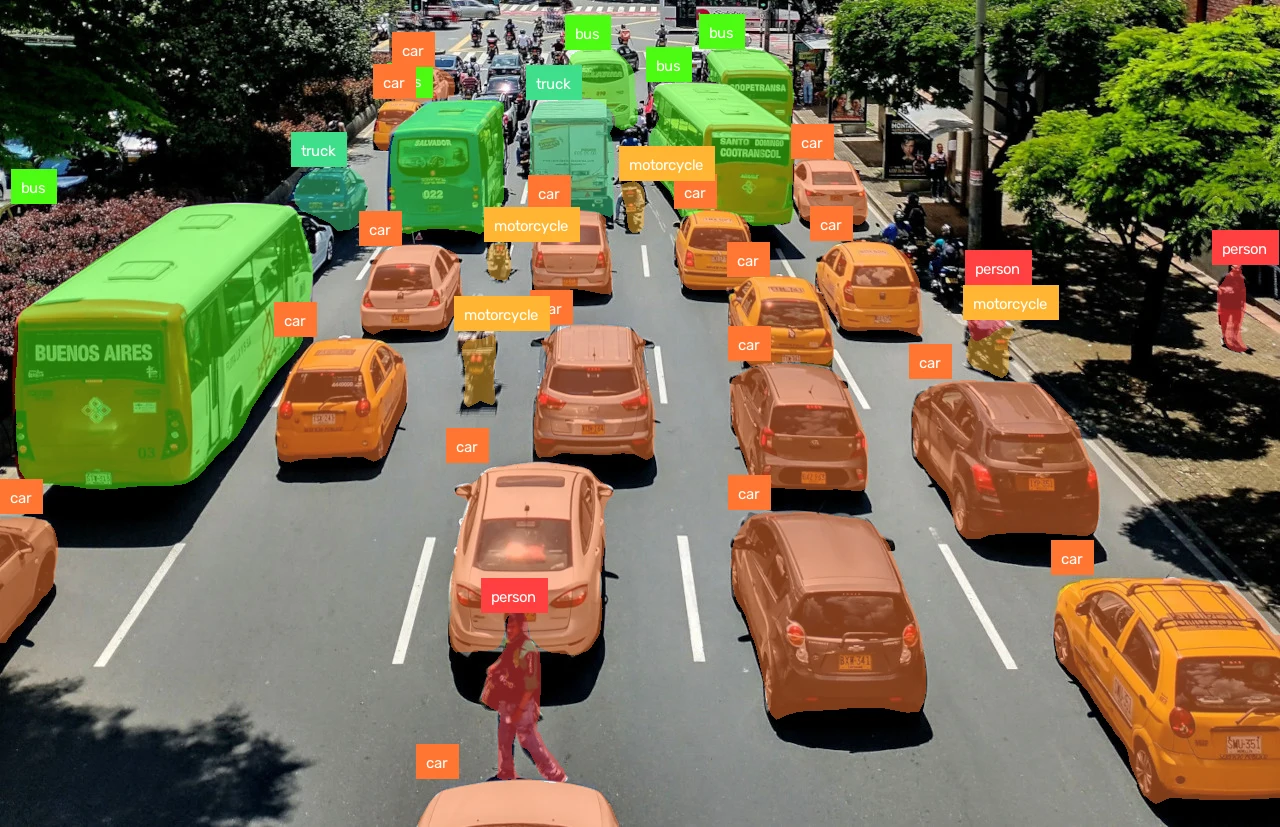
RF-DETR also provides instance segmentation checkpoints that predict masks alongside boxes. Run them through the [Serverless Cloud API](https://docs.roboflow.com/deployment/roboflow-cloud/serverless-api), or self-host using [Roboflow Inference](https://docs.roboflow.com/deployment/self-hosted/self-hosted).
### RF-DETR Instance Segmentation API
Set your API key and install the dependencies as shown above, then run a segmentation checkpoint and draw its masks:
```python
import os
import cv2
import supervision as sv
from inference_sdk import InferenceHTTPClient
image_url = "https://media.roboflow.com/quickstart/traffic.jpg"
image = sv.load_image_from_url(image_url)
client = InferenceHTTPClient(
api_url="https://serverless.roboflow.com",
api_key=os.environ["ROBOFLOW_API_KEY"],
)
result = client.infer(image, model_id="rfdetr-seg-preview")
detections = sv.Detections.from_inference(result)
annotated = sv.MaskAnnotator().annotate(image.copy(), detections)
annotated = sv.LabelAnnotator().annotate(annotated, detections)
cv2.imwrite("traffic-annotated.png", annotated)
```
### RF-DETR Instance Segmentation models and benchmarks
Pass any of these aliases as the `model_id` when running inference. The SDK resolves each alias to the underlying Roboflow project version. Figures are mask mAP on COCO `val`.
Alias
Input Size
Mask mAP50-95
ONNX latency (ms)*
TensorRT FP16 (ms)*
rfdetr-seg-nano
312x312
40.3
15.8
10.5
rfdetr-seg-small
384x384
43.1
19.3
11.9
rfdetr-seg-medium
432x432
45.3
23.9
14.1
rfdetr-seg-large
504x504
47.1
30.1
15.4
rfdetr-seg-xlarge
624x624
48.8
51.2
19.1
rfdetr-seg-2xlarge
768x768
49.9
89.6
25.6
## RF-DETR Keypoint Detection
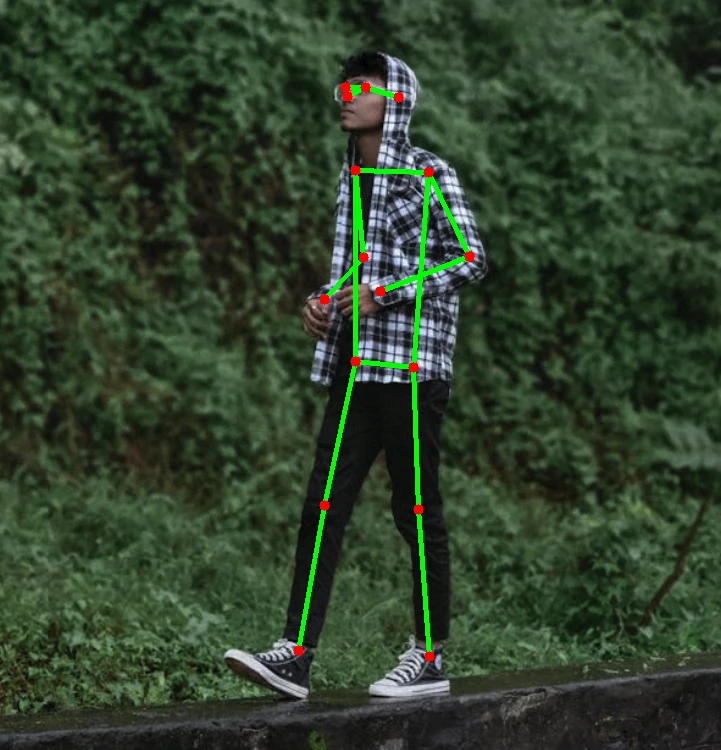
RF-DETR keypoint detection is a preview checkpoint, pretrained on COCO person keypoints. Run it through the [Serverless Cloud API](https://docs.roboflow.com/deployment/roboflow-cloud/serverless-api), or self-host using [Roboflow Inference](https://docs.roboflow.com/deployment/self-hosted/self-hosted).
{% hint style="info" %}
This checkpoint is a preview. Its accuracy and output format can change in later releases.
{% endhint %}
### RF-DETR Keypoint Detection API
Set your API key and install the dependencies as shown above, then run `rfdetr-keypoint-preview` and annotate keypoints:
```python
import os
import cv2
import numpy as np
import supervision as sv
from inference_sdk import InferenceHTTPClient
COCO_KEYPOINTS = [
"nose", "left_eye", "right_eye", "left_ear", "right_ear",
"left_shoulder", "right_shoulder", "left_elbow", "right_elbow",
"left_wrist", "right_wrist", "left_hip", "right_hip",
"left_knee", "right_knee", "left_ankle", "right_ankle",
]
image_url = "https://media.roboflow.com/notebooks/examples/person-walking.png"
image = sv.load_image_from_url(image_url)
client = InferenceHTTPClient(
api_url="https://serverless.roboflow.com",
api_key=os.environ["ROBOFLOW_API_KEY"],
)
result = client.infer(image, model_id="rfdetr-keypoint-preview")
# Each prediction lists only the keypoints the model can see, so place them in
# the 17 COCO slots the skeleton expects and mark the missing ones not visible.
xy, visible = [], []
for prediction in result["predictions"]:
found = {point["class"]: (point["x"], point["y"]) for point in prediction["keypoints"]}
xy.append([found.get(name, (0, 0)) for name in COCO_KEYPOINTS])
visible.append([name in found for name in COCO_KEYPOINTS])
key_points = sv.KeyPoints(xy=np.array(xy, dtype=np.float32), visible=np.array(visible))
annotated = sv.EdgeAnnotator(color=sv.Color.GREEN, thickness=3).annotate(image.copy(), key_points)
annotated = sv.VertexAnnotator(color=sv.Color.RED, radius=5).annotate(annotated, key_points)
cv2.imwrite("person-walking-annotated.png", annotated)
```
### RF-DETR Keypoint Detection models and benchmarks
Pass the alias as the `model_id` when running inference. Accuracy is COCO `val` AP50-95 scored with object keypoint similarity (OKS), the standard COCO keypoint metric, so it does not compare to the box and mask mAP above.
Alias
Input Size
Keypoint AP50-95
Parameters (M)
Latency (ms)†
rfdetr-keypoint-preview
576x576
71.8
126.4
9.7
Roboflow does not publish a prebuilt TensorRT engine for this checkpoint yet, so Inference runs it on ONNX Runtime even when you install the `inference-models[trt10]` extra. Reaching the latency in the table means building the engine yourself with the [rfdetr](https://github.com/roboflow/rf-detr) package.
***
† Keypoint accuracy and latency are the figures published in the [RF-DETR benchmarks](https://rfdetr.roboflow.com/latest/#keypoints): latency is TensorRT FP16 on 1x NVIDIA T4 at batch size 1, timing the model only. That is a different GPU and a different pipeline from the tables above, so the two sets of latencies do not compare directly.
\* Latency is measured with [Roboflow Inference](https://docs.roboflow.com/deployment/self-hosted/self-hosted) on 1x NVIDIA L4, batch size 1, mean of 1,000 inferences (100 warmup). The default `inference-gpu` install runs ONNX on the CUDA execution provider; adding the `inference-models[trt10]` extra selects a prebuilt TensorRT FP16 engine automatically. FP16 matches FP32 accuracy within 0.2 mAP on COCO `val2017`. Accuracy is the published COCO `val` spec (see the [RF-DETR announcement](https://blog.roboflow.com/rf-detr/)).